Friday, March 29, 2019

He is Risen

Hi Sweet 'n Sassy friends! It's Julee here, popping in with another Easter card using the fabulous He is Risen set from the March release! I just love these meaningful images and sentiments. There's so much power in the message that you don't really have to add to much to make a wonderful card.


I started this card, by stamping the He, is, and Risen sentiments on a 2.5 x 3.5" panel of cardstock.  I then colored in the words with Copic markers and added a few white gel pen accents.  I decided I wanted a bit of a background instead of the stark white, so I masked off the He and the Risen words with post-it notes and then smooshed some squeezed lemonade distress oxide for the background.  


When this was dry I stamped the image of the three crosses at the bottom of the panel and colored in the hills.  This panel is matted with black cardstock and then I layered this onto yellow cardstock, embossed with a sun ray embossing folder. 


Thank you so much for stopping by today! If you haven't had a chance yet, hop on over to the Sweet 'n Sassy shop to check out this month's releases. Here's a look at the awesome He is Risen set and a couple of promotions going on this month.


The March Stamp of the Month, He is Risen is FREE with any $75 order (after discounts and before tax & shipping) and is still available until 3/31/19.

http://www.sweetnsassystamps.com/march-stamp-of-the-month-doodle-florals-clear-stamp-set/?aff=3

And...


Happy Stamping!!

Thursday, March 28, 2019

Made New

{jane bosi}  Hello, Sweet Friends!  Today, I'm sharing this easy peasy reverse canvas with a tutorial!!  It features the stamp sets Made New and Scribble Flowers.

You will need:
a canvas--mine measures 6x6
burlap
paint or gesso
embossing paste or modeling cream
Mog Podge
stamps, paper and ink
coloring tools
decorative
tissue paper
bible page or patterned paper

To start, turn your canvas over so you are working on the back side.  The canvas is typically stapled to the wooden frame.  The burlap strips will cover the staples and create a nice rustic surface to work on.  Naturally, you could use a variety of mediums to cover, including pattern papers.  In fact, I found a paper pad at my local Hobby Lobby that is all burlap paper!  Burlap on one side, smooth paper on the other---perfect for this project!!  Cut four burlap strips and apply with a generous amount of mod podge.


 You'll have great luck piecing things together if you bevel each end.  Let it dry completely; overnight if possible.

Next, trim a piece of patterned paper or a bible page to fit inside the canvas.  


You'll want to apply mod podge to both the paper/page and the bottom of the canvas.  Insert the paper, quickly moving it into position.  You can use your heat gun to speed up the drying process for this step. 

Next, cover the burlap frame with paint or gesso.  This creates a cool shabby look! 


Let the paint or gesso dry completely.  I got a little excited and placed my butterflies in the center--I would recommend you wait until the last step--see below.


Using modeling paste (mine is gold) or embossing paste and your stencil, add a design to the frame.

Stamp your sentiment on tissue paper and trim as close to the image as possible


The tissue paper will become virtually invisible when you mod podge it to your frame.  Be sure to pick a spot that has solid coverage of paint/gesso.  Lay down a layer of mod podge, then the tissue paper sentiment, and another layer of mod podge on the top.  Let this dry completely.


THIS is the step where you stamp, color and trim your images.  Arrange the images in a pleasing way and...... 

BOOM! Your work of art is complete!


When you shop from this post, you are using my affiliate links.  I appreciate your support!
TTFN, Jane

Tuesday, March 26, 2019

Genuine Love

Hello Sweet Friends!  Sheri here today with a fun shaped card featuring the NEWLY released Genuine Love stamp set.

Did you know that creating shaped cards is super easy?  It's a fun way to use those larger shaped dies that we have in our stash!  The scallop circle I used is an older Sizzix die and it measures 4".  You just need to die cut 2 of the shapes you want to use. You will also need a scoring tool like a scor-buddy and some two sided tape like scor-tape.  I like to use 1/8" scor-tape or red line tape.  I take one of the die cut pieces and line it up on my scor-buddy and score it about 1/4" down to create a hinge.  You then add a piece of the scor-tape before attaching the other die cut on top to create your card base. 

Not sure if you saw the card I made last week for the March Release Blog Hop but I was inspired to try to see if I could change from a square focal point to a circle and that is how I ended up using the scallop circle card base.  As you can see I was able to do it! 


The wreath was created by stamping in a plus sign shape and then repeating that process with each image that I added.  It's not perfect but that adds to the hand made feel.


Here's another look at my original card from last week.


http://www.sweetnsassystamps.com?aff=6

The March Stamp of the Month, Doodle Florals is FREE with any $75 order (after discounts and before tax & shipping) and is still available until 3/31/19.

http://www.sweetnsassystamps.com?aff=6

And...


Happy Stamping!!


Monday, March 25, 2019

Feel Better Soon

Hello Friends, I have a "springy" card for you today using Genuine Love and Thoughtful Words.  I wanted to make a little wreath so I just took my circle die and traced the inside with a light pencil line and stamped the flowers and greenery on top .  I just love these colors, ink is from Memento and papers are from DCWV.  
If you place a $75 order you will receive Doodle Florals FREE!  It is such a fun and versatile set!  As always you get FREE SHIPPING with a $75 order.
~Stephanie


Saturday, March 23, 2019

Doodle Florals

Hello everyone! Today I want to show you two cards I made with the Doodle Florals stamp set; this months stamp set of the month!


I stamped a lot of the images, cut them out and colored them with alcohol markes so I had a couple of flowers to work with.


For the first card I made a horizontal arrangement with the flowers and some of the leaves. I added matching background papers and stamped the message Hugs and prayers on the card. It's from the Peaceful Peonies set, a great set if you're looking for beautiful sentiments.


For the second card I die cut a circle from patterned paper and I used it as a guide to arrange the flowers. I just added three flowers and a couple of leaves behind them. This card is really easy to make when you already pre-colored the flowers. Two background papers, a card base, some enamel dots and the stamped images. That's it!


For these cards I used the Doodle Florals and Peaceful Peonies stamp sets.

http://www.sweetnsassystamps.com/peaceful-peonies-clear-stamp-set/ http://www.sweetnsassystamps.com/march-stamp-of-the-month-doodle-florals-clear-stamp-set/

I hope you're inspired to create!
- Lucinde

Friday, March 22, 2019

Victory in Jesus

Hi Friends! 

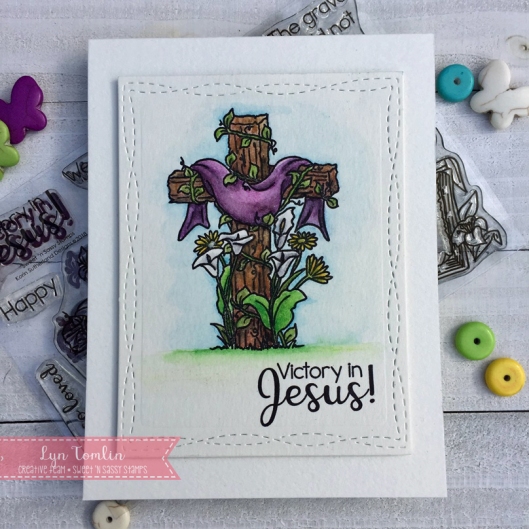
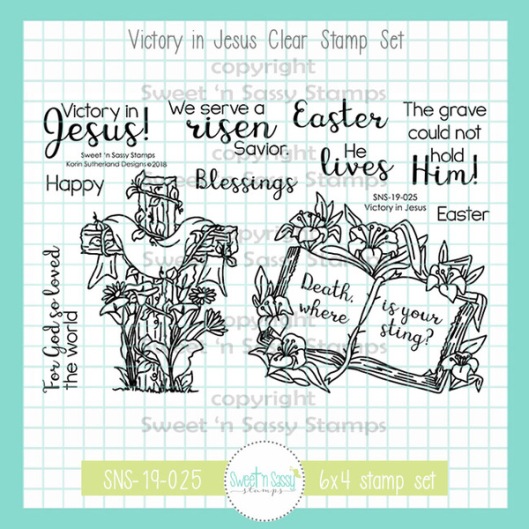
Today I have two projects for you using the new Victory in Jesus set.

I made a CAS card as well as a "everything but the kitchen sink" card.

My first project is a simple watercolor card.

Recipe :
  • Watercolor paper - Strathmore Coldpress
  • Image - Victory in Jesus
  • Ink - Stamped image with Gina K Amalgam Ink and colored it with Inktense watercolor pencils
  • My background paper is cut with a wonky rectangle die
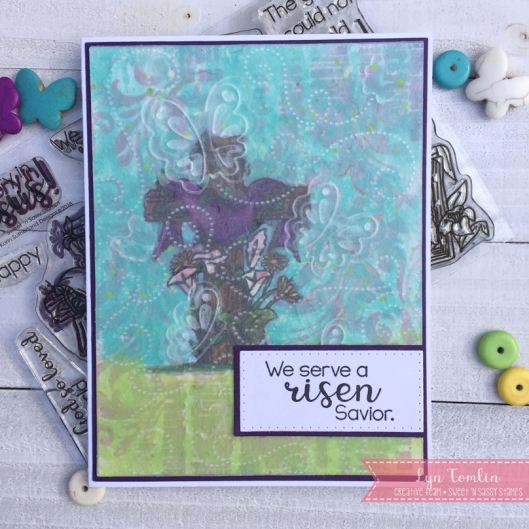
My Second project is a more complex one. I found a mixed media background in my stash. I thought it would be fun to stamp on top of it and color over it with color pencils. It actually worked; however, it was a little busy. To "mute" it, I covered it with embossed vellum and added the sentiment on top.

Recipe:
  • Background - Acrylics Dylusions
  • Background stencils - Tim Holtz
  • Image - Victory in Jesus
  • Ink - Stamped image with Gina K Amalgam Ink and colored it with Polychromos pencils
  • Vellum embossed with Cuttlebug butterfly embossing folder
I hope you are inspired today. See how you can create a variety of projects with a single project and most of all, this should be fun so make it FUN!!

Thanks for stopping by!
Lyn


Thursday, March 21, 2019

scripture crosses


Good morning! Today I have 2 cards to share with a very popular set from this month’s Sweet ‘n Sassy release, Scripture Crosses. This set sold out quickly but you can pre-order now...more are coming! I used the same sentiment image on both cards with various flourishes. I also used flowers from the sweet new Genuine Love stamp set.
 
Here I stamped the cross onto patterned paper. Then I masked it and stamped some flowers "behind" it.
 

I went with different colors for my second card but stamped the cross on patterned paper once again. This time I added flowers to the corners of the main image and popped one up.


There's plenty of time to get your Easter cards done and these sets are perfect to use!
Have a great day!
Diane


Tuesday, March 19, 2019

And the Blog Hop Winner is...

Hi Sweet 'n Sassy friends! It's Julee popping in with a little happy news for one of you awesome readers! We had so much fun sharing the current release with you on our March Blog Hop last week. We so hope you enjoyed it, too, and gleaned a little inspiration for using this month's stamps! While we think you're ALL winners, we did randomly select ONE lucky reader from among all the comments on the hop to receive a $10 gift certificate to the Sweet 'n Sassy shop.

And the winner is...
This month's winning comment was posted on Sheri's blog post.
Congratulations Cricutjunkie!
Please send an email to korin@sweetnsassystamps.com to claim your prize.

Thanks to all of you who commented. We love sharing this wonderful craft with you and look forward to hopping with you again next month!

Scripture Crosses | Might Have Peace

Hello Sweet Friends!  Sheri here today!  Today I have a card featuring the NEWLY released Scripture Crosses stamp set.

I created a semi CAS (clean and simple) card design.  As you might have noticed I love my layers!  I started by stamping one of the crosses in green dye ink and layering it with coordinating card stock on top of some plaid pattern paper that I found in my stash.  Embellished with some sheer ribbon and rhinestones.  All layers are popped up with foam dots. 


http://www.sweetnsassystamps.com?aff=6

March's Stamp of the Month is Doodle Florals and is FREE with any $75 order (after discounts and before tax & shipping).

http://www.sweetnsassystamps.com?aff=6

And...


Happy Stamping!!


Monday, March 18, 2019

Scripture Crosses


Hello Sweet 'n Sassy Stampers! 
It's Ceal, here to share more cards with you featuring our new releases. These two cards use the Scripture Crosses set. This set flew off the shelves and is available for pre order. 


For my first sample (above) I started with a white top folding card base and another panel of white card stock.  I created the rainbow background by blending pink, blue, and yellow with a Life Changing Blending brush.  After I covered the piece of card stock, I stamped the Scripture cross using Versafine Clair ink.


For my second sample (below) I also started with a white top folding card base and a white panel of card stock and a panel of faux wood patterned paper.
I stamped the scripture cross using Versamark ink and embossed it with white embossing powder. Next I used the Life Changing Blending Brushes to add the brown.


Affiliate links are used for me to earn a small amount off of the sale at no additional cost to you.
Thank you for your support!