Showing posts with label New Creature. Show all posts

Tuesday, March 27, 2018

All Blessings


It’s starting to look a little more like spring!  I’m sharing a colorful background I created using Whimsy Bouquet and some Distress Oxide inks. I used a glossy card stock that really allowed the inks to blend easily.  After cutting a circular window, I added a sentiment from Timeless Hymns and a butterfly from New Creation.  The smaller butterflies are from an older cutting/embossing folder.

Just a sweet Easter reminder ;)

Have a great week! Jane

Monday, July 13, 2015

paper napkin background

Hello! 
It's Tutorial Monday and today I am sharing how I made the background for my card. 
Here it is completed...


I used a butterfly from SNSS's New Creature and the words are from Our Refuge.  I also used one of the coordinating New Creature butterfly dies.
 
My background was made with a pretty paper napkin that I've had left over from some occasion for quite a few years.  I guess they were too pretty to throw away!
 
First, open the napkin.  You can get quite a bit of use from just one.  For this project, I made 4 backgrounds from 1 napkin.


As you can see the edges were a bit worn but that's ok...I discarded the edges and just used the center from this one anyway.
 
Next, grab a corner and gently peel off the top layer.  Discard the un-printed layer underneath.


Now cut a piece of scrap cardstock the size of the background you want.  You can cover it with double-sided adhesive but I prefer to just add Elmer's glue and then spread it with my finger until the entire piece is covered.  Using the liquid glue gives it more of a linen look.


Make sure your edges are covered with glue and then lay your napkin on top.  Pat it down and let it dry completely.  Then trim the extra napkin from the cardstock layer and adhere to your card base.


I stamped the sentiment on a strip of vellum and wrapped it around the floral background, adhering each side of the vellum to the back.  Then I stamped, diecut, and sponged ink onto the butterfly.  Clear Wink of Stella made the butterfly sparkly.  Add a few rhinestones and you are done!


Have a great week!
♥  Diane


Monday, June 8, 2015

Tutorial Monday: Sharpie Dip

{Jane Bosi}  Happy Monday, Sweet friends!  I'm excited to share this Monday's tutorial with you--it's both colorful and easy--two of my favorite things!!  And, as an extra happy bonus, you are likely to have all of the necessary supplies right in your home!
You will need several complimentary sharpie markers, rubbing alcohol, and eyedropper (pipette) a piece of white card stock and a piece of acetate.  An acrylic block could be used as a substitute for the acetate, however, most Sweet 'N Sassy stamp sets come backed with an extra piece of acetate.  You are not going to ruin it, so it's almost like it was meant to be :)
Begin by laying color patches with the sharpie markers on the sheet of acetate.  Any random pattern will do!
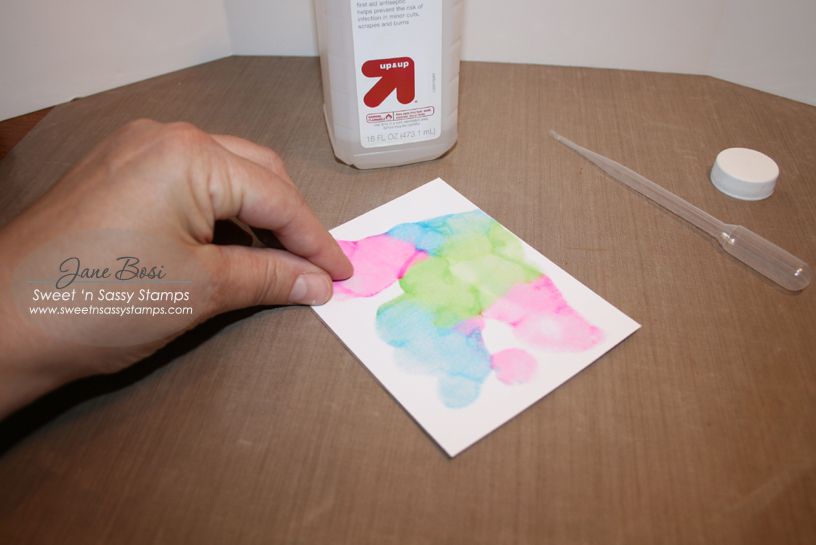
Using the pipette, add drops of rubbing alcohol to the entire surface of the colored acetate.  The rubbing alcohol will spread and blend the inks.
Immediately, cover the prepared acetate with the white card stock.  Gently press around the entire card stock piece to transfer the inks.
Depending on the outcome of the dipping, you can use either the front or back side for the next step.  It really is your personal preference.  In the above samples, the back side picture is my preference due to the mingling of colors and intensity.  Some of the colors on the front side are muddied.  The back side on this particular piece was much prettier.  You will see what I mean when you start to play around yourself!
To complete your project, all you need is your favorite images from Sweet N Sassy Stamps and some black ink.  The contrast of the black ink and the background colors is awesome, in my opinion :)  You can tell from the opening picture, I had a hard time stopping!  Below, is each card alone with a few more details:
 This card features New Creature--butterflies and sentiment.
 Also New Creature and Retirement Sentiments.  I rarely use white as a card base, but with this colorful front, the white really works.  The butterfly wings are highlighted with a white signo pen, also.
I created this collage card using Parisian Postcard---a simply gorgeous set--by randomly stamping images everywhere.  Later, I colored the flowers only and added a sentiment from Wait On The Lord.

I hope you've enjoyed this tutorial as much as I have enjoyed making it.  We sure would love to see your creations, so feel free to share in our comment section!  Most of all, go on get inky!

Don't forget to be awesome!
TTFN, Jane

I Got Crafty With:


Saturday, April 25, 2015

Everything Beautiful in His Time ~

Good morning Sweet'nSassy friends! Mary here to share with you a card I created using the Mother Word die. It is on the discontinued list, I encourage you to grab one before it is gone. The scripture is from the New Creature set.

More samples of this die on my Blog. Have a beautiful Day!

Materials Used:
Stamps: New Creature
Inks: versafine 
Paper: SU cardstock, dsp unknown
Accessories: SNSS mother word die, SU embossing folder, Ribbon, pearls
http://www.sweetnsassystamps.com/products/New-Creature-Clear-Stamp-Set.html http://www.sweetnsassystamps.com/mother-word-die/

Sunday, March 29, 2015

New Mercies

Good Sunday to you!
Of all the scriptures I ponder regularly this one is probably my most frequent.  

Lamentations 3:22-23
23 They (His Mercies) are new every morning: great is thy faithfulness.  

I am so thankful for the new mercies every morning and a fresh start each day!  With that thought in mind I reached for Sweet 'N Sassy's New Creature Clear Stamp set to feature on my Sunday post. 


I sponged distress ink over two stencils for the base then swished paper through distress ink spritzed with water for the butterflies.

Did you know that the New Creature stamp set now has a coordinating die set?


Thanks for looking and have a great Sunday!

Angie

Sunday, March 15, 2015

Blast from the Past - New Creature and Treasured...

Hello! It's Monika here today bringing you a BLAST FROM THE PAST.

Did you see all the wonderful samples using the new stamp and die sets from the March Release? Check out the blog hop if you haven't, and play along with us in our "Love Your Pet" challenge if you have a chance...  

 So, as I was looking at my past samples using New Creature and Treasured stamp sets, I had found quite a few samples and the images were all cut out. Imagine how easy this would have been with the coordinating dies?! 

Join me as I re-visit these OLD cards...
First is New Creature clear stamp set. Oh, how I love the butterflies in this set.
The butterfly is stamped on designer paper on the first card: 


This pretty is stamped on white card stock and colored with Copic markers:


These pretty butterflies are heat embossed with white embossing powder on vellum (my favorite technique to add a soft and elegant touch to my cards):


... and here are couple of my OLD cards using Treasured stamp set... 
On the first card, I cut the image out, colored it with Copic markers, then adhered it to the acetate circle window... the background is dry embossed and heat embossed. 


On the second card, the image is heat embossed with white embossing powder on vellum, and colored (on the back side) with Copic markers... such a soft look, don't you think?


 Some of the products featured with these cards are: True Friend clear stamp set, Ticket Sentiments clear stamp set, Ticket Dies, Vintage Postcard clear stamp set, Wildflowers clear stamp set... 

I hope you have enjoyed my trip to the past, revisiting some of my cards. I sure had fun seeing all the different styles and techniques I used. 

Thank you for stopping by, 
Monika


Friday, March 6, 2015

March 2015 Sweet Perks Reminder


Hello friends!  Only one more week to take advantage of our March Sweet Perks Club.  The bundles we are offering this month will only be available until Thursday, March 12th, 2015.  Each stamp and die set will then be added to the Sweet 'n Sassy Stamps Store 
at the full price.  

If you have not had a chance to take a look at the SWEET bundles for this month... 
Just take a look! 


Hillside Edges helped to create this scene using the Windy Winnie Bundle.  Glossy accents was used on the raindrops and the puddle.  The umbrella was paper pieced.

Treasured Bundle


A sentiment from the Everyday Miracles stamp set was added to this card made with the Treasured Bundle.  Some texture was added with Modeling Paste and pearl flourishes.

New Creature Bundle


Have you seen this beautiful card created by Angela using the Bokeh Technique and the New Creature Bundle.  Check THIS post to see Angela's tutorial describing how she made this card.


So what are you waiting for…hurry off to the Sweet 'n Sassy Stamps Store for a SWEET deal.  

Thanks for stopping by…have a blessed day!

Thursday, March 5, 2015

Beautiful Friend....

{Jane Bosi}  Happy Thursday, Sweet Friends!!

It seems odd to be dreaming of spring like things, creating springy cards, coloring butterflies....and, all while the snow still flies here in Central Wisconsin.  Since art often imitates life, I am hoping my springy, soft card will soon be imitated out my window!

I started with the Bookmarks & More Dies and some pretty papers from The Paper Studio.  I cut and mounted both bookmark pieces on dark brown card stock, trimming a thin edge around the patterned paper.  I also used one of the edge dies from Bookmarks & More Dies on the bottom of the kraft card stock for a subtle accent.

The shorter of the two bookmark pieces was just the right spot for my sentiment.  It, along with the larger butterfly, can be found in this month's Sweet Perk's bundled set, New Creature.  I'm super thrilled with the new dies!  I am a fan of fussy cutting, as a general rule.  I find it very therapeutic, but the dies lend themselves to a more polished look for my finished work---I can still find other reasons for fussy cutting!

The two smaller butterflies come from the Parisian Postcard set.  Don't they all look like the just fluttered down from a sunny, warm sky??

Here's hoping!  Have a great day and, don't forget to be awesome!
TTFN, Jane

Monday, March 2, 2015

Fun with Distress Inks and a little Bokeh too!

Happy Monday!  Angie, here with a Design Diva Demo where I share a couple of ways to color with Distress Inks.

To color the butterfly for this project I took a scrap of Mixed Media paper,
stamped ink on craft mat and spritzed with water. 

 To create gorgeous backgrounds or your own designer paper swish paper through the ink and dry with heat gun. Swish paper through the ink a second time to get more coverage which will leave a bit of ink still on craft mat.  Don't wipe that away, that's the good stuff!  After drying a second time with heat tool, flip the paper over and tap with fingers to soak up the last bits of ink.  
Check out the gorgeous ink spots!
 After the Distressed paper was completely dry I stamped the butterfly, added a bit more color with Distress markers, blended with an aqua brush then realized that the fabulous distress background no longer showed! Oh well, I still have a good bit of this gorgeous paper to use on another project! 

I like to use this next technique when I don't wish to have my layer fully covered in ink. Stamp ink on craft mat, take an aqua brush and paint randomly on Mixed Media paper working rather quickly.


Thoroughly spritz with water and lift paper to allow ink to move and swirl then heat set.


I get a different look every time I do this.  For this project I repeated the above step again to add a little more color. 
After the layer was completely dry I stamped the butterfly and colored with distress inks and aqua brush, making sure that the edges were deeply colored but not overly concerned with the middle since in the final step I adhere the fussy cut/die cut butterfly.

The Bokeh effect is all the rage right now so I thought it would be fun to add it on this card. I first saw this bokeh tecknique used by Lydia on her blog "Understand Blue". You don't need a fancy template, all you need is an unused pencil eraser!!! 


Ink the eraser and stamp close to the image then without reinking the eraser stamp further away making sure that the furthest dots from the image have the least amount of ink.  It's ok to overlap them a bit too!

For today's project I used the gorgeous stamp set New Creature that is part of March Sweet Perks Club Bundles.

Check out all the info on the March Sweet Perks Club Bundles HERE!