Showing posts with label lovely lotus. Show all posts

Friday, March 20, 2020

His Strength

Hi Sweet 'n Sassy friends! It's Julee popping in with an encouragement card.  My mind has been wandering and my heart has been restless this past week, and my creativity has been at a low. I've walked into my stamp room several times, sat down, stared for a while, then got up and left. So today I was pretty sure I was going to share a card I had made a week or two ago.  But then the sun came out and I sent the kids out in the back yard and I felt like stamping! Here's the card I made.


I knew I wanted to use the Psalm 23 Background stamp as this scripture has been on repeat in my head all week long. I hadn't had a chance to play with the Lovely Lotus set yet, so decided to pair them together.  I stamped the lotus in morning mist versafine clair ink, then stamped a mask from a post-it note. Once it was cut and placed over the flower, I stamped over it with the Psalm 23 Background in the same gray ink.


Next I pulled out tumbled glass and broken china distress oxides and blended a background, adding some interest by fingerpainting a little gesso over it here and there.  Once that was dry, I lifted the mask off and colored the flower with Arteza brush markers.

I then cut a 4 x 5.25" panel of white cardstock, stamped the sentiment from Be Encouraged 2 in the bottom center, then ran the upper portion through my die cut machine with a swiss dots embossing folder. I finished with a taffeta bow, a gray mat for my stamped panel and a white card base.

Thanks so much for stopping by today! I hope you have a fantastic day.

***This post contains affiliated links at no cost to you ***

Tuesday, January 31, 2017

Hello friends! Just a quick post from me today, sharing another brand new Sweet 'n Sassy stamp set, God is for You. The new set features six encouraging sentiments that can be used to mix with any type of images or designs. 

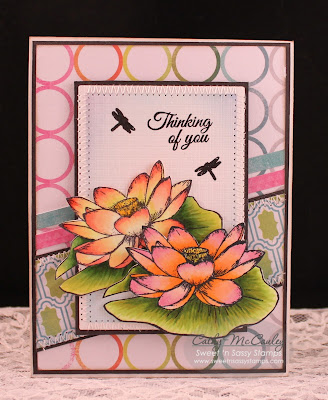
I broke out my brand new Zig Clean Color Watercolor Brushes for this project. (Ohhh...I'm so excited about these markers...they rock!) I started by stamping and embossing a few flowers from the Lovely Lotus stamp set with white embossing powder. Once my embossing was cool, I colored the flowers and background with the Zig markers. The sentiment and dragonflies were stamped in black Archival Ink and the panel was mounted on black cardstock. Pretty simple card, but those great Zig colors pack a powerful punch. 

Be sure to head to the Sweet 'n Sassy store to check out all of the new products and to take advantage of the Beat the Winter Blues sale...save 30% off of select products! Enjoy!

Kim


Monday, September 14, 2015

Gesso Resist Technique

Hi friends! Kim here today to share a quick and easy technique for creating amazing backgrounds....Gesso Resist! Here are the materials you're going to need:

I'm using a piece of watercolor paper (you'll need a heavier cardstock for this technique), gesso (Liquitex is my fav), a sponge, and background stamp, I'm using the Typewriter Text background stamp.
Put some gesso on a non-stick craft sheet and use the sponge to apply a thin layer of gesso on to the stamp. Use a light hand to apply the gesso as too much will create a puddle of paint and will keep the edges of the design from being crisp. (You can see how the top of the stamp has a little too much paint)
Stamp onto the piece of watercolor paper. You'll see that some of the archival ink, that was on my stamp 'cause I never clean my stamp, came off with the gesso. This won't affect the results. Be sure to clean your stamp immediately after stamping as the gesso will harden and effect the use of your stamp.
Next, grab a few Distress Stains and a water bottle. Apply the Distress Stains to a non-stick craft sheet, you can see my bottles above each color, and then spritz the stains with some water. This will allow the color to freely move over the watercolor paper.
Swipe the cardstock through the ink. Be careful not to move the cardstock around too much or your colors will become muddy (well, my colors would 'cause I'm using colors on the opposite side of the color wheel! LOL!). Spritz your cardstock with more water if you want the color to move around more.
Check out these results! Ohhh...love it! The gesso resists the stains, making the background design pop out...love it! You can see how I allowed the stains to drip off of the page. I had originally intended to cut a shape out of this piece of paper, but I loved the drips so much I use the entire piece!

I finished my card by adding a flower from the Lovely Lotus stamp set, colored with Faber Castell watercolor pencils, a few dragonflies, from the same set, and a sentiment.

Hope you enjoyed today's tutorial!!

Saturday, August 22, 2015

lovely lotus

Good morning!
 
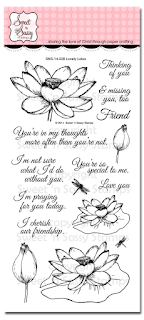
Last week I sat down to color these floral images from the Sweet 'n Sassy Lovely Lotus stamp set and realized just how pretty they are in person!  This set is beautiful and has such pretty sentiments!
 

Once colored, I was undecided on how I was going to use them, so they were temporarily set aside while I was off to stamp with friends.  One of my friends showed us the Shadow box Card and I remembered making these with an extra layer inside so that became my plan for the lotus images.  I never did end up adding that extra layer...lol...but it turned out pretty none-the-less! (maybe next time!)


Here's a view from the top so you can see the dimension of the card.  It folds flat for mailing...perfect!


Thanks for popping in!  Happy stamping!
♥  Diane


Thursday, August 13, 2015

Thank You for Everything

Hi folks! Kim here today to share a card I made recently for some of my family members after a recent trip to NY. 

Last month my family and I traveled to NY to visit with my extended family, and we ended up staying with my aunt and uncle. This was the first time I had stayed with them since I was very young and here we were moving in to their "no kids at home any longer" house for a week with our two kids and all that comes along with two kids. I was feeling a little nervous about how much we might disrupt their schedules. We ended up having a delightful time! Not only were they amazingly gracious, but it was great to get to catch up and visit with them for the week. One of the best NY trips to date...

As soon as we returned home, I got to work on a card to send them and thank them for their hospitality. I adore the Lovely Lotus stamp set and decided to use that for my card. I started by using the Floral Pattern Background stamp to create my own custom paper. I intentionally went with a more worn look to the background by not applying strong pressure to the stamp when I made the impression on the paper. 

I then used the Decorative Plaques die set to cut out the frame. Next I stamped the Lotus bud on the frame a few times and then again on a scrap piece of cardstock. All were colored with Copics and a few were fussy cut. Stamping directly on the frame and cutting out a few buds allowed me to layer the flower buds and create a lot of dimension. I finished the card to adding a sentiment, embossed piece of cardstock, and a few rhinestones.

I hope you enjoyed today's card!

Monday, August 10, 2015

Lovely Lotus Candle Tutorial~

Good morning Sweet'nSassy friends! Mary here revisiting one of my early favourites in my stamping history. I love to give gifts and this is a thoughtful, quick and easy gift. Let's get started...
You will need: Pillar candle (any size), white tissue paper, stamps, ink, colouring medium (I used coloured pencils), wax paper, heat tool, embellishments
Top left: stamp your image on tissue paper. 
Top right: colour with your choice of medium (I used prismacoloured pencils) Bottom left: closely cut out image using scissors
Bottom right: lay trimmed piece over the candle to desired position.
Pull off enough wax paper to wrap around candle. With one hand, hold taut so the stamped image doesn't shift and begin heating with your tool. You will see the wax "liquify" over the area you heat. In other words, you are sealing the tissue paper into the wax of the candle. Carefully, peel off the wax paper off the candle and be sure all portions of tissue has melded into the pillar.
It should look like this...
Voila! You are finished. Embellish as desired. For my Candle, I created a tag from SNSS Decorative Plaques die set, and wrapped matching twine around the candle. I stamped the sentiment on the oval tag and sponged the layered piece with Rangers ink. 
http://cdn2.bigcommerce.com/server1800/d6aaa/products/1269/images/3821/SNS_14_028LovelyLotus__28378.1437139964.1280.1280.png?c=2  http://cdn2.bigcommerce.com/server1800/d6aaa/products/1233/images/3678/SNSD_16DecorativePlaques__66828.1420766587.1280.1280.png?c=2

Friday, August 7, 2015

August 2015 Sweet Perks Club Reminder


Hello Sweet 'n Sassy friends!  Time is running out to take advantage of our August Sweet Perks Club Bundles.  The bundles we are offering this month will only be available as long as supplies last or until Thursday, August 13th.  After that the stamp and die sets will be added to the Sweet 'n Sassy Stamps Store at the full price.

If you have not had a chance to see the Sweet Bundles for this month, just take a look!

Just $27.95!!

Just $32.95!!

Here's a Pop-Up Diorama card using the adorable Prim Blessings Bundle.  Sweet 'n Sassy products make it possible to create fun and fabulous scenes like this one:


The inside of the card pops out when opened, but is flat when closed.  The directions for this fold can be found HERE.  Other dies used are the Bare Tree Dies, Happy Happy Dies, Fence and Grass Dies, and the Beach Dies.

Head on over to the Sweet 'n Sassy Stamps Store to snatch up a great deal on these bundles just in time to create perfect cards for the fall season!

While you are there be sure to check out our two new stamps sets just added to the store in July…Floral Pattern Background and Lovely Lotus.  Here is a sample using both of these beautiful sets:


Thanks so much for stopping by…have a wonderful weekend!

Thursday, July 30, 2015

I'm praying for you today...

Hello! It's Monika here today, playing with the new sets Lovely Lotus and Floral Pattern Background.

 
To make the background:
1.I 'smooshed' pink and purple ink on my craft mat, spritzed water on it, and placed the water color cardstock over the ink puddle.
2. After the ink dried thoroughly, I stamped the Floral Pattern Background image with VersaMark, and poured white embossing powder over it.
3.I brushed off some of the powder to give the image a weathered look.
4. Then I heat embossed the image.

 
Thank you for stopping by today,
Monika


Sunday, July 26, 2015

Lovely Lotus


Hi there, Sweet 'n Sassy friends!
 It's Ceal here to share with you a card I made using the Lovely Lotus set. This set is being released in August but guess what? You can Per-order today! 


To make my card I used a watercolor wash for my background and Inktense pencils to watercolor the mage. To finish it off I spritzed it with some Heidi Swapp color shine.


Friday, July 24, 2015

Pre-Order Bonanza

Hello, Sweet 'n Sassy Friends!  Did you know that many of our popular Sweet 'n Sassy stamp sets are now available as a pre-order?  These stamp sets are so difficult to keep in stock due to the fact that they sell out as quickly as we get them in.  Now is your chance to get the stamp sets you have been waiting for...beginning with our new July release, Lovely Lotus and Floral Pattern Background.


The Design Divas have been having so much fun using these two new sets this past week...Just take a look !


Some of our most popular stamp sets are the Innies.  The sentiments included in these sets are perfect for the inside of your card, but can also be used on the outside!  Many of these sets are now available as a pre-order.


Sweet 'n Sassy silhouettes stamp sets are sought after because of their versatility.  Many of these sets are also now available as pre-order items.


As you can see, there's something available for everyone!  Head on over to the Sweet 'n Sassy Stamps Store and pick up those favorites you've been waiting for!

Don't forget to check out our Out With the Old sale.  You can pick up these fabulous stamp sets for 50% off!


Thanks so much for stopping by!  Enjoy your weekend!