Showing posts with label Wait On The Lord. Show all posts

Thursday, March 15, 2018

Lead Me In Thy Truth


Hi Sweet Friends!

Julie, here sharing a Mixed Media card created with my distress oxide inks along with the March stamp of the month, Texture Tiles I and previously released sets, Majestic Monarchs and Wait on the Lord.


FYI- I was experimenting with distress oxide ink and realized that I should have used watercolor paper versus white cardstock for the direct to paper technique- oops!  I used broken china, seedless preserves, picked raspberry and abandoned coral in swipes directly to the cardstock.  It dried too quickly for the ink to move so I added splashes of the same colors to soften the background.  

Once the background dried, I stamped the sentiment from Wait on the Lord with archival black ink, heat set the ink with a heat tool before die cutting with a stitched oval die and mounting onto an ornate oval die.

I also added splashes of distress oxide ink in coordinating colors to the designer paper and stamped the script image from Texture Tiles I with picked raspberry ink over the sentiment oval as well as the black and light blue background panels.

The butterflies from Majestic Monarchs were stamped in black archival ink, heat embossed with clear ep before watercoloring with the distress oxide inks.  I fussy-cut each butterfly out and added them along with a few sequins to the card front.

Shimmer was added to the butterflies as well as the oval sentiment and fram using a clear glitter pen to finish off the card. 

I absolutely love the different tiles in the Texture Tiles I Clear Stamp Set- perfect for adding texture for so many cards!!  And don’t forget, Texture Tiles I is the Stamp of the Month for March! This means that you will receive this stamp set free in March with your $75 order ($75 net after all discounts) and you will also receive free shipping and handling (on $75 US only)!!  

Thanks again for stopping by- I hope all of you have a wonderful Easter and Resurrection Sunday!!


Monday, June 8, 2015

Tutorial Monday: Sharpie Dip

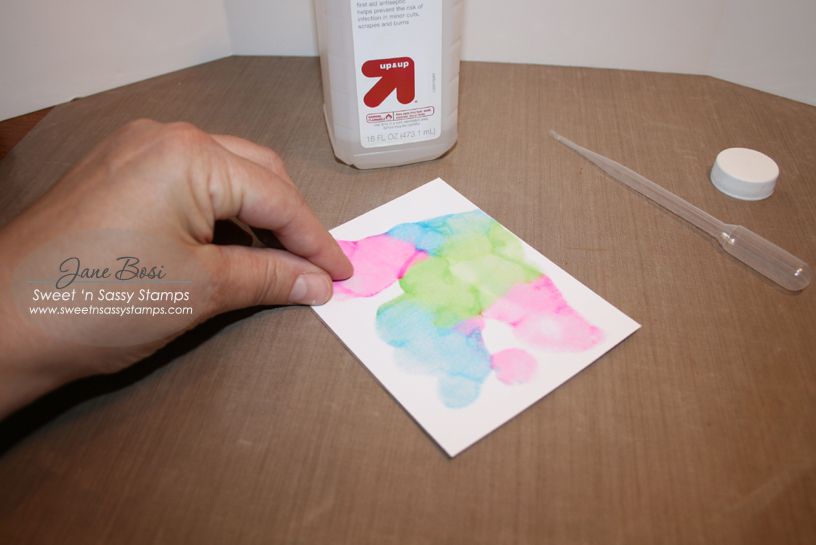
{Jane Bosi}  Happy Monday, Sweet friends!  I'm excited to share this Monday's tutorial with you--it's both colorful and easy--two of my favorite things!!  And, as an extra happy bonus, you are likely to have all of the necessary supplies right in your home!
You will need several complimentary sharpie markers, rubbing alcohol, and eyedropper (pipette) a piece of white card stock and a piece of acetate.  An acrylic block could be used as a substitute for the acetate, however, most Sweet 'N Sassy stamp sets come backed with an extra piece of acetate.  You are not going to ruin it, so it's almost like it was meant to be :)
Begin by laying color patches with the sharpie markers on the sheet of acetate.  Any random pattern will do!
Using the pipette, add drops of rubbing alcohol to the entire surface of the colored acetate.  The rubbing alcohol will spread and blend the inks.
Immediately, cover the prepared acetate with the white card stock.  Gently press around the entire card stock piece to transfer the inks.
Depending on the outcome of the dipping, you can use either the front or back side for the next step.  It really is your personal preference.  In the above samples, the back side picture is my preference due to the mingling of colors and intensity.  Some of the colors on the front side are muddied.  The back side on this particular piece was much prettier.  You will see what I mean when you start to play around yourself!
To complete your project, all you need is your favorite images from Sweet N Sassy Stamps and some black ink.  The contrast of the black ink and the background colors is awesome, in my opinion :)  You can tell from the opening picture, I had a hard time stopping!  Below, is each card alone with a few more details:
 This card features New Creature--butterflies and sentiment.
 Also New Creature and Retirement Sentiments.  I rarely use white as a card base, but with this colorful front, the white really works.  The butterfly wings are highlighted with a white signo pen, also.
I created this collage card using Parisian Postcard---a simply gorgeous set--by randomly stamping images everywhere.  Later, I colored the flowers only and added a sentiment from Wait On The Lord.

I hope you've enjoyed this tutorial as much as I have enjoyed making it.  We sure would love to see your creations, so feel free to share in our comment section!  Most of all, go on get inky!

Don't forget to be awesome!
TTFN, Jane

I Got Crafty With:


Sunday, June 7, 2015

Rest in the Lord

Are you enjoying the flowers that are blooming?  I sure am!  So I brought the flowers to paper today.
 
I used the Decorative Plaques dies as a starting point in my card design.  I then made a soft colored floral background and stamped the words over top using Thankful Blooms and Wait on the Lord.  Then I filled in the background with some accent butterflies from Parisian Postcard.
 

The white Decorative Plaques panel was centered over the white square layer and both pieces were stamped together.  Then I diecut the pink Decorative Plaques layer to place underneath the stamped piece.  A few accent pearls were added to the lower corner.
 
Have a wonderful day!
♥  Diane


Monday, April 18, 2011

Wait On The Lord

Today's SCS  TECHNIQUE LOVERS CHALLENGE # 321 - Same But Different was too hard to pass up.  I just made the card on the left late Sunday for today's post on my blog and sealed the envie and dropped in the mail. When I looked at today's challenge I had to pull up my picture and make another one. I like how the 1st one turned out but after loading it thought better of some of my placements but did not have time to start over so today I got to start over. I still had some dp left over and pleant of primas and off to my cave I went.
I changed the placemnt of my flourshes and leaves this time more around the primas. I airburshed both the pink and yellow prima and topped them off with a solid white closed together by a yellow brad this time. Much softer effect I think than the copic colored yellow prima on the left. I used the same Nesties, sentiment and copic coloring around the Nestie for both.
This is also for Friday's QUEEN FOR THE DAY # 56 - Mrs.Boz. I chose her BEAUTIFUL CARD HERE to CASE. I changed the flower type and used dp but kept the basic layout.
I used last Tuesday's COLOR CHALLENGE # 319 - So Pretty Pizzazz.
My focal sentiment is from a set called "Wait On The Lord" from SWEET N SASSY STAMPS that I just bought and could not wait to get it dirty. I love using sentiments for focal panel but I also love long sentiments suchh as this for using on the inside. I have almost nothing for inside of a card. Now another early and late day at work ahead of me so off I go.
RECIPE:
Stamps: Wait On The Lord, SNSS
Paper: whtie, pretty in pink, pear pizzazz, so saffron, MME
Ink: so saffron
Accessories: Nesties label 9, Quickutz Flourish, Fiskars Leaf, Martha Stewart Fern punch, Primas, ABS, copics
Techniques: ABS, 3D, Same but Different