Showing posts with label Encouraging Peonies. Show all posts

Monday, October 3, 2022

Encouraging Peonies


Hello Sweet 'n Sassy friends!
It's Ceal, here. Today I am sharing a card using some of our newest products mixed with some old.
To make my card I started with a white top folding card base and a white panel for the card front. First I created a subtle background by using the Grunge Grid stencil and then I stamped one of the flowers from the Encouraging Peonies set and fussy cut it out, cutting the leaves off because I wanted to add my own leaves using the new set Foliage Silhouettes and the coordinating die, they also come in a bundle
Using distress inks I created a smooshed background and then using the Foliage Silhouettes dies set cut out the leaves to add to the Peoney. To give the leaves even more dimension I stamped them first and then placed the die cut leaves over the stamped images.  I added the greeting to finish the card. 


 (Affiliate links are used at no additional cost to you, I would appreciate you using them when you shop.) 


For all products used on this card head over to my personal blog, Simply Beautiful.

Monday, September 5, 2022

Botanical Branches


Hello Sweet 'n Sassy friends.
It's Ceal, here. Today I am sharing a couple cards using the Botanical Branches set. 
Unfortunately I have need quite a few sympathy cards here lately, and this set makes a beautiful sympathy card.
To create my card I started with a top folding white card base and a white panel.
The top card I stamped the branch from the Botanical Branches, colored it and cut it out with the Botanical Branches die set. The sentiment is from the Keep In Touch Too set. 

For the bottom card I stamped and colored the branch directly on the panel and used a sentiment from the Encouraging Peonies set. 


Monday, December 27, 2021

Monday, November 8, 2021

On my heart today


Happy Monday! Esther here today sharing this encouragement card using the BRAND NEW Script Background stamp. In celebration of their 14th birthday there are sales and new releases going on all month long, and this week all Background and Creative Worship stamp sets are 20% off! 

Shop Backgrounds Here ~~~ Shop Creative Worship Here


     ~~~This post contains affiliate links at no extra cost to you~~~

  Supplies and Tools:

Wednesday, August 4, 2021

You've been on my mind by Charmaine Canham


Good Morning!!! 
I am all for making unique and one-of-a-kind cards, but sometimes the need arises to make multiples. Well, I have a solution for you! 


I am using the Encouraging Peonies stamp set that is just gorgeous. It has the most
simplest sentiments and can easily be paired with any of these flowers.


Here is what I did:
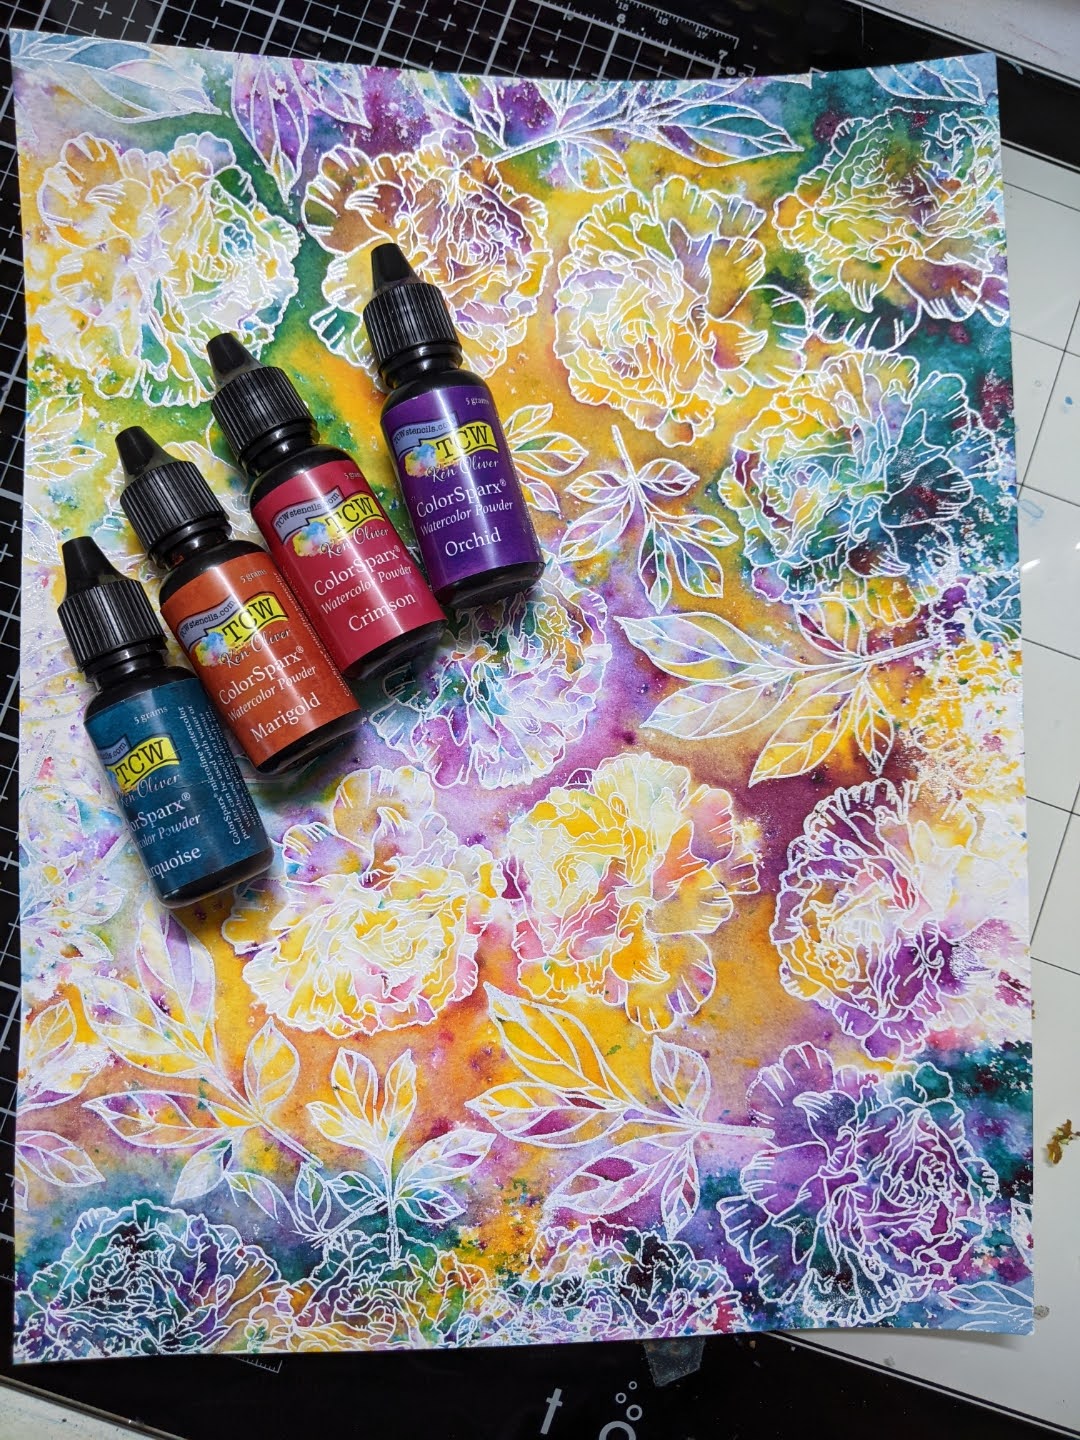
Start with any watercolor paper, like Strathmore, white or clear embossing powder, and Versamark.


Next, randomly stamp flowers and leaves all over an A2-sized sheet. You will need to cut the watercolor paper down as this is a bit larger (or keep it this size, it's not important!)
Make sure to use an embossing buddy before you stamp to not get embossing powder everywhere.

Next, use painter's tape or washi tape and adhere the edges to a waterproof surface. The sheet will buckle when you add water. I am using The Crafters Workshop ColorSparx that comes in packs of three. Use any complementary colors so that you don't inadvertently make mud. 
Wet your paper and start by adding a little at a time.

Add more water to dissolve the pigment. 


You can let this dry naturally or take a dry cloth and soak up all the water. You can also ( I just thought of this!) use a blank sheet of paper and transfer color for another project. If the color is still too strong in some areas, add water and dry it.


Since I am making mini slimline cards, I try to see how I can position my dies (from Gina Marie Designs) to get the prettiest areas onto my card. Run this through your die-cut machine.


Instead of stamping the sentiment on a separate piece of paper, why not try something different and stamp it on acetate?? You will need pigment ink, like Stazon, for it to dry quickly. You can also heat emboss the sentiment!


Once the sentiment is stamped, an easy way to adhere the acetate to the card front is to use brads. Punch holes through both the acetate and card front. Make sure to use double-sided foam tape to "hide" the legs in the back.


Attach the card front to a 6 1/4 x 3 1/4 base for a clean look in the back. Since the mini slimline cards are roughly 6 1/4 x 3 1/4, I still use a top folding A2 base with my pre-printed logo on it. I just cut it down to size. The envelopes I use are #7 (6 1/2 x 3 1/2) and work perfectly. 


And that is it! I use the "friend" die in gold on two cards that matched the brads on the cards. 


I hope you like today's cards and let me know which is your favorite!!!

Talk soon, 


Wednesday, May 19, 2021

Thanks so much by Charmaine Canham


Good Morning!!! I get a lot of requests to make sets of cards. I honestly dislike making the same card twice so this has always been hard for me to do.
 Let me show you how I made a quick pack of three Thank you Cards!


I am using three different stamp sets today: Everyday Greetings 2,
 Encouraging Peonies and Texture Tiles 8.


Today, I am using the resist technique. First, clear emboss cardstock with Versamark and clear embossing powder after repeat stamping all over the paper. Heat and set aside.


I made 2 cards with the dots and 2 cards with the peonies.


I used Distress Ink instead of my go-to Distress Oxide
for a more vibrant color. Smear the ink pad over the A2 card base. 


Here is the new Salvaged Patine Distress Ink over the Peonies.


I love these purple peonies!


To finish these cards, repeat stamp the Texture Tiles in either similar monochromatic colors or completely opposite for a more dramatic look.  Layer the sentiment strip with double-sided foam tape.


Which one is your favorite?? To finish the pack, stamp the texture tiles stamp
on the envelope for a "matchy-matchy" and complete look!

Thank you for looking and have a great rest of your week!

Charmaine

Follow me for almost daily inspiration on Facebook and Instagram


Wednesday, May 5, 2021

Hope in God by Charmaine Canham

Good Morning, Flowers!

I just received my (new to me) Jennifer Nilsson, Encouraging Peonies stamp set, and I had to ink it up. Sweet 'n Sassy also has a big Buy 2 get 1 Free deal on all of her stamps this week! Make sure to check it out! But let me tell you how I made this beauty!


I started applying the new Distress Oxide color, Salvaged Patina, to half of an  A2 cardstock base. 
 

Make sure this is dry or dried with a heat tool before moving to the next step. Stamp the smallest dots from the Textures Tiles 8 stamp set with Gina K Designs Soft Stone ink pad over the whole card.


I just love these leaves on this stamp set. I heat embossed them with silver powder from Hero Arts and Versamark watermark ink.


The Future stamp set has beautiful and inspiring sentiments. I stamped the sentiment with black Versafine ink, and clear heat embossed. I didn't want to take the chance of it smearing at this point.


I noticed that the leaves disappeared in the background in that beautiful patina color. I pulled out Salty Ocean Distress Oxide and painted the leaves with a small paintbrush. This gave it a soft watercolor look.

 I always want to doodle on my cards. I pulled out my white Posca and Micron pen and started stippling and adding highlights to the leaves. This is probably not recommended, but I pulled out my gray Copic markers and added shadowing under the leaves over the distress oxide. I finished by adding a hand-drawn border and white dots in the darker shadows.


This card transformed so much by adding shadows and highlights organically. I hope you liked my card today, and leave me a comment or a question if you have any.

Remember to check out this week's deal below!
I hope you have a great day!
Charmaine

Follow me for almost daily inspiration on Facebook and Instagram.