Showing posts with label Nature Silhouettes 2. Show all posts

Saturday, January 27, 2018

Beautiful Silhouettes

I am so excited about today's cards! Sweet N Sassy's New Silhouette stamps are so versatile! You can create almost any background and compliment it with a silhouette! You really can't wrong with them!

For my first card, I went with a simple acrylic block technique. This card feels very masculine and I am too often short on these so... YAY!
  • I used my acrylic block and Distress inks for the background.
  • Then I used Nature Silhouette 2 and black archival ink for the ground/grasses, added a sentiment from Thoughtful Words  and added my duck from Scene Silhouettes Wetlands (This is the January Stamp of the month and it is FANTASTIC - you still have time to get it free with $60 purchase). 


For my second card, I created a beach scene.
  • I tore some paper and  used it as a mask to ink up my beach line with Distress Inks
  • With the straight side of the paper acting as a mask, I added the ocean and sky - also with distress inks.
  • When that dried, I added details with shades of brown Copics and a white gel pen to get more realistic sands and waves
  • I added "beachy" birds from Scene Silhouettes Wetlands and a sentiment from Floral Greetings.


This is just two ways to use these awesome stamps! I hope they inspire you and I can't wait to see what ways you come up with!

Thanks for stopping by!

Lyn

Monday, September 4, 2017

Thoughts of You

Hello Sweet Friends!  Julie here and today I am sharing a quick Clean and Simple (CAS) card created with the Nature Silhouettes, Nature Silhouettes 2 and Long Stem Silhouettes Clear Stamp Sets (all designed by Korin Sutherland).

I love the different scenes that you can create with all three of these stamp sets as well as the font on the sentiments in Long Stem Silhouettes


To create this card, use various distress oxide inks for the background.  Stamp the pads onto a silicone sheet, spritz with water and press a piece of white cardstock.  Lift up and dry with a heat tool, repeat the process until the background is finished (I used three different colors for this panel- twisted citron, worn lipstick and peacock feathers).

After layering the images from Nature Silhouettes and Nature Silhouettes 2 images onto the background with versafine onyx black ink, trim and layer onto black cardstock, add to a white card panel and stamp the sentiment from Long Stem Silhouettes using versafine onyx black ink.

Heat emboss the bird image with clear embossing powder, fussy-cut and adhere with dimensional foam to finish off the card. 

Thanks for taking the time to visit us today and I hope I have inspired you to create something this week- hugs and God Bless, sweet friends!

Saturday, July 9, 2016

His Wings

Hello! It's Monika here today, with a collage card.
I had been wanting to make a card with different window panels so the other day I set down with a number of stamp set, and a "window" frame... and got inky.


The background was made with Nuance pigment powders I picked up at a stamp show couple of weeks ago. There are couple of different companies offering pigment powders... and I decided to go with them.


After stamping the small landscape image from Creative Worship: Good Shepherd clear stamp set, I used PrismaColor Pencils to add some shading. The silhouette images came from Forest Silhouettes and Nature Silhouettes 2 clear stamp sets. The words are from Good Shepherd and Creative Worship: His Wings clear stamp sets... I also used couple of dies from Forest Silhouettes die set.
The feathers from His Wings clear stamp set were stamped on vellum with VersaMark, heat embossed with white embossing powder, then cut out.


Thank you for stopping by,
Monika


Wednesday, February 24, 2016

Worship the Lord

Hello! It's Monika here today showing you my way of Bible Journaling.
 
I wanted to give Bible Journaling a try... but I am still not comfortable with the thought of using my Bible as my base sheet. What if I make a mistake? I can't just tear the page out and toss it aside... and believe me, I do make lots of mistakes...
So I decided to do my journaling on a piece of paper and attach that paper to my Bible. I guess I could call this my altered Bible.
 
 
What do you think?
I really liked how the background turned out on my previous card, so I made the background the same way...
The right side was sponged with Mustard Seed distress ink. Then I went over the ink with a wet brush to spread the ink. After the ink dried, I also splashed some water over the area...


I added some highlights to the words and dress with Prismacolor Pencils.
The silhouette butterflies were stamped on vellum and heat embossed with white embossing powder.
 
Thank you for stopping by,
Monika


Wednesday, February 10, 2016

Word of Life

Hello! It's Monika here today with a card I made using the newly released His Book clear stamp set. While it was released as part of the Creative Worship line which is for Bible journaling, this set is perfectly suitable for card making.
 
 
I stamped the Bible image on water color card stock, colored it in with Prismacolor pencils, then fussy cut it. It is popped up on dimensional tape.


I also used Nature Silhouettes and Nature Silhouettes 2 clear stamp sets. The silhouette images were perfect for a subtle background. The silhouette butterflies were stamped on vellum and heat embossed with white embossing powder.
 
I hope I inspired you to craft today.
Thanks for stopping by,
Monika


Friday, January 8, 2016

New Beginnings

Hello Sweet 'n Sassy friends!  Cathy here with a card to share as we say good-bye to 2015 and welcome a new year.  The sentiments in the New Beginnings stamp set offer a note of encouragement and are perfect for looking forward to what the Lord will do in 2016.


It's difficult to see in the photo, but the large background from the Leafy Flourish Background and More stamp set was clear embossed over the butterflies on the My Mind's Eye DP adding some subtle texture.  Distress inks were sponged on the circle panel which was then stamped with images from the Nature Silhouettes and Nature Silhouettes 2 stamp sets. The butterflies were die cut, sponged, and stamped along with the sentiment from the New Beginnings stamp set.  This week's Mojo Monday sketch provided the inspiration for the card design.


Here are the Sweet 'n Sassy stamp sets used in the card above:


"…but one thing I do, forgetting those things which are behind and reaching forward to those things which are ahead…"  (Philippians 3:13)

Thanks so much for stopping by…enjoy your weekend!

{{{Hugs}}}
Cathy

Saturday, November 21, 2015

Faith & Feathers ~


Good morning family and friends! Mary here with some samples from one of my favourite sets from Korin. Faith is an ensemble of inspirational quotes and scriptures. It comes with seven sentiments/scriptures. The feathers are from the Nature's Silhouette 2 and the birds and feathers die.
My second sample uses the same combination of stamps with second generation stamping. Very simple with no embellishments.

The Birthday Celebration continues until the end of the month. This week November 20-26 Sweet and Sassy is celebrating by offering
25% off all dies - use this code when you place your order: BDAYDIES25

A bit about myself:
I was born and raised on an Ojibwe-Cree reservation in Northwestern Ontario. My heritage is one that I cherish and appreciate very much.  Both my parents have now departed for the next life, so I especially find it important to continue  imparting to my now grown kids, the values of who we are as a people. It gives me great joy when I hear them quote our values in various life experiences. Currently, my husband and I own a home exteriors business. We also serve in our home church and we travel extensively for prayer related ministry in various networks.

I was introduced to stamping 20 years ago! aacck! I cringe when I think about my first creations. haha. For the most part, I like what I create. Then there are some days I should've left my inks and stamps alone but that too is part of the creative process.

My first introduction to SNSS was through a little humble store. I gravitated to the stamps because of the scriptures. I fell in love with Cocoa!!! I served on the Crazy4Cocoa DT and then on the Digi Challenge in 2011. Since then, I have served on the SNSS team. I am so privileged to have walked with all these women over the years. So much talent, inspiration and sisterhood.

I love finding my stamping inspiration through stories and people. My first card (above) I call "messy faith". The reality of growing in our faith is rarely a clean cut journey. I'd rather say it gets messy as we deal with the realities of our own heart. The messy background is symbolic of that. If we stop and listen to faith stories, it is seldom without a mess but the result is beautiful. I added feathers to my card because it is symbolic of my heritage. Feathers represent honour. We need to honour all people. We honour because it flows out of who we are and not what the other deserves. Jesus did that.

Best advice for stamping: get to know your inks and the different uses of each type. 

My all time favourite SNSS is Cocoa! Here are a few creations from the past:

FAITH Cards - Materials Used:
Stamps: Faith, Nature's Silhouette 2
Paper: SU, Hampton Arts
Inks: Paint, SU, Versafine
Accessories: SNSS dies, jute, bead
 http://cdn2.bigcommerce.com/server1800/d6aaa/products/1049/images/1368/SNS_13_032Faith__18998.1373574970.1280.1280.jpg?c=2     http://cdn2.bigcommerce.com/server1800/d6aaa/products/1004/images/1993/SNS_13_004NatureSilhouettes2__04227.1387041222.1280.1280.png?c=2    http://cdn2.bigcommerce.com/server1800/d6aaa/products/1005/images/2182/SNS_020BirdsFeather__14915.1388163392.1280.1280.png?c=2

Wednesday, November 11, 2015

hope in God

Hello Sweet 'n Sassy friends!  Before I get to my card today, let me first say thank you to all our Veterans for their service to our country.  Thank you!
 
Sweet 'n Sassy Stamps is celebrating their birthday all month long and we have lots of inspiration to share.  Be sure to keep checking Facebook and the blog for samples, give-aways, and promotions!  This week SNSS is offering free shipping with your $30 order until Thursday, November 12th.  Be sure to enter code BDAYFREESHIP at checkout.
 
Today I am sharing a card with one of my fave sets... Nature Silhouettes 2.  This set is so fun to use by stamping the silhouettes over a sponged background!
 

The lower half of the stamped panel was masked off before sponging.  A circle was punched from an additional mask to sponge in the sun.  Then a sentiment was added from The Future stamp set and another bird was stamped beside it.
 
Have a great Wednesday and don't forget to thank a veteran!
 
~Diane 
 

Monday, April 13, 2015

Tile Tutorial


Happy Monday, everyone!  Cathy here with a new Design Diva Demo for you!  Before retiring from teaching, I used to make coasters out of unglazed tiles for my parent helper gifts at the end of the school year.  I often get asked at paper craft festivals how they are made, so I thought I would share my process in this tutorial.

Begin by gathering all of your materials.

Supplies:
Non-Stick Craft Sheet
4" x 4" Unglazed Tiles (purchased from building supply store)
Adirondack Alcohol Inks in a variety of colors
Adirondack Metallic Mixatives (Optional)
Alcohol Blending Solution
Felt Applicator Tool
Archival Inks
Sweet 'n Sassy Stamps
Sharpie Markers (Black and White)
Paper Towels
Vinyl/Latex Gloves
Cork
Tacky Glue
Spray Varnish

Lightly sand your tiles and wipe off the fine dust with a damp paper towel or baby wipe.  Make sure the tiles are completely dry before beginning to apply the inks.


Be sure to put on those vinyl/latex gloves if you don't want inky fingers!  Choose three or four colors and give a little squirt of each into the felt on the applicator tool keeping each of the colors separated on the felt.  Then add a little squirt of metallic mixative to the middle of the felt. (Optional)  If you use the metallic mixative, you must remember to shake it well before using. 


Dab and swirl the colors onto the tile remembering to cover the sides as well.  No need to worry too much about what it looks like at this point…just be sure to cover the tile with color.


Now comes the fun part!  Squirt some Blending Solution on the felt applicator tool.  You can even squirt some right on the tile if you want.  The more blending solution you use the lighter the colors will be.


Continue dabbing and swirling with the Blending Solution until you get the look you like.


Here are several color combinations, although using exactly the same colors will yield entirely different results.


Allow the tiles to dry.  You can stop at this point, but we are going to add some stamped images to the tiles, so grab your Archival inks and choose the stamp sets you want to use.  


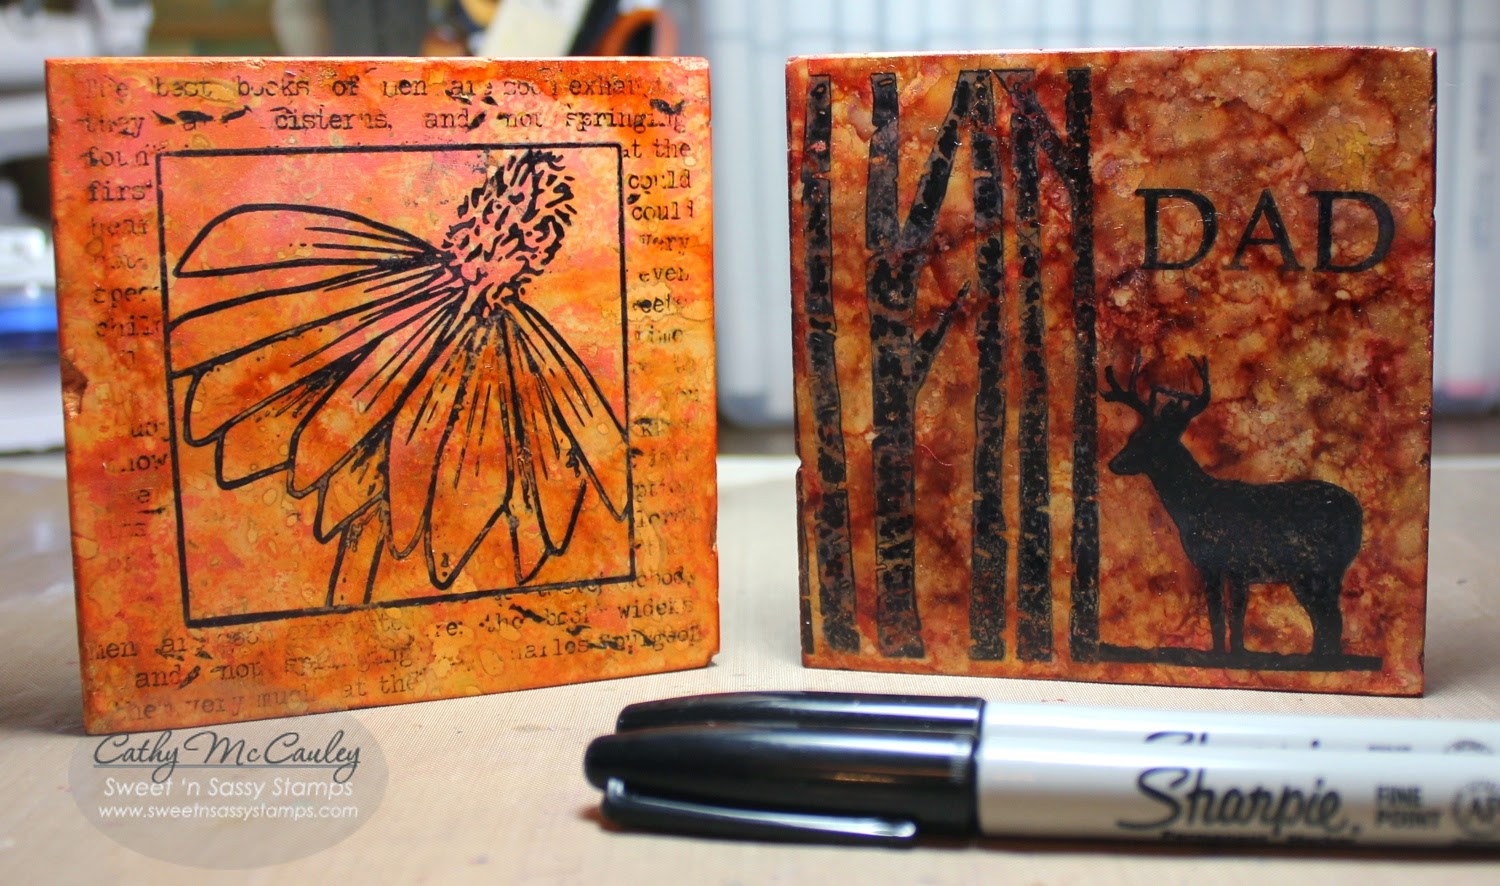
Generally I like using SNSS silhouette images, but the for the tile on the left, the coneflower from the Flower Blocks 3 set was used.  The middle was masked and the Typewriter Text Background was stamped in Jet Black Archival ink, then the coneflower was stamped.  Tender Thoughts and the new For My Father set was used for the tile on the right.  A black Sharpie pen works great for any touch ups that are needed.


Nature Silhouettes 2, Faithand Serene Silhouettes stamp sets were used to make the tile on the left.  For the tile on the right, the Typewriter Text Background was stamped using Deep Purple Archival ink.  The flourishes from the Leafy Flourish
Background and More stamp set were then stamped using the Jet Black Archival ink.  White accents were added using a white Sharpie Paint Pen.

To make your coasters water proof, give the tiles several coats of clear glaze or acrylic varnish.  Allow the tiles to dry between each coat…about 1/2 hour.  (I applied 4 coats of Clear Glaze to mine.) Be careful to use the spray in a well ventilated room or outside.


Trim cork to fit the back of the tile using a craft knife.  Apply Tacky Glue to the back of each tile making sure to cover all the way to the edges. Stick the piece of cork to the back and place a lightweight object on top of the tile until the glue dries.


The tiles are now finished and ready to be used or given as gifts!


Here are the Sweet 'n Sassy Stamps used for the tiles above:

I hope you've enjoyed this tutorial!
Have a marvelous Monday!