Showing posts with label How Tweet. Show all posts

Monday, July 18, 2022

Sending Love & Prayers


 Hello Sweet 'n Sassy friends! 
It's Ceal, here. Today I am sharing a card using a set that was released this past friday and is a must have for your crafty stash. It is great for cardmaking, scrapbooking and bible journaling AND you can save 10% on it through Friday. 

To make this card, I started with a white top folding card base and a panel of white heavystock distress. I used Salvaged Patina and Uncharted Mariner for the background.  
I stamped the sentiment image from the new set and then added the hearts and the other paper plane from to other sets.


Affiliate links are used at no cost to you

Saturday, April 16, 2022

Stand Tall

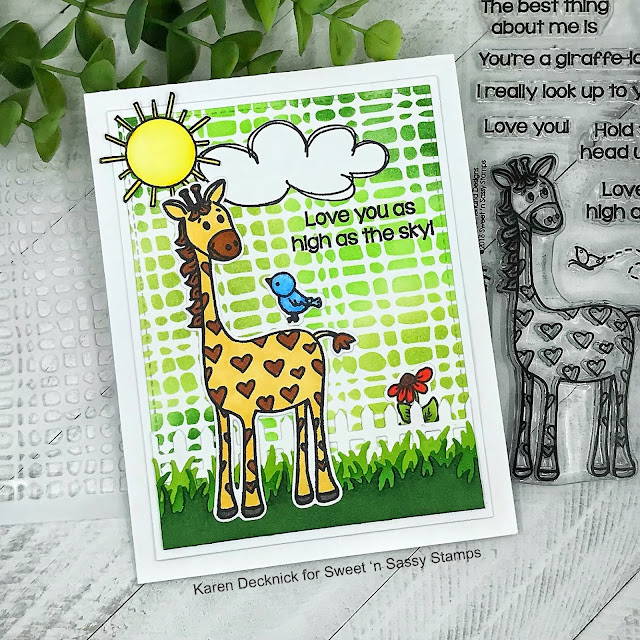
One of my goals this year is to add more cards for kids into my stash. I also love punny sentiments too. So, when I spotted the adorable Stand Tall set on the Sweet 'n Sassy Stamps site I knew I had a winner that would do both.


The background I made in March with three different colors of green and the Grunge Grid stencil. I die cut the panel and added the fence along with three layers of grass form the Fence & Grass die set. I trimmed the edges, matted with white and attached to a white card base. I stamped the images on white, fussy cut the cloud/sun and die cut the other ones. I left the cloud white and colored the other images with alcohol markers. I assembled as seen and stamped the sentiment directly on the background panel. 


Stand Tall Bundle


 How Tweet Bundle


 Melt for You


 Grunge Grid Stencil


Fence & Grass Die Set 


I hope you enjoyed today's card and thanks so much for stopping by!

Karen

Monday, March 21, 2022

Beautiful Bird Day


Hello Sweet 'n Sassy friends!
 It's Ceal, here. Today I am sharing a card using one of the newest releases paired up with an older favorite of mine. 

To create this card I started with a white top folding card base and a white panel. I used the Mosaic stencil to blend the background.  Next I stamped the cute birdie, colored him and cut him out with the coordinating die.  I also cut out a couple clouds with the die and added some shimmer to them with a nuvo glimmer pen.
For the greeting I stamped part of it directly on the card front and the word beautiful I stamped on a separate piece of cardstock and fussy cut it out.


Wednesday, June 16, 2021

So Tweet by Charmaine Canham

Good Morning and Happy Wednesday! 

Korin has this sweet little stamp and dies set on sale this week, and I thought I
should revisit this cutie and make a sweet evening scene for these two lovebirds!


 How Tweet Stamp and Die Bundle is an older set but so fun to play with. Here is what I did:

I started with a gel print I made but wasn't happy with (but held on to it for days like today!), and it just happens to have blue and orange-pink sections, perfect for our male and female birdies. Since the print was made with acrylic paint, heat emboss the ink to prevent smearing.

Next, I purchased this die from The Ton and have not used it. I think this will be perfect to showcase the stars aligning for these two birds. 

I use Bristol Smooth paper because it is perfect for blending with oxides, I have found. 

After blending the sky, spritz some Shimmer spray on it for a starry glittery sky. Also, glue this piece onto another white piece of cardstock for the white stars to show through from behind.


Play with the placement of the birdies and clouds. I hand cut all the pieces; I wish I had the dies, but it was therapeutic to do. Also, use dimensional foam tape under some elements for interest.


I use Versafine Clair ink for detailed stamping and sentiments.


It was a relatively quick card to make (it would have been faster with dies), but I
 really enjoyed making a cutesie (a different type for me) card. 


I hope you liked today's card and will leave me a comment here or on Instagram.
 I always enjoy reading your feedback!
Have a great day!

Charmaine

Follow me on Facebook and Instagram for almost daily inspiration
Check out my new Website, CharCards.net

*Post includes affiliated links at no cost to you*


Monday, January 11, 2021

Using Artist Trading Coins


Hello stamping friends, Esther here today with something a little different. Some of the Sweet n Sassy Stamps team members recently did an Artist Trading Coin exchange, and these are the fun little bird themed ATC's I made in three different color schemes. 

I started by doing some ink smooshing on watercolor paper. I had originally planned to use my inky results as the coins themselves, but then decided I wanted to turn them into fun little birdies instead. 

Here are the ink combos I used: 

  • Salty Ocean / Picked Raspberry 
  • Salty Ocean / Twisted Citron
  • Salty Ocean / Wilted Violet

After I dried my ink smooshed paper I spot-stamped a background stamp before stamping my birds and fussy cutting. I added some white gel pen to their cheeks and a touch of clear glitter to their beaks. 
 

~~~This post contains affiliate links at no extra cost to you~~~

 Supplies and Tools:

  • These Sweet n Sassy stamp sets
  • Circle Nestabilities (Spellbinders) 
  • Heart Dies (Firefly)
  • Lacy Borders (Lawn Fawn)
  • Flower Shower Spring Stack (DCWV)
  • Canson Watercolor Paper
  • White Gel Pel
  • Clear Glitter Pen
  • These colors of Distress Oxide (Ranger)
    • Salty Ocean, Picked Raspberry, Twisted Citron, Wilted Violet, Black Soot

I've heard people ask (and wondered myself) - "So what do you do with artist trading coins?" I thought I'd show you a fun way to use them on cards.

I used all the same supplies as above to create a matching background and added a white paper doily (Hello Doily- Sizzix die) behind my coin, a banner (embossed with Quilted Delight M- Bossabilities (Spellbinders) across my card front, and some pretty sequins.


Monday, June 8, 2020

My Anchor Holds


Hello Friends, Esther here with two new cards to share with you.  I'm loving all the masculine stamp sets in this month's release, and this first card features a little scene created with "Peace Be Still" on an ink smooshed background.  I stamped my images on mix media paper and colored them with Arteza real brush pens before fussy cutting and adding them to my card front. For extra texture I added some cheesecloth behind my collage.


~~~This post contains affiliate links at no extra cost to you~~~

Supplies and Tools:
  • These Sweet n Sassy Stamp Sets
  • Arteza Real Brush Pens
  • Canson Mix Media Paper
  • Lighthouse w/clouds (Cottage Cutz)
  • Shells Cutups Dies (The Cat's Pajamas)
  • Ornate Ovals (Divinity Designs)
  • Cheesecloth
  • Jet Black Archival Ink (Ranger)
  • These colors of Distress Oxide (Ranger
    • Broken China
    • Cracked Pistachio
    • Black Soot


My second card features a set from last month called "My Father's House"


For this card I created a fun vintage scene with script and newsprint designer papers from The Paper Studio, die cuts from various companies, and four different Sweet n Sassy sets.


~~~This post contains affiliate links at no extra cost to you~~~

Supplies and tools:
  • These Sweet n Sassy Stamp Sets
  • Kirby Teesdale Paper Pack (The Paper Studio)
  • Canson Mix Media Paper
  • Arteza Real Brush Pens
  • Dotted Ovals Dies (Sizzix)
  • Crochet Dies (Sizzix -Tim Holtz)
  • Callista Rectangle Shadowbox Frame (Spellbinders)
  • Scallop Basic Edges 2 (My Favorite Things)
  • Fishtail Banners (Stamp Simply)
  • Jet Black Archival Ink (Ranger)
  • Vintage Photo Distress Oxide (Ranger)


Thursday, February 7, 2019

love you


Good morning! I think I have made more valentine cards this year than any other. But what's not to love about valentine cards, right? Today I have two more to share using some Sweet ‘n Sassy stamps.
 
On my first card I used the new Forever & Always set. I also used How Tweet. I drew the little thought bubbles with a black pen and kept it a CAS card in black & white so the colored heart would pop.
 

For the second card, I used the same Forever & Always set and also used Texture Tiles 1. The background hearts are more of a peachy-pink color. The flourish heart is so pretty! I popped it up with foam dots.
 

Have a great day!
Diane


Tuesday, June 26, 2018

Love That Texture!

Hello sweet friends!  I love adding texture to cards!  Whether it's bricks, wood grain, pebbles, or tree bark, the new Texture Tiles 2 stamp set is a must have for creating that perfect texture.

The brick tile from Texture Tiles 2 was stamped on a Gelli Print scrap found in my scrap file to create the brick wall.  Check out how realistic it looks!  The flowers are from the Pretty Potted Florals stamp set and were Copic colored, cut out, and popped onto the wall.  A sentiment was added from the Scripty Thoughts stamp set to finish the card.

How about some tree bark?  Drag several shades of Distress Ink down the length of some card stock and stamp the wood grain tile with a darker shade.  A background was created with Distress Oxide inks and the pebbly tile from Texture Tiles 2.  The adorable birdie, clouds, and sentiment are all from the How Tweet stamp set.


Be sure to check out these stamp sets and others that work perfectly with the wonderful Texture Tiles 1 and Texture Tiles 2 stamp sets at the Sweet 'n Sassy Stamps Store.  Even better...The Texture Tiles 2 stamp set is FREE with your $75 purchase until June 30th!

Thanks so much for stopping by!  I hope I've inspired you to try stamping some texture on your next creation!

Hugs,
Cathy

Thursday, November 10, 2016

Chirp Up


Hi Sweet 'n Sassy friends! 

It's Ceal, here to share with you today a card I made using the How Tweet set. I just adore this sweet little bird and he is so fun to color!
My card was simple to make, I randomly stamped the bird down the left side of my card panel and then I stamped him on a scrap piece of cardstock, colored him with Copic markers and then fussy cut him out. I added just a touch of color to his wings and hair and then used some glitter glue to make it sparkle, which is hard to see in the photo. To finish the card I added the greeting and then randomly added some Nuvo crystal drops.


Also don't forget it's our birthday month and we have lots of fun things going on, today is the last day to place a $25 order and receive a free goodie bag so hurry to the store and don't miss out.


Happy Stamping!