Showing posts with label Home for the Holidays. Show all posts

Friday, February 22, 2019

Girl Power X3 in Red and Teal

Hi Friends! Today I have some fun projects using the new Girl Power 2 set. I have also used other sets (I will point them out as I go) but this one is the focus on all of my projects. I wanted to show how a single stamp could be used in different styles and complexities (is that the right word? I'll go with it :)). To show this versatility, I decided to use the same color pallet on them and red and teal is the color combo I chose. These projects are all different but the each make me smile out loud! So here we go...


My first project is a mixed media art journal page. I saw a 6x6 disc bound journal and felt ready to commit to that as it was less intimidating than a bigger journal with two pages to cover. This is my more complex project as it has acrylics, and archival ink, and texture paste, and Copics, and Washi tape, and a masked (many times over) image. I even pulled out my gelliplate and got so messy and had so much fun. If you haven't tried a journal page - I encourage it. It is very rewarding.
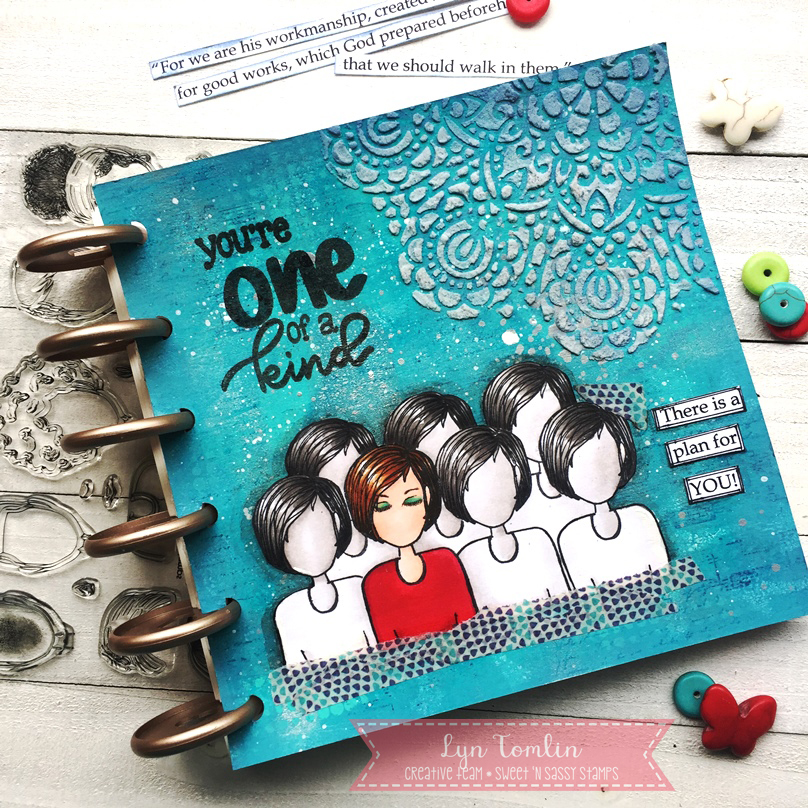
Recipe (in order of use haha):
  • Background - Acrylics Dina Wakley Acrylics Ocean, Turquoise, and Sterling
  • Background stamps - Texture Tiles 1 using Archival Inks Cobalt and Paradise Teal
  • Splatters - White Gesso and Sterling acrylics
  • Corner texture - Stencil with texture cream (Momenta Art-C in Platinum)
  • Sentiment (big) Be Unique Clear stamp set from SNSS, (little) typed on computer
  • Image - Girl Power 2 Masked over and over. Main image colored with Copics R24, R27, R29(shirt), E53, E55, E57, E59 (Hair), E00, E21, E11(skin) Other images colored with warm grays - adhered with Multi Matte Medium
  • Washi Tape - not sure brand
  • Outline image with Stabilo All Pencil and water brush

My Second project is a less complex and uses only a few dies, designer paper (from my stash)some tulle, and sequins. There is a mask though :) It is a shaker of sorts...

Recipe:
  • Spellbinders circle dies (two sizes so I could add the frame on top) This card allows you to see through to the inside
  • Designer paper from my stash
  • Tulle - folded in half filled with sequins and closed up with score tape the taped down between the paper layers and the card base
  • Image - Girl Power 2 (I chose the girl that looks like me) Keep in Touch Too (sentiment) and Home for the Holidays (gift). I stamped the gift first then masked it then stamped the girl.
  • My background paper is cut with A Jillian Vance Design Basic Polka Dot Die


My Final Project is kind of Clean And Simple but still has a few steps. It still uses a mask (I cut them out so I wanted to use them as many times as possible I guess haha!) I cut out some frames, stacked them and colored up my image. to pop into the frame. I wanted this to look like a selfie pic of me and one of my best friends so I chose girls with our hairstyles. For fun I decided to try to video it. It isn't awesome but it is my first time doing this and the video stopped and I had to add in the end...oh well - feel free to check it out if you want to HERE)

Recipe:
  • Spellbinders Rectangle and Square dies (taped together to create a frame and cut multiple times to stack and remain the same).
  • Image - Girl Power 2 Masked over and over. Main image colored with Copics R24, R27, R29(shirt), E53, E55, E57, E59 (Hair), E00, E21, E11(skin)
  • Sentiment - You and Me set from SNSS
  • My background paper is cut with A Jillian Vance Design Basic Polka Dot Die

I hope you are inspired to pick up a stamp set and see what other ways you can create with it. See how you can combine sets for a single project and most of all, this should be fun so make it FUN!!

Thanks for stopping by!
Lyn


Tuesday, November 27, 2018

Merry Christmas- A Quick Mixed Media Card


Hi Sweet Friends!  Julie, here and today I am sharing a quick Mixed Media Christmas card using non-traditional colors along with one of my favorite Christmas stamp sets, Christmas Silhouettes and images from Home for the Holidays and Texture Tiles 1 .


The background panel was created using distress oxide inks, smooshing the ink onto a piece of white cardstock and when the ink had dried, adding splatter with the splatter image from Texture Tiles 1.

The reindeer image from Christmas Silhouettes was stamped with archival black ink and heat embossed with clear embossing powder before fussy-cuting.  The sentiment from Home for the Holidays was created in the same way on another piece of white cardstock and die cut with a stitched circle die. 

The script image from Texture Tiles 1 was stamped onto the diagonal die-cut square before mounting onto the card front with dimensional foam.

A bit of silver cord and a few rhinestones were added to finish off the card.

Don’t forget, we are still celebrating our 11th Birthday Celebration all month long!  This week, you can save 11% off Sentiment, Fall and Christmas stamps (good through 11/30/18 with HAPPY11SFC code) plus....

Check out the special stamp sets you can choose from for your Stamp of the Month with a net order of $60 (US) and don't forget, add a few more $$ to your order to get free shipping and handling (with net orders over $75 (US)). 


Thanks again for taking the time to stop by!  I hope all of you have a wonderful week!

Monday, November 5, 2018

Cookie Time

{jane bosi}  C'mon you guys!!!  Who is ready for some Christmas baking???  I'm loving this new Christmas Cookies set!  So many fun cards and projects to make!  I just need more time than ideas right now!
I started with a few cards--stamped the images on water color paper and embossed before water coloring using distress inks.  I added some sparkly glitter glue to each image and sentiments from Home For the Holidays and Christmas Wishes.  For the top card, I just couldn't cover any the cookie goodness so I stamped and embossed my sentiment on velum so the whole design could show through.  

I'm not sure why I'm so drawn to these images--other than it's the beginning of my favorite time of the year!

Enjoy!  Jane


Sunday, September 30, 2018

Home for the Holidays

{jane bosi} Hello, Friends! I wanted to pop in to share some last minute goodies from our September release--naturally, you'll be seeing lots more of these beautiful images in the days to come, but for now, let me share two that feature the images from Home For the Holidays

I particularly love this set because the dog image looks just like our Charlie.  He's a bit of a sass, but we love him just the same. 

 It's beginning to look like my favorite time of the year.....Enjoy!

Jane

Tuesday, September 25, 2018

all roads lead home

 
 Hello! I have a fun card to share today with another one of the new sets from the Sweet ‘n Sassy September Release. Here I used Home For The Holidays. I love the image of the door with the stones around it!


I decided that I wanted to be able to peek through the door and see the tree inside so I carefully cut the panes out with an exacto knife and placed some clear acetate on the inside of the door to resemble glass. I also cut the center from the wreath image and "hung" it on the door.
 

I stamped and colored my door image and then stamped it again onto my card front. The entire door was cut from the card base and then I just cut part of the way around it on my image panel so the door remained attached and could be opened. I used the white door that was cut out to use as a pattern for the acetate that was attached inside the door that opens.


The tree was adhered inside so it lined up behind the door.
 

Here's the inside with a greeting and a few presents.


And here's one more card with this set... with the truck and sweet pup!


Have a great day!
Diane