Showing posts with label Birthday Borders. Show all posts

Monday, November 2, 2020

Calorie Free


Hello Sweet 'n Sassy stampers! 
It's Ceal, here with you today to share a couple cards with you.
Sorry I am late, I had a super busy weekend and missed the fact that I was supposed to post here today. 

So, it's our birthday month and we have lots of fun in store for you. 
My cards use a new release, Humorous Birthday Innies which I used on the outside lol. I paired it up with an older set, Birthday Borders for the backgrounds on both cards. 

I just love the sentiments of the Humorous Birthday Innies set.


Monday, October 5, 2020

Birthday Fun


Hello Sweet 'n Sassy Stampers!
It's Ceal, Today is my day to to share with you. 
I can always use birthday cards in my stash and because I have been out of town all week and needed a couple of quick and easy cards to share here today. 
To create these cards I used top folding white card bases and panels. I stamped the images from the Birthday Borders set, then colored them using Copic markers. Both of the greetings were stamped from the Sentimental-Mash-up set. 


These are a quick and easy way to add birthday cards to your stash

Monday, February 17, 2020

Birthday Borders


Hello Sweet 'n Sassy Stampers!
It's Ceal, here today to share a couple cards with you using the Birthday Borders set. This set isn't just for birthdays I have made Valentine cards with it and now a retirement card. 


To create the first card I started with a white top folding card base and a white panel. I stamped the cupcakes from the Birthday Borders set, colored them using Copic markers and then masked them off to create the background around them. The sentiment on this card is from the Scripty Thoughts set. 


The second card I created a retirement card using the Birthday Borders set. I started with a white top folding card base, a panel of Black Onyx for the mat and a white panel. 

I randomly stamped the confetti image from the Birthday Borders set using my favorite embossing ink and white embossing powder and then created a rainbow background with the Life Changing Blender Brushes. I added a sentiment from the Sentimental Mash-up set along with some die cut balloons to finish the card.


Wednesday, February 12, 2020

February New Release Blog Hop + Giveaway

Welcome to our February Release Blog Hop!

We've got a spring in our step with the new February release and are so excited to share the projects we've been working on with you! Read on for a bit of inspiration and a little walk through of our new release, then hop along to the blogs linked below for all sorts of papercrafting inspiration.

Plus, there's a GIVEAWAY! Leave a little shout out in the comment section on each stop along the way for a chance to win a $10 gift voucher to the Sweet 'n Sassy Stamps shop. Winner will be announced here on the SNSS blog, Wednesday, February 19.


Here's the official hop list. If a link misbehaves along the way,
hop on back here to pick  up where you left off.


February is my big masculine birthday month with both hubby and my dad celebrating around Valentine's day.  I was so excited to see the  Birthday Borders set in this release, along with a more masculine themed sentiment builder set in the Sentimental Mash-up set.  The Birthday Borders comes with 4 border stamps. They're repeating patterns, so they're easy to match up to extend further if you want. Or in my case, it made the decision to do a little stamp surgery easier!


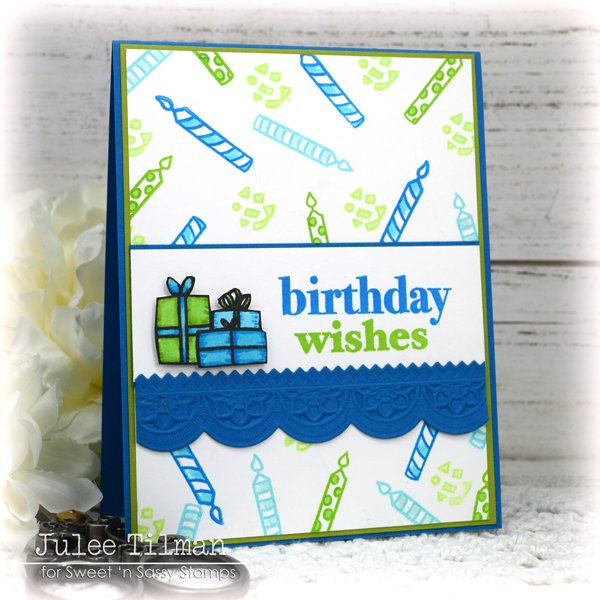
I cut the last three candles from the candle border individually as well as the final cluster of confetti from that border strip and then proceeded to stamp them randomly in blues and greens as the background for my card.  Next I stamped the presents border and colored with Copics.  I fussy cut just the first section of presents to pop up on my card.  I stamped the birthday and wishes stamps from Sentimental Mash-up on a white panel, then matted with blue and added a die cut border to finish things off. Easy peasy!

Korin made some absolutely adorable cards with our new alpha set. I love how the SNSS alphas are the perfect size for cardmaking as well as journaling!


In this gorgeous notecard, she pairs the new Springtime set with the Loop da Loop Alpha and Lots of Love.  A few ink splatters and a doodled frame and this card is ready to hit the mailbox!


If you watched Korin's fun live stream during our Winter Stamp-a-thon you might have seen how she made this totally rad watercolor card.  The card features Loop da Loop Alpha, Love Wordfetti, Vintage Love, Texture Tiles 5, and Texture Tiles 1. Isn't it fabulous?


Aren't these sweet little Valentiness from Guest Designer Jill Holdorf featuring the Loop da Loop Alpha just so cool? Love those layered hearts!


Okay, the next stop on the hop is my blog, Poetic Artistry

Here's a little look-see at the sets included in the FEBRUARY release...

First up is the January stamp of the month, Sentimental Mash-upOur February stamp of the month is another must-have in your stamping collection. It includes a lovely collection of builder sentiments in mixed-fonts that are perfect for both masculine and feminine creations. This set is available for purchase for $15.95, OR you can get it as a FREE gift with a $75 purchase (after any discounts and before shipping and tax) during the month of February! Just add it to your cart and the discount will automatically apply once you've qualified.


Jenn Nilsson brings spring to life with her adorable Springtime set. Chicks, rain boots, an umbrella, and flowers, now all we need is winter to go away!


Dragonfly Dreams indeed! This set by Korin is just so breathtaking. The definition on the wings and bodies is amazing!

Our Creative Worship set this month is the whimsical Loop da Loop Alpha from Rebecca Rios. These sketchy scripted letters are so much fun!


Our final set for February is the fun Birthday Borders set from Korin. Balloons, cupcakes, confetti, and presents... who's ready to celebrate?


That's our February Release in a nutshell! So many fabulous sets to choose from! What's your favorite? 


May you be blessed today and always!

Tuesday, February 11, 2020

Happy Birthday

Hello Sweet Friends!  Sheri here today with a CAS (clean and simple) birthday card using the NEW Birthday Borders.  It also features a sentiment from this months Stamp of the Month, Sentimental Mash-up set.  This set is FREE with any $75 order.

***THIS POST CONTAINS AFFILIATE LINKS AT NO ADDITIONAL COST TO YOU***

I'm always looking for stamps in my collection that can be used for Teens and Masculine card designs and the Birthday Borders and fonts in the Sentimental Mash-up sets both fit that bill.  I also find that CAS card designs are also perfect.

For my card I stamped the candles with copic friendly ink and colored them in a rainbow order.  I also added a little glossy accents to the flames and used a Spectrum Noir clear glitter pen to add a little sparkle to the candles.  I finished off the card by stamping a birthday sentiment and added a couple coordinating enamel dots for embellishment. 


http://shrsl.com/1p6qi  http://shrsl.com/1p6qi


Happy Stamping!!

Monday, February 10, 2020

Shape Cards & Birthdays


 Hello everyone! Today I'm sharing two fun cards featuring three newly released Sweet n Sassy stamp sets! For my first creation I decided to make a mini shape card using the Springtime set. If you look closely you'll see a bit of white ink smeared on my black circle to create a chalkboard effect.  (The second photo shows it up better.)

~~~This post contains affiliate links at no extra cost to you~~~
Supplies and tools:
  • Springtime (Sweet n Sassy Stamps)
  • Canson Mixed Media Paper
  • Sonnet Water Colours
  • Prismacolor Pencils
  • Petals and Blooms Paper Stack (The Paper Studio)
  • Teardrop Circles Dies (Spellbinders)
  • Circle Nestabilities (Spellbinders)
  • Small Scallop Circle Nestabilities (Spellbinders)
  • Crochet Dies (Sizzix  - Tim Holtz)
  • Christmas Quilt Embossing Folder (Couture Creations) 
  • Brilliance Moonlight White Ink (Tsukineko) 
  • Versamark Watermark Ink
  • White Embossing Powder
  • Black Embossing Powder
  • Baker's Twine


My second card is a bright and cheerful birthday card using both the Birthday Borders and Sentimental Mash-Up sets. I used gel pens to color in my confetti - just to make it a little more fun and exciting looking! 


 Supplies and tools:


Friday, February 7, 2020

Springtime ATC Coins

Hi Sweet 'n Sassy Friends! It's Julee Tilman popping in to share a little of what I've been creating with the new release.

During our Winter Stamp-a-thon, Lyn's challenge was to make ATC Coins, which are 2.5" circle pieces of art you can trade with other artists. I didn't have time to create any during the challenge window, but couldn't wait to try them out once I found a little me time!


At the end of the session I had six ATC Coins. I started with a 8.5 x 11 piece of cardstock and coated with one layer of gesso to prime it for paint.  Then I squirted on some distress paint in chipped sapphire, evergreen bough, salty ocean, and tumbled glass, blending in with my fingers.  I then added some brick stenciling randomly across the page with white Dylusions paint.  Once this was dry, I randomly added bits of stamping using the Texture Tiles 1 set and archival ink.  When everything was dry, I cut six circles from the page with a 2.5" circle die, placing the die where I thought it would give the most interest.  These top two coins are made with the Birthday Borders set and have already been sent out for trade!  The sweeter sentiment is from the So Sweet Cocoa set and much love is from Sentimental Mash-up.


The rest of my coins use the adorable new Springtime set. I stamped the butterflies and boots a few times on cardstock, then colored with Copics and fussy cut.  For the spring has sprung coin, I then colored in the white space on the image cut out so it appeared more natural. I softened the  coin up a bit with some white stamping with the hearts from Texture Tiles 5, then stamped my sentiment in archival ink.  The dream big sentiment is from Dragonfly Dreams and I stamped the butterfly in archival ink directly on the coin, then cut out the butterfly I had colored minus the antennae and popped up the wings.


The thinking of you sentiment is from Birds & Blooms and I used the same treatment with the butterflies, adding a bit of thin washi tape to break up my design.  My final coin uses the lovely boot image and I paired it with a sentiment from the Sentimental Wordfetti set.

I traded a couple of these, but also thought they would work great on card fronts, so created a couple cards using them.


For this one, I matted the coin with a black scalloped circle, then divided my pattern paper in half, adding a die cut border to break things up.  I stamped the flowers from the boot image at the bottom and lightly colored in, then added a few more butterflies to finish off the card.


My second card uses the same scalloped circle to mat the coin, but a few more layers of patterned paper.  I stamped one with the dots from Texture Tiles 5 and then finished off with a butterfly accent.

Thanks so much for stopping by today! I hope you have a fabulously creative day!

***This post contains affiliated links at no cost to you ***

Thursday, February 6, 2020

birthday borders

Good morning! Today I have some cards to share with some border images and sentiments from the new Birthday Borders and Sentimental Mash-Up stamp sets from this month’s release at Sweet ‘n Sassy Stamps. First I used a portion of the row of candles. I stamped them with gray ink so I could stamp the birthday word over top in black. They were colored to coordinate with the patterned papers. Then a single cupcake from the row of cupcakes was popped up.


For the second card, I repeatedly stamped the row of balloons in pink for a background. Then I stamped balloons again onto various scraps of the same patterned papers to adhere over several of the balloons.


Have a great day!
Diane


Tuesday, February 4, 2020

Birthday Borders and More

Hello Friends!

Today I am sharing cards using the new Birthday Borders Stamp Set.  Best thing is, this set is not just for birthdays!
What's Valentine's Day without sweet treats?


The cupcakes are perfect for your Valentine Day cards, especially with the adorable little hearts on top of the cupcakes.  I colored the image with Copics and then fussy cut it out.  I added three 1.5" panels of cardstock in ombre teal colors to my card base.  I added some detail to the edges of the strips with a stitched edge die.
The heart was die cut from white cardstock and adhered to the panels.  I stamped the sentiment, which is from the Lots of Love Stamp Set in Versafine Black Ink using my MISTI.  The cupcakes were popped up on foam tape and adhered to the card.  A few sequins were added to finish.

Next up are those fabulous balloons.  I seem to have a thing for balloons lately...


Before doing any stamping, I painted a light wash of yellow watercolor paint (I used Ken Oliver Color Bursts), along with drips on my watercolor paper panel (I used Canson Watercolor Paper).  
I stamped the balloons using Versafine Black Ink.  I created a mask for the balloons and stamped the image 2 more times to the top of the panel.  I then stamped 4 of the balloons from the row.  They were later fussy cut out.  Stamping was done with the MISTI so I could stamp over the image multiple times, which is necessary given the rough texture of watercolor paper. 
The balloons were water colored with Arteza Brush Pens.  I added strings to the balloons using a 01 Pigma Micron Pen.
I added splatters in orange and teal with Ken Oliver Colorbursts.  The sentiment is from the new set, Sentimental Mash Up.  I love this set!  You get so many options and so many fonts; it is a super fun set.  Even the name is fun!  This set also happens to be the February Stamp of the Month.


And being the beginning of the month, you can take advantage of the February Release Early Bird Bundle!

That's it for me!  I hope I have inspired you to craft today!

Lee Ann 

Monday, February 3, 2020

Conversation Hearts


Hello Sweet 'n Sassy Stampers! 
It's Ceal, here to share a couple Valentine cards with you today.

The first card uses an older set Heart Candy. I just love this set with the conversation hearts. I use to buy these also as an adult until the Necco company went out of business and now there are only the Brach ones which aren't as good. To create his card, I simply stamped the heart candy to cover the card front.


My Second card uses some newer sets in fact it uses one of our February releases, Birthday Borders.  I stamped the sweet kitty from the Lots of Love set using Copic friendly ink and colored it using Copic markers.  I used the Birthday Borders set to create the  bundle of balloons the he is carrying.