Showing posts with label Forest Silhouette Dies. Show all posts

Thursday, November 4, 2021

heartfelt thoughts

Good morning! If you haven't heard, Sweet ‘n Sassy Stamps is having a birthday and celebrating with weekly sales and releases all month long!


This week, save 20% on all Birthday and Sentiment sets! There are 2 new stamp sets released this week... here I used the Heartfelt Thoughts sentiment set (the November 2021 Stamp of the Month). I also used Pinecone Background and Forest Silhouettes Dies. I kept this card CAS...black & white with a pop of red.


Have a great day and be sure to check back each week for sales and new releases!
Diane


Wednesday, January 27, 2016

Forest Silhouettes Scene

Hello! It's Monika here today with a fantastic scene I built with dies. I love stamping, but these days I am crazy about dies. I love the sharp lines the dies can cut, the sweet images... oh, I get so excited looking at my box full of these metal pieces.
 
I decided to create a masculine scene for a frame I got at Ikea ages ago.
 
 
I wanted dimensions so I used different colored cardstocks and lots of foam adhesive.


The background was sponged with Peacock Feather Ranger distressed ink, then was blended with a wet paintbrush.

Can you spy all the different die sets I used? Ok, you don't have to guess... here they are: Forest Silhouettes, Bare Tree, Fence & Grass, Hillside Edges die sets. The verse is from Our Refuge clear stamp set.
 
I hope I inspired you to create something.
Thank you for stopping by,
Monika


Saturday, January 3, 2015

winter ATC frame

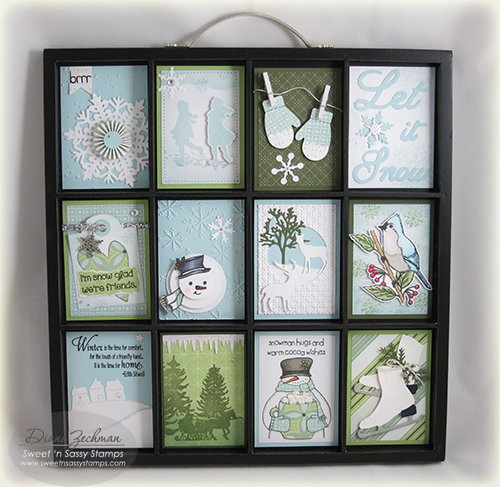
Hello friends! I have a special project to share today that I made for a Christmas gift. I wanted the recipient to be able to enjoy it all winter long, though, so I went with a snowy/winter theme. Each little card in my frame is ATC size (2 1/2 x 3 1/2 inches) and I used lots of my favorite Sweet 'n Sassy stamps and dies.

SNSS ATC frame diane zechman
I wanted to be able to switch out the ATC's for each season/holiday or whatever theme I want...so they were attached in the frame with Removable Glue Dots. I found these to work perfectly for the right amount of adhesion needed, yet still be able to be easily removed.
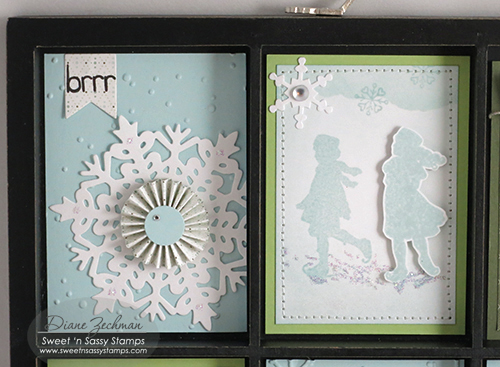
Here's some close-ups of each ATC. For the first one I scored and folded a rosette and centered it onto a Sweet 'n Sassy Large Snowflake diecut. The "brrr" is from my Snowman Soup stamp set.
The second one has some stamped skating friends from the SNSS Winter Silhouettes stamp set, with one popped up for dimension. There's a few tiny snowflakes from my Snowy Hello stamp set lightly added to the top. The edges of this one were stitched on my sewing machine.
SNSS ATC frame 2 diane zechman
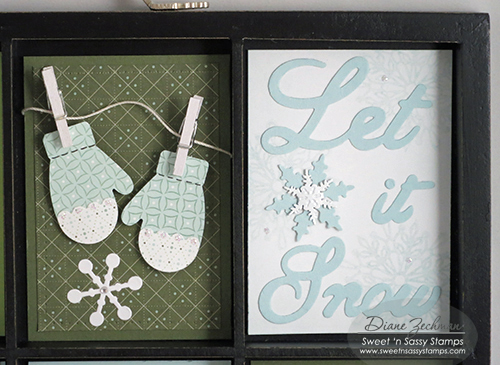
The mittens were made with a punch I had and the white tiny clothespins came from Michael's.  Crochet thread was perfect for the string.  I faintly stamped snowflakes in the background of the Let it Snow words from the Spectacular Snowflakes stamp set.
SNSS ATC frame 3 diane zechman
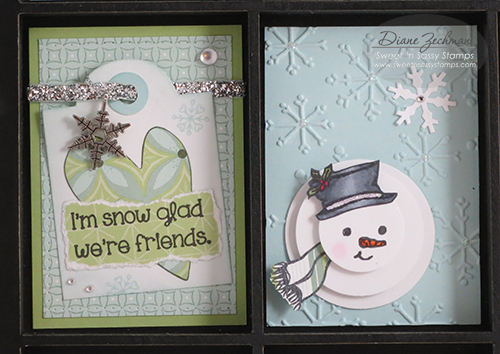
On the left, below, I used one of the Bookmarks & More dies to create a tag. The heart was cut from the Heart dies and the tiny snowflakes and words are from my Snowy Hello set.
On the right, 3 circles were punched and popped for dimension. The snowman's face, hat and scarf are from the Warm Hello stamps.
SNSS ATC frame 4 diane zechman
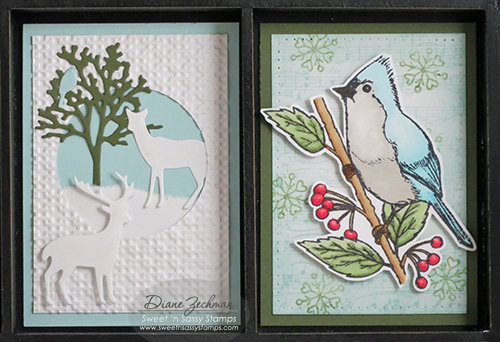
The tree, deer, and bird, below are from Forest Silhouettes dies. On the right, I lightly stamped the Music Background. More Snowy Hello flakes were stamped (this time in green) and the bird from Peace of God was popped up.
SNSS ATC frame 5 diane zechman
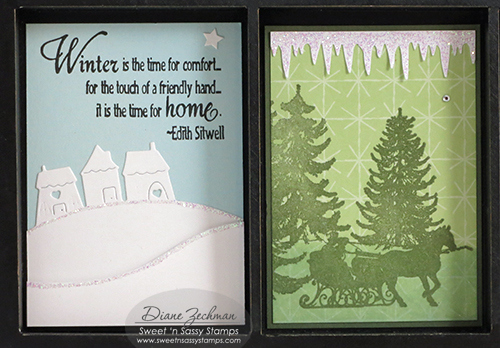
The Hillside Edges dies made a cute snowy scene and the words from Winter Silhouettes went with it perfectly.  For the next one, I stamped the sleigh ride image from one of my fave Christmas sets, Old Fashioned Christmas.
SNSS ATC frame 6 diane zechman
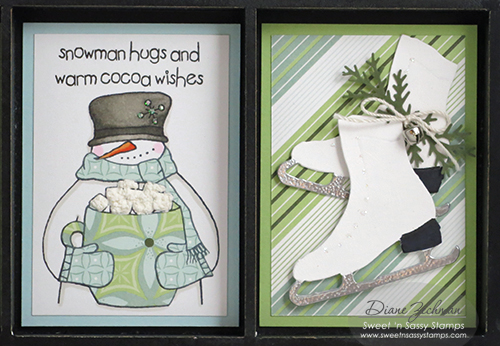
The words and snowy fella below, drinking hot cocoa, is from my Snowman Soup set. The mug, scarf, and mittens were paper pieced. Then I applied a Puffy Velvet Fabric marker (like Liquid Applique) to the marshmallows and heat them with a heat tool to puff them up.
The skates are a die I had. The blades were heat embossed with silver e.p. and the branches, along with a tiny jingle bell, finished them off.
SNSS ATC frame 7 diane zechman
Lots of glitter and bling were added to each one to make this frame sparkle!
Have a great start to the New Year...thanks for popping in! 
Here are the Sweet 'n Sassy products that I used...
♥ Diane

Saturday, October 18, 2014

Happy Birthday, deer.


Good afternoon!

Jessica here with a masculine card that I made using a couple of SNSS dies: Forest Silhouettes and tall grass.  The sentiment is from the Forest Silhouettes stamp set.  I die cut the grass out of vellum and then embossed it on the card front for added texture.


Hope this CAS card gives you an idea for a card for those guys in our lives who love hunting and nature!

Have a great weekend!
Jessica

Tuesday, October 14, 2014

I will Say of The Lord ~

Good morning Sweet'nSassy friends! Mary here to share with you my love for Fall, the crisp air and falling leaves. So naturally my card takes on a fall theme. I paired my images with a scripture  from Our Refuge, any scripture that tells of Who He is becomes a favourite. The Leaf silhouette set and matching die brings balance to my favourite moose die image from Forest Silhouette dies. 
Materials Used:
Stamps: Our Refuge, Leaf Silhouette
Paper: Basic Grey, SU
Inks: Versafine inks, Ranger inks
Accessories: Jute, SNSS forest silhouette dies, SNSS Leaf silhouette dies.

Enjoy your Fall days! Have a great week! 

Wednesday, September 17, 2014

Many Thanks.........

Hello friends!  Jacquie here to share with you!  I thought I would share one of my FAVE September Release creations!

I used the Forest Silhouettes Clear Stamp Set and the matching Forest Silhouettes Die Set for this project.  These are a GREAT pair, as they really make card making simple.  I stamped my trees with Versafine black ink, made a little snow with a sponge of Danube Blue Memento ink, and finished off my base with a little clear Stickles.  Have to have some sparkle for the snow, on the ground and the trees!

Once all that was ready, I stamped my bird in Black Versafine, cut it out with the matching die, popped it up with foam tape, and added my sentiment.  Lastly I added a silver ribbon and voila!  A simple thank you card for a guy or a girl!

Hope you enjoyed my creation!  I look forward to seeing what you all create with our NEW September Release stamps and dies!

Have a WONDERFUL day!


Tuesday, September 16, 2014

Leaves and Forest Silhouettes~

Good morning everyone! Mary here to share some leafy inspiration! Korin recently released some amazing new dies for current sets available in the store.
 
My first card is using the leaf silhouettes and newly released matching leaf silhouette dies! I layered these squares onto the leaf skeleton background that is perfect for quick colourful and textured coverage.

The second card is using the falling leaves stamp set with the Forest silhouette dies! I love the look of these images against the sponged background. For the "floor" I sprinkled some stampendous embossing fragments, tinsel and powders and melted them all together. I adhered the deer to the floor with the leaves falling gently. So serene.

Have a wonderful Day!

Materials used: 
stamps: Falling leaves, Skeleton leaf BG, Leaf silhouettes
Paper: SU 
Inks: Versafine inks, SU inks, Ranger distress inks
Accessories: Stampendous powders, SU punch

Sunday, September 14, 2014

Autumn Greetings

Hello! It is Gloria with you today. Wasn't that a GREAT September Release on Friday? What a sweet collection of autumn-themed stamps and dies!

I made a simple tag and pocket project to share with you today, using some of the new goodies!


I found this kraft envelope, (3 1/2 x 6 inches) in my stash, and I made a gift card and tag holder out of it. I rubbed the edges with ink, and then I stamped the leaves from the Falling Leaves stamp set in various colors of orange, red, and gold ink across the center of the envelope.

I die cut the tree from the Forest Silhouettes die set out of brown cardstock and "planted" it to look like the leaves had fallen off the branches. I cut the fence from the Fence and Grass die set out of cream cardstock. I rubbed the fence with a bit of tan ink and added it to the envelope with foam squares.

I stamped the sentiments from the Autumn Mum Greetings stamp set onto gold paper with brown ink. I trimmed the sentiments to look like signs and added them to the envelope with foam squares.


To make the matching tag, I trimmed a Graphic 45 kraft tag a tiny bit on each side to make it fit into my envelope. I rubbed the edges with ink and stamped the sentiment from the Autumn Mum Greetings stamp set with brown ink in the center of the tag.

I used the leaf dies from Leaf Silhouettes die set to trim out a few paper scraps. I rubbed the leaves with ink and added them to the corner of the tag. I tied some ribbon and twine to the top of the tag. The back of the tag is blank to enable me to add a gift card or write a message. 

Thanks for looking!

Gloria

Friday, September 5, 2014

One SWEET PERK and an Open House

Hello Sweet 'n Sassy friends!  Happy Friday!  I hope you have all been having a wonderful week!  This has been a very busy week at the Sweet 'n Sassy Studio!  The response to the Sweet Perks Club has been phenomenal and for that we are grateful.  
Thank you for your overwhelming support of this new venture!


BUT there is only one week left to take advantage of the September SWEET deals this club has to offer.  After Thursday, September 11th all of the bundles become available as single items at the regular price…just in time for the new release!    Here is a card that was created using dies from two of the new bundles…Forest Silhouettes and Leaf Silhouettes:


We are also very excited about our OPEN HOUSE this weekend.   
Tonight, from 6:00 - 9:00pm EST and again tomorrow, September 6th from 10:00 - 4:00pm EST, the Sweet 'n Sassy Studio will be opening it doors to YOU!  We will have light refreshments and a Make and Take table, so if you are in the area, please stop by to say hello!

Sweet 'n Sassy Studio
69 Ridge Drive
Mohrsville, PA 19541
(717)202-5496

One more thing before I go…Our new release will be revealed on the Sweet 'n Sassy Stamps Forum at Splitcoaststampers on Thursday evening, September 11th from 8:00 - 10:00pm EST.  Then, on Friday September 12th, we hope you will join us on the Sweet 'n Sassy Stamps Blog for our Release Blog Hop and Challenge!  Here's just a little sneak peek of what you can expect to see:


 Thanks so much for stopping by…have a blessed day and a wonderful weekend!