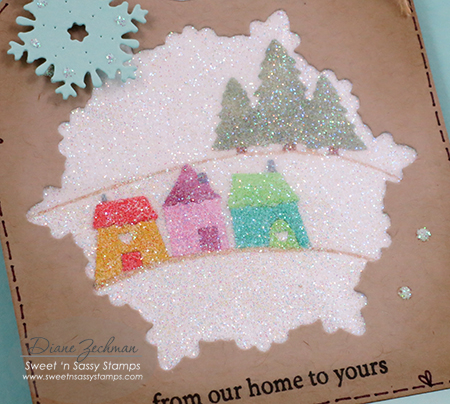
Today I have a snowy tag using the Sweet 'n Sassy Hillside Edges dies, Spectacular Snowflakes dies, Small Snowflakes dies, and Christmas Silhouettes stamp set (sentiment). The snowy scene was created with an old technique using packing tape and ultra fine glitter.

To create this tag, I started with a 3 1/2 x 8 1/2 inch piece of cardstock and scored it at 4 1/4". The fold will be at the top of your tag.
To make the tag shape, I cut a 1 inch square in half diagonally and traced one of the pieces on each top corner and cut on the traced lines.
Next I diecut the second largest snowflake die (Spectacular Snowflakes dies) from the front of the tag.
At this point you can decorate the "inside" of the tag however you want. I used the Hillside Edges dies and colored them with markers.
Now the fun part...adhere clear packing tape to the inside of the front layer, making sure you completely cover the diecut opening. Then apply ultra-fine glitter to the front of the tag (it will stick inside your diecut window where the packing tape was placed).
Adhere the front to the back with double-sided tape (Scor-Tape works great!) and finish as desired. I used a Small Snowflake diecut and a sentiment from Christmas Silhouettes.
Thanks for visiting our blog...have a wonderful day!
♥ Diane


1 comment:
wow!! It took me a minute of processing & re-reading about the clear packing tape "get it", I'm a bit slow this morning but I "got it" now! Very cool technique and effect, I love it!! I will have to try this today! I've yet to start making my Christmas cards so these ideas are inspiring. :)
Post a Comment