Showing posts with label tags. Show all posts

Monday, August 22, 2022

Back to School Tags


Happy Monday! Esther here today sharing some fun tags I created to attach to gifts I'm giving out to my Sunday School kids to celebrate going back to school this fall. 
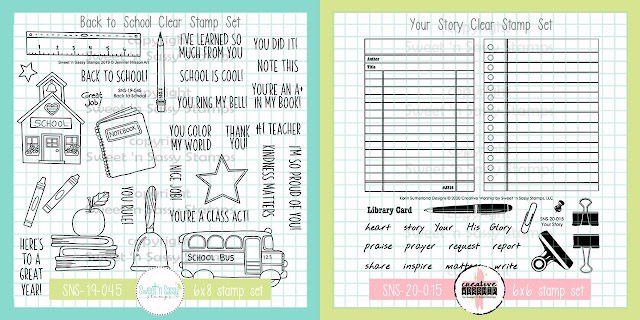
I started by stamping the library card from Your Story in Versafine Clair Nocturne Ink on white card stock and cutting them out. Next, I stamped a bunch of images from the Back to School stamp set on mixed media paper and colored them with Arteza Real Brush Pens. After fussy cutting (because I don't own the Back to School coordinating dies --- yet!), I arranged them on my library cards and stamped various school related sentiments at the top. Each tag has a personal message from me on the back.
~This post contains affiliate links at no extra cost to you~~~


Tuesday, June 15, 2021

Florals and More

 Hello! 

Have you been enjoying all of the June release inspiration?  

Being the floral lover that I am, I could not resist another card using the new Botanical Branches as a filler.  


I used the pussy willow stems from the Botanical Branches Stamp Set, coloring them in gray with Copics.  The roses and leaves are from the True Beauty Stamp Set and were colored in grays and yellows.  Gray and yellow. The color combination has to be one of the most perfect combos there is!  

All of the images were fussy cut out. An embossing folder was used on the background panel.  All of the pieces were put together and adhered to the card front.  The sentiment is from the Encouraging Thoughts Stamp Set; It was stamped on a grey sentiment strip.  A few sequins finish the card. 

I liked this grouping of images so much that I recreated it in tag form.  I needed this tag for a Bible study I will be starting.  I am not usually one for tags, but something about this was freeing!  


My tag was first sponged with distress inks in various shades of green.  Next, texture was added to it but using a darker green with the Fern Fronds Stencil.   Lastly, I spattered a bit of white acrylic paint on the background. 

Then I used the same rose from the True Beauty Stamp Set and colored it with Copics after stamping with Memento Tuxedo Black Ink.  The branches are again from the new Botanical Branches Stamp Set and were colored with Copics.  Everything was fussy cut out.  I added a bit of vellum to the bottom right corner just to soften things a bit then arranged the elements and adhered them to the tag.  I finished the tag off with my printed steps and hand lettered title.  A couple of ribbons finish it off.  

That's it for me!  Thanks so much for stopping by and have a blessed day!

Lee Ann  

Monday, November 23, 2020

Christmas Tags -- SALE


Hello everyone. Esther here with some warm and cozy Christmas tags using two silhouette stamp sets. I stamped the trees, snowflakes, and sentiment on kraft tags and then sponged around them using brown ink to give them a vintage feel. The little houses were stamped on watercolor paper and fussy cut. I also sponged some brown around their edges so they wouldn't be too bright for my tags. Adding snow was quick and easy with a bit of diluted white acrylic paint.

Have you been following along with Sweet n Sassy's 13th birthday celebration sales this month?  The special for this week is Silhouettes and Sentiment sets --- Buy 3 get one FREE!!!

Check out all the stamps on sale by clicking here! 

~~~This post contains affiliate links at no extra cost to you~~~

 Supplies and tools:

  • These Sweet n Sassy Stamp Sets
  • Manila Tags Nesting Dies (Stamplorations)
  • Crochet Lace
  • White Acrylic Paint
  • Graphite Black Brilliance Ink (Tsukineko)
  • These colors of Distress Oxide (Ranger):
    • Candied Apple, Fired Brick, Pine Needles, Fossilized Amber, Tumbled Glass, Vintage Photo

Wednesday, May 18, 2016

Sweet on You and Baked with Love


 Happy Wednesday Sweet 'n Sassy Friends!

It's Susie here to share a card and also a tag using the 
Baked for You clear stamp set. 

For my card I thought it would be fun to feature some of the yummy baked goods and add the sentiment, sweet on you.  While I was all sorts of inspired, I decided to make a tag too.  I used the sugar canister and the oven mitt along with the baked with love sentiment.  I used my Silhouette Cameo to die cut all of the stamped images.

Here is a look at the stamp set so you can see what's included:


Have a fantastic day and hold tight for more great creative team projects.

Susie

Sunday, December 14, 2014

snowy scene tag

Christmas will soon be here...are you ready? I hope you are enjoying the holiday preparations. May you have peace and joy as we celebrate the true meaning of Christmas!

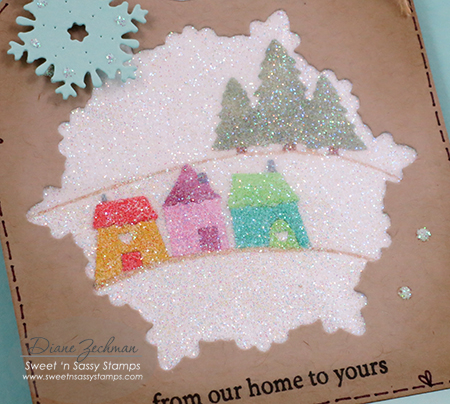
Today I have a snowy tag using the Sweet 'n Sassy Hillside Edges dies, Spectacular Snowflakes dies, Small Snowflakes dies, and Christmas Silhouettes stamp set (sentiment). The snowy scene was created with an old technique using packing tape and ultra fine glitter.

hillside edges tag diane zechman

hillside edges tag close diane zechman
 
To create this tag, I started with a 3 1/2 x 8 1/2 inch piece of cardstock and scored it at 4 1/4". The fold will be at the top of your tag.
 
To make the tag shape, I cut a 1 inch square in half diagonally and traced one of the pieces on each top corner and cut on the traced lines.
 
Next I diecut the second largest snowflake die (Spectacular Snowflakes dies) from the front of the tag.
 
At this point you can decorate the "inside" of the tag however you want. I used the Hillside Edges dies and colored them with markers.
 
Now the fun part...adhere clear packing tape to the inside of the front layer, making sure you completely cover the diecut opening. Then apply ultra-fine glitter to the front of the tag (it will stick inside your diecut window where the packing tape was placed).
 
Adhere the front to the back with double-sided tape (Scor-Tape works great!) and finish as desired. I used a Small Snowflake diecut and a sentiment from Christmas Silhouettes.
 
Thanks for visiting our blog...have a wonderful day!
♥ Diane


Sunday, September 14, 2014

Autumn Greetings

Hello! It is Gloria with you today. Wasn't that a GREAT September Release on Friday? What a sweet collection of autumn-themed stamps and dies!

I made a simple tag and pocket project to share with you today, using some of the new goodies!


I found this kraft envelope, (3 1/2 x 6 inches) in my stash, and I made a gift card and tag holder out of it. I rubbed the edges with ink, and then I stamped the leaves from the Falling Leaves stamp set in various colors of orange, red, and gold ink across the center of the envelope.

I die cut the tree from the Forest Silhouettes die set out of brown cardstock and "planted" it to look like the leaves had fallen off the branches. I cut the fence from the Fence and Grass die set out of cream cardstock. I rubbed the fence with a bit of tan ink and added it to the envelope with foam squares.

I stamped the sentiments from the Autumn Mum Greetings stamp set onto gold paper with brown ink. I trimmed the sentiments to look like signs and added them to the envelope with foam squares.


To make the matching tag, I trimmed a Graphic 45 kraft tag a tiny bit on each side to make it fit into my envelope. I rubbed the edges with ink and stamped the sentiment from the Autumn Mum Greetings stamp set with brown ink in the center of the tag.

I used the leaf dies from Leaf Silhouettes die set to trim out a few paper scraps. I rubbed the leaves with ink and added them to the corner of the tag. I tied some ribbon and twine to the top of the tag. The back of the tag is blank to enable me to add a gift card or write a message. 

Thanks for looking!

Gloria