Supplies:
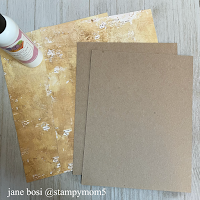
Chipboard 7 x 9 (2)
2 ½ x 9
Designer Paper 8 x 10 (2)
3 ½ x 10
Cardstock for boxes 4 x 7 (24)
Other Scissors
Scoring Tool
Adhesive (tape and glue)
Stamps
Ink
Circle punch (optional)
Creating the Calendar “Book” Base
Step One: Cover all chipboard pieces with designer papers. Be sure to miter corners as shown below.
Complete the larger pieces with an additional piece of designer paper or cardstock, measuring just slightly smaller than the 7x9 dimension of the cover pieces, to finish the front and back of each. You will not need to do this for the smaller spine piece. See step two.
Step Two: Adhere the smaller covered chipboard piece in the center of the spine foundation piece. This piece, along with the two covers, forms the book-like base for your project.
Step Three: Working on the backside of the spine section, place adhesive on each edge and adhere the covers.
Decorate the front cover and set aside, moving on to creating the individual boxes.
Step One: Score, on the long side of each 4 x 7 cardstock piece (24) at 1”, 3”, 4” and 6”
Rotate the cardstock and score again at 1” and 3”
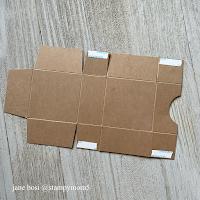
Step Two: Trim scored lines and corresponding flaps as shown below. If desired, you can create a half circle notch on one end flap with a circle punch. I used a 1 ¼” circle punch.
Step Three: Place adhesive on the front and back flaps as shown.
Step Four: Fold and adhere each box (24) as shown.
Putting It All Together:
Step One: Adhere each box to the base. I use a wet adhesive rather than tape for this step. It is faster and I can get better overall coverage. Pour a liberal amount of adhesive on your non-stick surface and dip each box bottom in for complete coverage from edge to edge. As seen in the photo, the box bottom is the piece with the notch. The three flapped piece is the cover—which I have begun to decorate with the red cardstock square.
I apologize for this partial picture, but you still get the idea. You will adhere 12 boxes on each cover; four rows of three boxes. Be sure to leave enough space between the rows so you are able to open each box. I place a glass mat on top of the boxes while the glue dries to insure each box is well secured.
While the glue dries, decorate the box covers, numbering them from 1-24.

Adhere the numbered decorative pieces to the box tops in a random order. Fill each box with a small treat, toy and/or scripture verse.
This is really a fun project! I sure hope you give it a go! Tag me @stampymom5 when you do--I'd love to see your work!


No comments:
Post a Comment