Showing posts with label Christmas Wordfetti. Show all posts

Monday, July 11, 2022

Christmas SALE!!!


Esther here today with a Christmas card all done up in classic blue and white. I used chipped sapphire distress ink for all my stamping and even colored the die cut heart and background matting with it as well.This week is our annual "Christmas in July" sale with all the Christmas and winter themed items 20% off using coupon code: festive22. 

Click here to go the Christmas Sale page.


     ~~~This post contains affiliate links at no extra cost to you~~~

Supplies and tools:

Saturday, October 16, 2021

A Trio of Christmas Cards

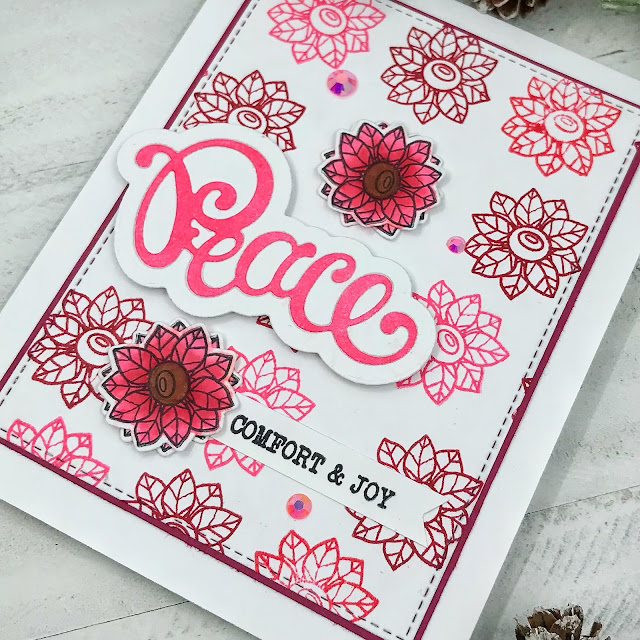
Happy Saturday Everyone! I created some backgrounds a couple of weeks ago using the brand new Warm Winter Friends. I just love the sweet animals and other images in this set! I decided to utilize the flower in the set to create my trio of backgrounds.


For my first card, I created the background by inking up a white A2 panel with ballet slipper ink and then stamping the flower over it with cranberry ink. I die cut the panel and layered it on a lacy edge rectangle die cut. I stamped the rabbit with Versafine Clair Nocturne ink and colored with Altenew Artist Markers. I decided it needed something more, so I added in a white snowflake. 


For my second card, I created the background by stamping the flower on a white cardstock panel with festive berries distress oxide ink, honeysuckle and cranberry dye ink. I die cut the panel and cut a mat from purely pomegranate cardstock. I stamped the flowers multiple times on white, colored with honeysuckle and cranberry inks and die cut out. I decided to glue two flowers together to create a bit of depth and texture. 


I started my third background by inking up the white panel with honeysuckle, stamped the flower with cranberry and then stamped the text background over the top in black. At this point, my third background became a hot mess because I decided to use a stencil with white ink over it. In my mind it worked, but in reality it did not.

I did not like it at all, so I took a baby wipe and wiped it off. Now it was very faded and I was at a loss for what to do. I made another oops too, but you can't see it in the photo so we are not going to talk about it. I searched for a layout and decided to utilize an older Freshly Made Sketches sketch challenge. 

I added some white splatters to the panel, cut the panel down to a square and used purely pomegranate cardstock again for the mat and long strip. I used a leftover flower from my other card and added some white gel pen dots to the center to mix it up a bit. Ta-da, I managed to salvage the background! Whew!


Here are the background panels before I turned them into cards. The top panel is the one I added the text script too.


I used the same sentiments for each of the cards and here are pictures of how I did the peace one. I cut a base for each one in white, then nested the die pieces together and cut again in white. Next, I inked up white cardstock in three different colors and die cut just the word peace. Finally, I glued them together as seen in the photos. I decided not to waste the extra inked up cardstock and used some heart dies for future cards.


These cards fit our October Sweet 'n Sassy stamps VIP Group challenge, Think Pink. We would love to have you join us in the group and play along.


Warm Winter Friends

Peace & Joy Word Dies

Christmas Wordfetti

Christmas Text Background

Large Snowflakes Die Set


I hope you enjoyed today's cards and thanks so much for stopping by!

Karen (click my name to follow me on Instagram)

Wednesday, October 6, 2021

Peppermint Stripes & National Coffee Day Hop Winner


Hi friends! It's Julee sharing some of my first makes with the Peppermint Stripe Stencil I designed for our October release. I'm a huge fan of peppermint and diagonal stripes, so this is a match made in heaven for me!  

Before I get to the creative details, it's also time to announce the winner of our National Coffee Day Blog Hop prize...


Congrats VanessaB! Please send an email to snssassistant@gmail.com to claim your prize.

I designed the free digi below with the sentiment Vanessa suggested in her winning comment. Just right click and save to your computer. Thanks to everyone for hopping along! Please give credit to J Tilman Designs @vervegirl if you use it. Please and thank you.😁


Okay, on with my creative shares for the day.  I had fun with my first pass with this stencil, testing it with ink, glitter paste, and a mix of both. So much fun!

For my first card, I used mint tape to mask off the trio of thin stripes, then stenciled the bold lines in red.  Next I moved the tape to cover the red lines and added pink glitter paste to stencil the stripes.  I love how it looks like a real candy cane!


I recently received the coordinating dies for the classic Precious Poppies set, and could wait to use them. Poppies are red, so I figured they work for Christmas, right?  I added a sentiment tag with two sentiments from the Christmas Wordfetti set, then accented with a few little images stamped and die cut from the Wonder of Christmas Bundle.


My next card was inspired by my favorite wint-o-green mints. I did some masking and used sea glass on just the two outer thin stripes, then evergreen on all the other stripes for a fun wintergreen look.

I used the Christmas Silhouettes set and Karin markers for a soft watercolor effect, first stamping with the brusho, then coating the stamp lightly with water and stamping over it. When that was dry, I stamped again in clear embossing ink then embossed in clear. I love the look. I cut with the coordinating die cuts, then added the peace die cut from the Peace & Joy Word Dies, and a splash of color with the Doily Border Dies in cranberry and finished off with a gold poinsettia.


That third stenciled background hasn't made it onto a card yet, but I'm sure it won't be long. I used the stencil as is (no masking) with pink glitz glitter gel on red cardstock.

Thank so much for stopping by today! If you saw something you have to have, be sure to take advantage of our Earlybird Savings with 10% off individual new releases through Saturday, October 9.


Thursday, September 16, 2021

Holiday Cards & giveaway!

 Good morning! Today I am sharing two projects using the Sweet ‘n Sassy Stamps Holiday Wreath and Pinecone Background sets. Also used are Christmas Wordfetti and Mini Tags Dies. I have a little giveaway too, so be sure to read to the end!

My favorite poinsettias are pink so I made my first card in that color. This is a pretty simple design and was finished off with a few sequins.


A white frame was created with two rectangle dies for my second card, then it was run through an embossing folder. Just a portion of the pinecone image was used for the center and it was matted with gold paper for some shine.


Giveaway- I have an extra set of the Doily Border Dies and Scalloped Border Dies! These are brand new but they are loose...not in the packaging that you normally receive them in. I will choose from one of the comments on this post on my personal blog that are left by 9:00 pm tomorrow night (Sept. 17) to send these to.


Have a great day!
Diane


Wednesday, September 15, 2021

Holiday Wreath and an Instagram Hop


Hi friends! It's time for the SNSS September Release Inspiration Hop on Instagram. You can head over to the SNSS Instagram feed to start the hop. There's lots of inspiration with this month's release as well as a chance to win by commenting on the hop posts, so be sure to head on over there for some fun!


 Today I'm featuring the beautiful Holiday Wreath set, paired with a few other goodies.


For my first card, I colored the wreath in some winter blues, adding a bit of glossy glaze and some sparkle lacquer to accent the flowers, berries, and pinecones in the image. I hand trimmed the image and added foam tape to the back for dimension.

The scallops are cut with the Scallop Border Dies from aqua and navy, then offset and layered for a fun accent on the card. I finished with the Merry Christmas sentiment from my Endless Love set and a thin navy mat.


For my second card, I went with pinks and reds for my color scheme, coloring the Holiday Wreath with Copic markers and adding some frosted lace stickles to the pine cones.  I hand trimmed again, and this time chose to stamp the Christmas Text Background on pink cardstock for a fun background. I finieshed off with a sentiment from Christmas Wordfetti embossed onto a sentiment strip, and then a few scattered sequins.


Thanks so much for stopping by today! I hope you have a fabulous day.

Friday, December 25, 2020

Merry Christmas


I hope you and yours have a wonderful and blessed Christmas. Regardless of what has happened this year, the true sign of hope for our future was born this day...Happy Birthday Jesus!

 I had to create some quick tags for my final round of Christmas gifts and they turned out so sweet and simple but still "hand made". I die cut a bunch of tags, used the musical notes from Texture Tiles 7 (a great year round set), then I picked out the sentiments from Christmas Wordfetti that were based on Christmas songs. I love the look!


Merry Christmas!

Hugs!

Lyn

Saturday, November 21, 2020

Christmas Blessings

Happy Saturday everyone! I'm sharing this Christmas card that I actually started last month but never got around to completing it. To be honest, it only got finished because I needed a card for today's blog post and it was already halfway done. When life gets really busy I'm always grateful I have half finished projects in my stash. 

Today's card showcases four sets, Welcome HomeChristmas Wordfetti, Deck the Halls and Christmas Pine. Have you guys ever bought a stamp set because you had one idea to use it? Well that was me with the Deck the Halls set. Ever since the release of Welcome Home I kept wondering if the houses would fit inside the ornament from Deck the Halls. Guess what? There was only one way to find out so I bought the set. Of course, I will make other cards with it too, but that was my justification for purchasing it. Someone had to figure out if my idea would work or not so it might as well be me. 


I started by stamping the ornament with VersaFine Clair Nocturne ink. I stamped the house, roof and trees with distress oxides inks (broken china, mowed lawn, fossilized amber). I colored the windows yellow, top of the ornament silver (gel pen) and fussy cut out. Then, I stamped the pine boughs with evergreen and parsley inks onto white cardstock and cut with a stitched rectangle die. That's as far as I got last month until I picked it up again this week.

This week I stamped the fence, trees and houses along the bottom with evergreen, wheat, midnight and cranberry inks. I stamped the sentiment with the same black ink as the ornament. I positioned the ornament, looped the sliver thread through the top and attached to the back. I matted the white layer onto black and attached to a green card base. 


These two sets below are part of the Sentiments & Silhouettes Sale going on though November 26th.


I hope you enjoyed today's card and thanks so much for stopping by!

Karen


Friday, October 23, 2020

Gnome Fun!

Have you had the opportunity to play with the new Winter Gnomes yet? They are so adorable and so much fun to color.

I used Copics to color my sweet image in fun purpley blues and bright greens and added a simple sentiment from the Christmas Wordfetti set. I went clean and simple but textured for the background. I love this one.

Thanks for stopping by! I hope you are inspired!

Lyn

Tuesday, September 22, 2020

Be Merry

 Hello Sweet Friends!  Sheri here today with a card featuring the NEW Christmas Gnomes stamp set! This set is so cute!! It has three Gnomes and a bunch of sentiments that are perfect for creating fun loving Christmas cards with.

***THIS POST CONTAINS AFFILIATE LINKS AT NO ADDITIONAL COST TO YOU***

I picked the Christmas Lights Gnome for my card today. I stared by stamping him with alcohol friendly ink and using copic markers to color him. I then fussy cut him out and popped him up as the focal point. The pattern papers I used are from the Echo Park Merry & Bright 6x6 pad.

Card Measurements:
A2 Top Fold Card Base: 4 1/4" x 5 1/2" (4 1/4" x 11", scored at 5 1/2")
Red Mat: 4" x 5 1/4"
Pattern Paper Layer: 3 7/8" x 5 1/8"
Red Mat: 2" x 4 3/4"
Pattern Paper Layer: 1 7/8" x 4 5/8"
Red Circle: 2 7/8"
White Tag: 1 1/2" x 5/8"


Happy Stamping!!