Showing posts with label Texture Tiles. Show all posts

Wednesday, May 5, 2021

Hope in God by Charmaine Canham

Good Morning, Flowers!

I just received my (new to me) Jennifer Nilsson, Encouraging Peonies stamp set, and I had to ink it up. Sweet 'n Sassy also has a big Buy 2 get 1 Free deal on all of her stamps this week! Make sure to check it out! But let me tell you how I made this beauty!


I started applying the new Distress Oxide color, Salvaged Patina, to half of an  A2 cardstock base. 
 

Make sure this is dry or dried with a heat tool before moving to the next step. Stamp the smallest dots from the Textures Tiles 8 stamp set with Gina K Designs Soft Stone ink pad over the whole card.


I just love these leaves on this stamp set. I heat embossed them with silver powder from Hero Arts and Versamark watermark ink.


The Future stamp set has beautiful and inspiring sentiments. I stamped the sentiment with black Versafine ink, and clear heat embossed. I didn't want to take the chance of it smearing at this point.


I noticed that the leaves disappeared in the background in that beautiful patina color. I pulled out Salty Ocean Distress Oxide and painted the leaves with a small paintbrush. This gave it a soft watercolor look.

 I always want to doodle on my cards. I pulled out my white Posca and Micron pen and started stippling and adding highlights to the leaves. This is probably not recommended, but I pulled out my gray Copic markers and added shadowing under the leaves over the distress oxide. I finished by adding a hand-drawn border and white dots in the darker shadows.


This card transformed so much by adding shadows and highlights organically. I hope you liked my card today, and leave me a comment or a question if you have any.

Remember to check out this week's deal below!
I hope you have a great day!
Charmaine

Follow me for almost daily inspiration on Facebook and Instagram.


Friday, February 22, 2019

Girl Power X3 in Red and Teal

Hi Friends! Today I have some fun projects using the new Girl Power 2 set. I have also used other sets (I will point them out as I go) but this one is the focus on all of my projects. I wanted to show how a single stamp could be used in different styles and complexities (is that the right word? I'll go with it :)). To show this versatility, I decided to use the same color pallet on them and red and teal is the color combo I chose. These projects are all different but the each make me smile out loud! So here we go...


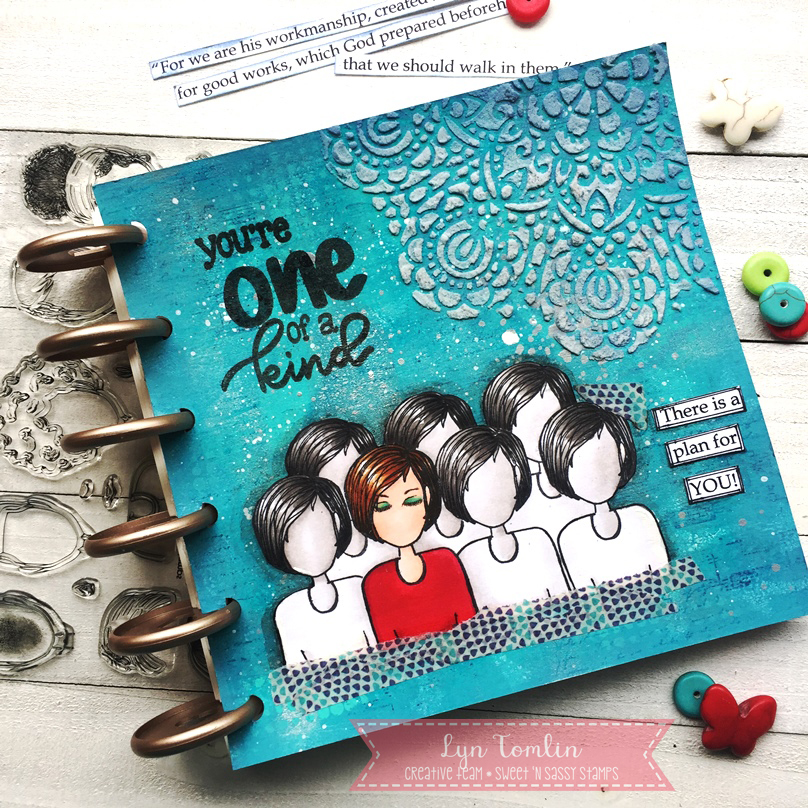
My first project is a mixed media art journal page. I saw a 6x6 disc bound journal and felt ready to commit to that as it was less intimidating than a bigger journal with two pages to cover. This is my more complex project as it has acrylics, and archival ink, and texture paste, and Copics, and Washi tape, and a masked (many times over) image. I even pulled out my gelliplate and got so messy and had so much fun. If you haven't tried a journal page - I encourage it. It is very rewarding.

Recipe (in order of use haha):
  • Background - Acrylics Dina Wakley Acrylics Ocean, Turquoise, and Sterling
  • Background stamps - Texture Tiles 1 using Archival Inks Cobalt and Paradise Teal
  • Splatters - White Gesso and Sterling acrylics
  • Corner texture - Stencil with texture cream (Momenta Art-C in Platinum)
  • Sentiment (big) Be Unique Clear stamp set from SNSS, (little) typed on computer
  • Image - Girl Power 2 Masked over and over. Main image colored with Copics R24, R27, R29(shirt), E53, E55, E57, E59 (Hair), E00, E21, E11(skin) Other images colored with warm grays - adhered with Multi Matte Medium
  • Washi Tape - not sure brand
  • Outline image with Stabilo All Pencil and water brush

My Second project is a less complex and uses only a few dies, designer paper (from my stash)some tulle, and sequins. There is a mask though :) It is a shaker of sorts...

Recipe:
  • Spellbinders circle dies (two sizes so I could add the frame on top) This card allows you to see through to the inside
  • Designer paper from my stash
  • Tulle - folded in half filled with sequins and closed up with score tape the taped down between the paper layers and the card base
  • Image - Girl Power 2 (I chose the girl that looks like me) Keep in Touch Too (sentiment) and Home for the Holidays (gift). I stamped the gift first then masked it then stamped the girl.
  • My background paper is cut with A Jillian Vance Design Basic Polka Dot Die


My Final Project is kind of Clean And Simple but still has a few steps. It still uses a mask (I cut them out so I wanted to use them as many times as possible I guess haha!) I cut out some frames, stacked them and colored up my image. to pop into the frame. I wanted this to look like a selfie pic of me and one of my best friends so I chose girls with our hairstyles. For fun I decided to try to video it. It isn't awesome but it is my first time doing this and the video stopped and I had to add in the end...oh well - feel free to check it out if you want to HERE)

Recipe:
  • Spellbinders Rectangle and Square dies (taped together to create a frame and cut multiple times to stack and remain the same).
  • Image - Girl Power 2 Masked over and over. Main image colored with Copics R24, R27, R29(shirt), E53, E55, E57, E59 (Hair), E00, E21, E11(skin)
  • Sentiment - You and Me set from SNSS
  • My background paper is cut with A Jillian Vance Design Basic Polka Dot Die

I hope you are inspired to pick up a stamp set and see what other ways you can create with it. See how you can combine sets for a single project and most of all, this should be fun so make it FUN!!

Thanks for stopping by!
Lyn