Showing posts with label Be Unique. Show all posts

Thursday, January 28, 2021

It's just a warm up....

{janebosi}  Hey Friends!  We've had so much coffee goodness with this month's release--and, let's face it, 'tis the season for warm cozy drinks.  We've hit a cold snap here in Wisconsin and have been in "feels like" below zero temperatures for a good week now! It is time to enjoy the cocoa, coffee, tea--whatever to keep those insides toasty.

Tomorrow, we have a super fun collab coffee blog hop so today I thought I'd warm you up a little with a few other goodies I've been working on.

My first two shares feature the Going Postal set.  This gorgeous vintage set was designed by .  The scripty image is actually handwriting of a beloved member of her family.  I just love that!  There is something so intimate and comforting about a loved ones' handwriting.  I have an autograph book from my childhood--when those were a thing!  I love seeing the penmanship of my grandparents, parents and aunts and uncles.  

This card also features images from Rose Banner

This card also features a floral from Flower Garden.

The little gnomie from Winter Gnomes pairs perfectly with a sentiment from the new Coffee Talk 2 set.  Who doesn't relate to "coffee before talkie?" I added some stripes to the background piece with the new Background Builders: Stripes set as well.


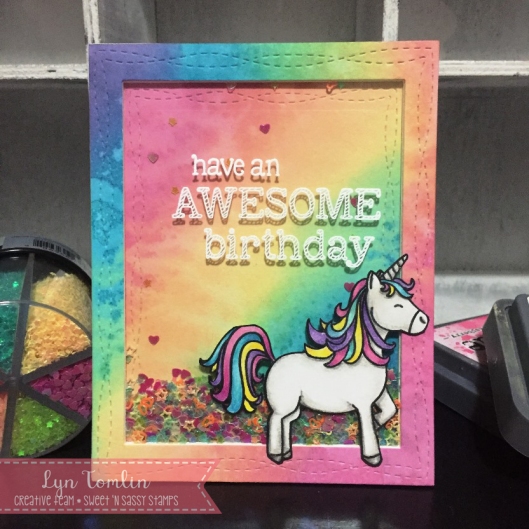
I used the Background Builders: Stripes set on this fun birthday card, too.  Nothing says "Happy Birthday" quite like rainbows and unicorns.  Both along with the gems and sentiments are from one of my favorite "adorable animals" sets:  Be Unique.


That's all for today!  Please come back tomorrow for more inspiration and a fun hop!
TTFN, Jane

Monday, April 20, 2020

Unicorn Hugs


Hello Sweet 'n Sassy friends!
It's Ceal here to share with you today. It has been a rough weekend for me so I only have one card to share. I used an older set but one of my favorites! especially when I need to send a card out to a little girl who loves unicorns, this Be Unique set is perfect. 


To create my card I started with a white top folding card base and a white panel. I stamped the unicorn on the panel, colored it using Copic markers and then masked it off to create a rainbow behind her using a stencil. It's hard to see in the photo but I added some liquid pixie dust to the rainbow so it is shimmery and I added some glossy accents to her horn. 
To finish the card I added a greeting from the Sentimental Mash-up set. 

Edited to add another card I finished today 

For this one I used the Be A Flamingo set, another older set but perfect to make a cute card to send to a little girl. I have a friend who has been using her stash of patterned paper and inspired me to do the same so I created the background with patterned paper. 


Friday, September 13, 2019

Deck The Halls!

Today I have some super fun projects using the new Deck the Halls set!

During the September "new stamp" reveal on the SNSS VIP Facebook Page (join if you haven't already - it is lots of fun!), we were all talking about how one of the ornaments looked liked a hot air balloon and another looked like a light bulb...


In the hopes of inspiring you to look at your stamps in different ways, I have colored this one up and used it in ways other than the standard one. I hope you like them!

The first two cards are at least Christmas themed (haha!) For these, I used the ornament as an "O" in the word JOY. It is a fun way to use Alphas in combination with images. The Alphas for this one are from the Shake It Off Alphas set. I used Distress Oxides to color these.


The second card uses the argyle ornament. I flipped it over and masked the circle hanger. I drew a basket in with a Copic Multiliner and colored everything with Copics. I added a sentiment from the Inspirational Word Art set (on sale this month!)


Finally, I created two project with the plain ornament turned over with the circle hanger masked off and the bottom of a light bulb hand drawn in with a Copic Multiliner.
The first project is a CAS card with lots of sparkle and shine (via Wink of Stella and Glossy Accents). The sentiment is from the Be Unique set (perfect isn't it!)


The second one is a journaling card for my compact Bible. I used Texture Tiles 1 on the card's background. PS and by the way, if you get no other texture set, I highly recommend this one - I use it all of the time!

To finish my journaling car, I cut out the bulb and adhered it and added the sentiment (sorry! this sentiment came from an old set called Shining Light) 


I hope you are looking at all your sets in new ways - it makes them new again which is a win in my book! I can't wait to see what you do with these ornaments!

Thanks for stopping by! Hop over to the store to check out the Sweet and Sentimental Sale!
Lyn

Friday, August 23, 2019

Create your Own Background

Hi Friends! Today I have a fun background card for you using lots of stamp sets and my MISTI. This technique is a great way to stretch your stamps and create something unique...Speaking of my MISTI, have you had the opportunity to join in on the combo blog hop with My Sweet Petunia and Sweet N Sassy Stamps? If not, you still have a week to hop along and comment for a chance to win a $50 gift code to each shop. The link is at the bottom of this post :)

For today's project, I went through all my stamp sets and pulled ones with Birthday appropriate sentiments and images to create a subway art type layout. You could, of course, use any theme you want (I think Thank You and Christmas would be fun too!)

I arranged all the sentiments first, placing them both vertically and horizontally. Then I went back and filled in blanks with images (smaller and larger depending on the open spaces.)

Once the layout is satisfactory, I inked it up and created my card panel. I created a panel on both Xpress it paper and Neenah Dessert Storm (kraft) card and colored it with Copics.

You can create as many cards as you want now that it is set up on your MIST and since it takes a while to set up, I find myself not quite ready to dismantle it (haha!) I think this one would be great for stash of birthday cards - what do you think?

If you would like to join in on the blog hop now, START HERE!

Thanks for stopping by!
Lyn

Stamp Sets used for this card included:

All Wrapped up


Sentimental Wordfetti


Llama Love


Be Unique


Birthday Pals (discontinued)


Monday, August 19, 2019

Clean & Simple Stamping


Hello there and thanks for stopping by.
It's Ceal, here and I am sharing a couple of super CAS cards with yo today. 
My style is clean and simple but this past wee I have been catching up on Dare to get Dirty challenges at Splitcoastsrampers so these two cards are super CAS.


To make these card I simply stamped my images, the Unicorn from the Be Unique set and the rocket from the Over the Moon set and colored them using Copic markers. The greetings on both cards are from the Faith Wordfetti set


Thursday, May 23, 2019

Be Unique

{janebosi} Happy Thursday, Friends!  Today, I'm sharing a birthday card I made for a very special little lady!  I've just started binge watching Once Upon a Time with my youngest daughter and.....I am all abut the fairy tale, right now!! 

One of the things I love most about Sweet N Sassy Stamps is the incredible versatility of each set.  I can use them in my Bible and on a card for a 10 year old....and a 50 year old and all the year olds between and after!

This card features images from Be Unique and Mighty Fortress.  Super fun and a little sparkly with some sequin embellishments.  Both images are colored with copic markers and tucked in some cloud like die cuts. 

Thanks for stopping by! Have a awesome day--Jane

Friday, February 22, 2019

Girl Power X3 in Red and Teal

Hi Friends! Today I have some fun projects using the new Girl Power 2 set. I have also used other sets (I will point them out as I go) but this one is the focus on all of my projects. I wanted to show how a single stamp could be used in different styles and complexities (is that the right word? I'll go with it :)). To show this versatility, I decided to use the same color pallet on them and red and teal is the color combo I chose. These projects are all different but the each make me smile out loud! So here we go...


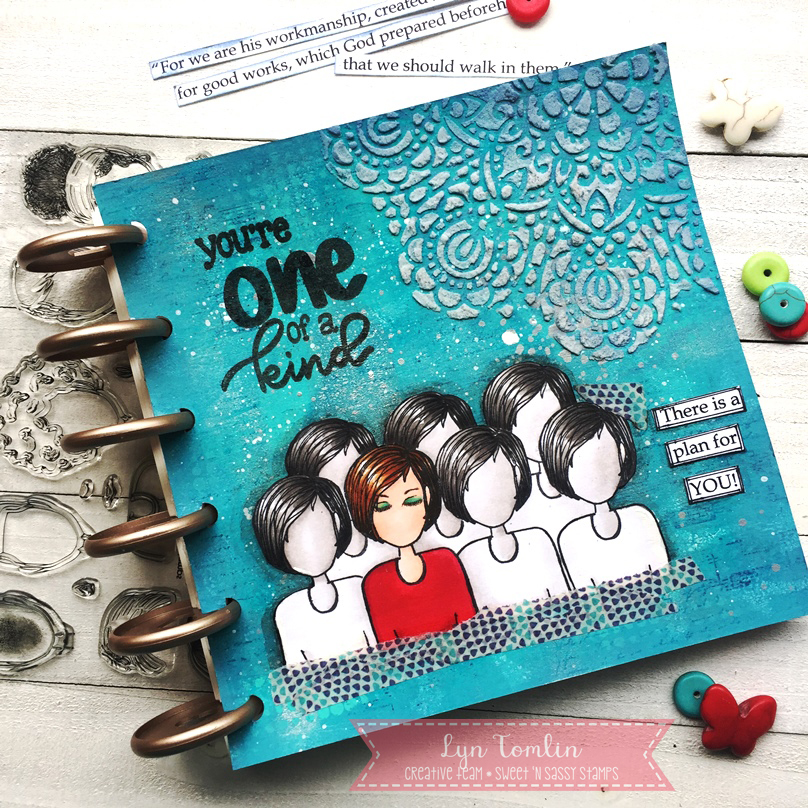
My first project is a mixed media art journal page. I saw a 6x6 disc bound journal and felt ready to commit to that as it was less intimidating than a bigger journal with two pages to cover. This is my more complex project as it has acrylics, and archival ink, and texture paste, and Copics, and Washi tape, and a masked (many times over) image. I even pulled out my gelliplate and got so messy and had so much fun. If you haven't tried a journal page - I encourage it. It is very rewarding.

Recipe (in order of use haha):
  • Background - Acrylics Dina Wakley Acrylics Ocean, Turquoise, and Sterling
  • Background stamps - Texture Tiles 1 using Archival Inks Cobalt and Paradise Teal
  • Splatters - White Gesso and Sterling acrylics
  • Corner texture - Stencil with texture cream (Momenta Art-C in Platinum)
  • Sentiment (big) Be Unique Clear stamp set from SNSS, (little) typed on computer
  • Image - Girl Power 2 Masked over and over. Main image colored with Copics R24, R27, R29(shirt), E53, E55, E57, E59 (Hair), E00, E21, E11(skin) Other images colored with warm grays - adhered with Multi Matte Medium
  • Washi Tape - not sure brand
  • Outline image with Stabilo All Pencil and water brush

My Second project is a less complex and uses only a few dies, designer paper (from my stash)some tulle, and sequins. There is a mask though :) It is a shaker of sorts...

Recipe:
  • Spellbinders circle dies (two sizes so I could add the frame on top) This card allows you to see through to the inside
  • Designer paper from my stash
  • Tulle - folded in half filled with sequins and closed up with score tape the taped down between the paper layers and the card base
  • Image - Girl Power 2 (I chose the girl that looks like me) Keep in Touch Too (sentiment) and Home for the Holidays (gift). I stamped the gift first then masked it then stamped the girl.
  • My background paper is cut with A Jillian Vance Design Basic Polka Dot Die


My Final Project is kind of Clean And Simple but still has a few steps. It still uses a mask (I cut them out so I wanted to use them as many times as possible I guess haha!) I cut out some frames, stacked them and colored up my image. to pop into the frame. I wanted this to look like a selfie pic of me and one of my best friends so I chose girls with our hairstyles. For fun I decided to try to video it. It isn't awesome but it is my first time doing this and the video stopped and I had to add in the end...oh well - feel free to check it out if you want to HERE)

Recipe:
  • Spellbinders Rectangle and Square dies (taped together to create a frame and cut multiple times to stack and remain the same).
  • Image - Girl Power 2 Masked over and over. Main image colored with Copics R24, R27, R29(shirt), E53, E55, E57, E59 (Hair), E00, E21, E11(skin)
  • Sentiment - You and Me set from SNSS
  • My background paper is cut with A Jillian Vance Design Basic Polka Dot Die

I hope you are inspired to pick up a stamp set and see what other ways you can create with it. See how you can combine sets for a single project and most of all, this should be fun so make it FUN!!

Thanks for stopping by!
Lyn


Saturday, October 27, 2018

Llamas and Unicorns and Rainbows .. Oh my


Hello Sweet 'n Sassy Stampers!
It's Ceal, here to share some fun cards with you. I needed some birthday cards for a couple teens and the two sets I used to make them fit the bill. Llama Love and Be Unique


Bothe of the cards are pretty easy to make on the first one I stamped the party banners and llama using memento ink and colored them with Copic markers.
The second card is a little more involved because I stamped the unicorn and then masked it off to stamp the rainbow behind her.


Thursday, May 31, 2018

You Are SPEC-tacular!

Hello friends!  Cathy here sharing several cards using products from the April and May release.  First up is a card using the popular Girl Power stamp set.  

The little glasses in the Girl Power set was the inspiration for this card.  After stamping and coloring the frames, Glossy Accents was added to the lenses for texture.  The speckled back ground was stamped with one of the Texture Tiles 1 stamps and white embossed.  Nuvo Embellishment Mousse was sponged over the embossing for a glorious shimmer.  The cool Girl Power girl was colored with Copic Markers, fussy cut and popped onto the card.  The stamp sets used to create the sentiment include, Words of Life: Common Words 1, Skinny Caps Alpha, and Mini Grunge Type Alpha.  How fun!

My next sample is a shaker card created with the adorable unicorn from the Be Unique stamp set.  

The "Wrinkle Free Distress Background" was created with the little diamond stamp included in the Be Unique stamp set and one of the stamps in the Texture Tiles 1 stamp set.  The rainbow and unicorn were Copic colored, fussy cut and popped onto the front of the card.  Sparkly sequins were used to fill the shaker card.


That's it for me today...thanks so much for stopping by!  Be sure to stop again soon to see samples using the new June Release!
Have a blessed day!

Hugs,
Cathy

Monday, April 30, 2018

Magical Birthday

Hello friends, Stephanie here with a sweet birthday card using Be Unique.  I so love this stamp set!  I colored with copics and added some sparkle to the mane and tail with stickles.  The designer paper is from my scrap bin, the Yellow card stock is from Bazzil and it actually sparkles.  It has been such a great release this month for Sweet 'n Sassy Stamps and May is going to be even better!  Happy Stamping everyone!


Friday, April 27, 2018

Rainbows and Unicorns

I guess you can tell that we love the 'be unique' stamp set ;) I just had to show you another card made with the beautiful unicorn. I love that you can color it in every color you like. So I used some (soft) rainbow colors today.
I colored the unicorn and the rainbow with alcohol markers and cut them out. I used foam tape behind the unicorn so it pops out a bit more. I searched for some matching patterned papers and added some sequins to make the card a bit more sparkling.
http://www.sweetnsassystamps.com/be-unique-clear-stamp-set/
I used the stamp set 'be unique'.

- Lucinde


Thursday, April 26, 2018

Be Unique!

Today I have a couple more cards using the oh so cute and utterly adorable Sweet N Sassy Stamps Be Unique Clear Stamp Set.

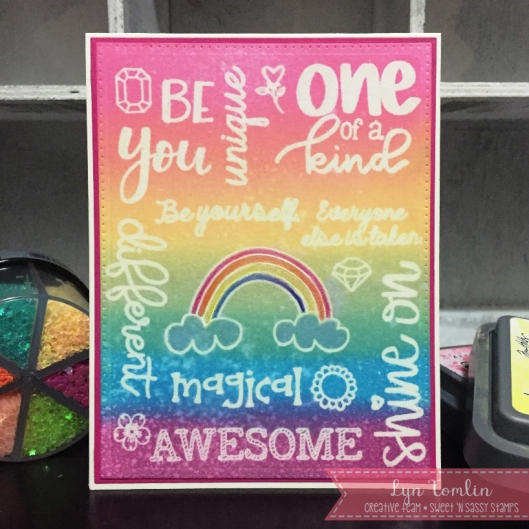
First, I took all of the sentiments and smaller images and created a subway art style set up. I embossed it in with versa mark and white embossing powder. Then I got rainbow inky with Distress Oxide Inks. I went simple with the layout since the sentiment layout really "spoke" for itself (pun intended :))


While I was playing in the ink, I created a panel for my second card. I used a stitched die cut for a frame and created a simple shaker card with some shaker shapes I found at Micheal's - they were in a container like a collection of spices come in and the colors were so perfect, I just had to buy them! I embossed the sentiment on the transparency and stamped a unicorn on watercolor paper and colored it up with my polychromos pencils. (I really like the way the texture and pencils worked together.) I fussy cut it and added it to the corner of my card.

These were so much fun to make! I hope they've inspired you!

Thanks so much for stopping by!
Lyn