Showing posts with label Harshgurl. Show all posts

Friday, May 20, 2022

Mini Botanical Greetings


    Happy Friday crafty friends! I hope you had a good week! Today I'm sharing a simple card using stamps from Sweet 'n Sassy Stamps.


    I wanted to keep things very simple so I started with a premade mini slimline card. I trimmed another piece measuring 3 ¼ x 5 ¾. On this piece I stamped images from the Botanical Branches stamp set. Then used my Copic markers to color the images.

    Next I used gold watercolor to splatter on the background. After that dried, I stamped one of the sentiments from the Everyday Greetings stamp set. To finish my card, I trimmed another piece out of pattern cardstock to glue to my card base and then I used foam tape behind the front panel to glue it to the card. 

    I hope you enjoyed today's blog post and that it has given you some inspiration to do something creative this weekend! For more inspiration you can follow me on Instagram.

    Don't forget to checkout Sweet 'n Sassy Stamps Inspiration Hop! Make sure you click the image below to join the fun on each stop for a chance to win $25 credit to shop at Sweet 'n Sassy Stamps.


*Products mentioned contain affiliated links at no extra cost to you.*

Friday, May 6, 2022

Have fun in the rain!

 Happy Friday crafty friends! I hope all of you had a great week. It was a bit busy on my end - both in everyday life and work! But, I took advantage of a rainy evening to take a break in my craft room and made today's card.


 For today's card I made an A2 card base and cut another piece to use as my front panel. On this piece I stamped the clouds and puddle from the Puddle Jumpers stamp set and masked them so I could ink the background later. Then I used the Mosaic stencil and some gray ink to create some kind of road hill.


 Once I was done with the background I used Copic markers to color the puddle and clouds. On a separate piece of cardstock I stamped and fussy cut the cute little girl image from the Puddle Jumpers stamp set, and also colored her with a selection of my Copics. To finish the card I used foam tape to tape the image the front panel. I added a sentiment from the Puddle Jumpers stamp set, some glossy accents on the images, and placed some clear sequins to add a bit of shine to the card.

 Before I leave you, have you checked this month's new release over at Sweet 'n Sassy Stamps? If you haven't, you should definitely check it out!

 Also, Sweet 'n Sassy Stamps is celebrating National Scrapbook Day this weekend! You can save 15% with code NSD2022 on your purchase. I hope you take advantage of this sale to add some goodies to your stash.


 I hope you have enjoyed today's blog post and that it has give you some inspiration to do something fun & creative this weekend! For more inspiration you can follow me on Instagram.


*Products mentioned contain affiliated links at no extra cost to you.*

Friday, April 1, 2022

Easy Mini Slimline Card

 Happy Friday! I hope all of you had a great week! I’m excited to share with you an easy mini slimline card I made using one of the new stamps from Sweet 'n Sassy Stamps.

 I created a mini slimline base card measuring 7x6 with scoring on the 7 inch side at 3½. I also trimmed another piece of cardstock measuring 3 ¼ x 5 ¾. On this piece of cardstock, I heat embossed one of the images from the new set called Roses For You with white embossing powder.

After I heat embossed the front panel, I used three different ink pink tones to blend. Once I was done blending, I used a microfiber cloth to wipe any ink on the embossed images. Next, I cut out a piece of craft foam (they sell these at Hobby Lobby), glued it to the front panel, and then glued it to the card base.

To finish the card, I stamped a sentiment from the Roses For You set on a circle die cut and added some embellishments.

Don't forget to checkout this month's new release! I think you will really love it!

I hope today's card has given you some inspiration to do something fun and creative today! For more inspiration, you can follow me on Instagram: @harshgurl .


*Products mentioned contain affiliated links at no extra cost to you.*

Friday, March 18, 2022

Finding joy in the Rain


Happy Friday my friends! I'm excited to share with you today's card project using supplies from Sweet 'n Sassy Stamps new release.

For today's card I used the new Mosaic stencil and the adorable stamp set called Puddle Jumpers. This set has some cute images and beautiful sentiments. I Love that the sentiments are so uplifting and perfect to send to a loved one who needs a reminder that no matter what is going on, everything will get better.

When I made my card, I started by making an A2 card base and cutting another piece for the front panel. On the front panel, I used the new Mosaic stencil with some gilding polish to give it some texture and shine.

Then I stamped and cut one of the images from the Puddle Jumpers set and colored it with some Copic markers. I used an oval die where I stamped the cloud, and then one of the sentiments that come with the set.


I then used some masking tape to cover the sentiment so I could stamp the little rain/heart drops over. To finish, I added some glossy accents on the flowers and rain drops.

Don't forget to check out Sweet 'n Sassy Stamps new release, you will really love it!

For more inspiration you can follow me on Instagram: @harshgurl. As always, I do hope this has given you some inspiration to do something fun and creative this weekend. See you next time!


*Products mentioned contain affiliated links at no extra cost to you.*

Wednesday, March 9, 2022

Simple card with few supplies


 Hello crafty friends! I hope your week is going great so far. Today I want to share a simple card I made while I was helping/visiting my parents last week. My mother was hospitalized but know doing much better and my dad had surgery and is recuperating. Even in the mist of that, I took a quick break to make today's card using a new stamp set from Sweet 'n Sassy Stamps new release called Spread Your Wings.

I used my mom's supplies to make the card, she has fallen in love with card making too! I made an A2 size card and trimmed another piece to use for the front panel.

On this piece I used one of my mom's embossing folders that made a wreath. I thought it would go perfect with one of the butterflies from the Spread Your Wings stamp set.


After embossing the background, I used a blending brush to color the wreath and a pink Copic marker to color the berries. I wanted to keep it simple. Then I stamped and die cut one of the butterflies from the Spread Your Wings stamp set and added foam tape on the back to glue it to the card. To finish I stamp one of the sentiments that comes in the set and added some embellishments.

I hope you have enjoyed today's blog post! Don't forget to checkout this month's new release

For more inspiration you can follow me on Instagram: @harshgurl. As always, I do hope this has given you some inspiration to do something fun and creative today. See you next time!


*Products mentioned contain affiliated links at no extra cost to you.*

Friday, February 18, 2022

Latte Love


Happy Friday my crafty friends! I'm excited to show you today's card using the new stamp & die set called Latte Love from this month's new release

I made an A2 card base and cut another piece to use as the front panel. On this piece, I used the Background Builders: Stripes stamps to make a checkered table in pink inks.


Next, I stamped and die cut images from the Latte Love stamp set, and colored them with Copic markers. I used foam tape behind the images and glued them to the card. Then I stamped the hearts above the coffee mugs to make it seem like heart-shaped steam was rising from them. To finish, I added some glossy accents to those cute mugs and on the sentiment.

I hope you have enjoyed today's blog post! Don't forget to checkout this month's new release

For more inspiration you can follow me on Instagram: @harshgurl. As always, I do hope this has given you some inspiration to do something fun and creative today. See you next time!


*Products mentioned contain affiliated links at no extra cost to you.*

Friday, February 4, 2022

Love in a Mug


 Hello crafty friends! Who's ready for the weekend? I know I am, lol! I'm so excited to share with you today's card with a coffee/love theme. Most of the supplies I used are from this month's new release, I hope you check it out.

To start I made an A2 size card base. Then I cut another piece to use for the front panel of the card. On this piece, I used the new Hugs & Kisses stencil with a light pink ink. Then I shifted the stencil just a bit to use some hot pink paste. That way the light pink ink shows as a shadow behind the hot pink paste. On the left side of the front panel I used the same light pink ink to stamp the coffee beans from the Texture Tiles 9 stamp set.


Next I stamp and die cut one of the mugs from the new Latte Love stamp set and used Copic Markers and Liquid Pearls to color it, and glued it to the front panel. I then heat embossed one of the sentiments from the Latte Love stamp set to a banner die cut and glued it to the card. To finish, I stamped those cute hearts to make it look like heart-shaped steam is rising up from the coffee mug. These hearts also come in the Latte Love stamp set.

I hope you have enjoyed today's blog post! Don't forget to checkout this month's new release, you will love it! 

For more inspiration you can follow me on Instagram: @harshgurl. As always, I do hope this has given you some inspiration to do something fun and creative today. See you next time!


*Products mentioned contain affiliated links at no extra cost to you.*

Friday, January 21, 2022

Simple card for a friend

Hello crafty friends! I hope your Friday is going great so far. I’m excited to share with you a quick card I made using one of the new stamp sets from this month’s release, called Let's Get Cozy.

I made an A2 top folding card and cut another piece for the front panel. On this piece I used the Diamond Tile stencil with one of my favorite inks. I only inked the corner where I would place the stamp images.
 

I then stamped the chair image from the Let's Get Cozy stamp set and colored it with Copic markers. Once I was done coloring, I fussy cut the image and glued it onto the front panel with foam tape. I also used the Friend word die and a sentiment from the Sentimental Wordfetti stamp set. To finish the card I used some clear sequins.

On my Instagram (@harshgurl), I also shared another card using the Let's Get Cozy stamp set. This time I made a little scene with it! 


I hope you have enjoyed today's blog post! Don't forget to checkout this month's new release, you will love it! 

For more inspiration you can follow me on Instagram: @harshgurl. As always, I do hope this has given you some inspiration to do something fun and creative today. See you next time!


*Products mentioned contain affiliated links at no extra cost to you.*

Friday, January 7, 2022

Fun card for someone special!


Happy Friday crafty friends! I hope all of you had a wonderful Holiday and a Happy New Year! Today I want to share with you a fun card I made using a new stamp/die set from Sweet 'n Sassy Stamps new release - Snowy Hello. This stamp set has some adorable images that are not only great for the Holiday Season but perfect to make and send a card any time throughout winter time.

I made an A2 card base and trimmed another piece of cardstock measuring 4 x 5¼. On this piece, I ink blended the background using some of my favorite inks. I wanted my background to be bright so I used yellow, pink, and purple.

Once I was done inking the background, I sprayed some water to add some white spots. I also splattered some white pearl watercolor to add a bit of shine.

I used the Hillside Edges dies to add some pine trees in the back ground and I added one of the cute snowman images from the Snowy Hello stamp and die set. All images were colored with alcohol markers. To finish the card I added some glossy accents on the hat and the carrot and added some clear sequins to add more sparkle to the card.

I hope you have enjoyed today's blog post! Don't forget to checkout this month's new release, you will love it! 

For more inspiration you can follow me on Instagram: @harshgurl. As always, I do hope this has given you some inspiration to do something fun and creative today. See you next time!


*Products mentioned contain affiliated links at no extra cost to you.*

Friday, December 17, 2021

Sending a Snowy Hello!


Hello crafty friends! Lieschen here hoping you are having a great Friday so far! I can't wait to share with you a couple of things, but let's begin with this simple card I made using the Christmas Blocks, Holiday Greetings, and Diamond Tile Stencil from Sweet 'n Sassy Stamps. It's just a perfect card to send a snowy hello during the holidays.

I created a mini slimline base card measuring 7x6 with scoring on the 7 inch side at 3½. Then I trimmed a piece of cardstock measuring 5½ x . I used this piece of cardstock to stamp the cute snowman from the Christmas Blocks stamp set.

I masked the snowman so I could ink the background using nice blue ink pad and the Diamond Tile Stencil. Then I used my Copic markers to color that adorable snowman. To finish the card, I heat embossed a sentiment from the Holiday Greetings stamp set, added some glossy accents on the snowman, and used some clear sequins to make the background pop more.

This was such an easy/fun card to make! I hope you give it a try with your supplies.

I also want to take advantage to remind you of two things:

Sweet 'n Sassy Stamps has the last Inspiration Hop for the year! Make sure you join in the fun and leave some love comment on the design team's post for a chance to win $25 to shop at Sweet 'n Sassy Stamps! Check their Instagram page for more info.


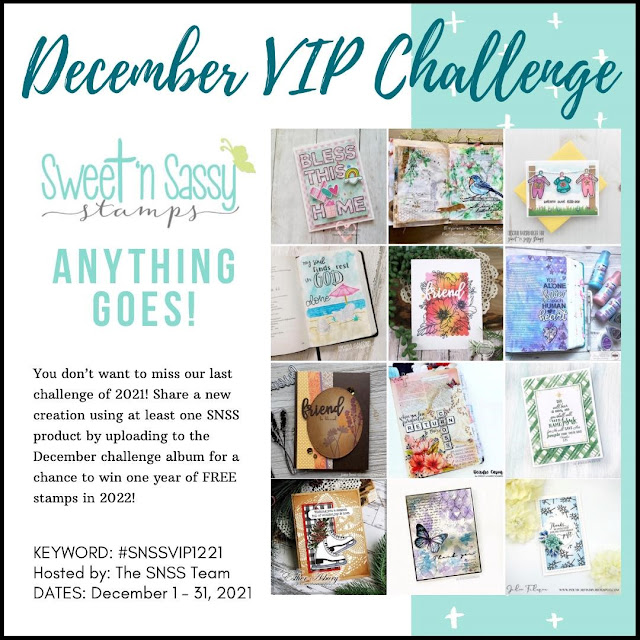
Are you following Sweet 'n Sassy Stamps VIP page on Facebook? If not you should start today! Not only is there daily inspiration with fun crafty projects and fun announcements before we make them public, but this month we have the VIP challenge "Anything Goes!". And like it says in the picture, YOU REALLY DON'T WANT TO MISS IT! A winner will be selected from the December challenge album for a...are you ready for this???? TO WIN ONE YEAR OF FREE STAMPS IN 2022!!!! How awesome is that! Again, you need to follow their Facebook VIP page!

That is all I have to share with you today. I hope that you have enjoyed today's post and crafty project. For more inspiration make sure you follow me on Instagram: @harshgurl

I hope you and yours have a Merry Christmas and a blessed New Year!

See you in 2022!


*Products mentioned contain affiliated links at no extra cost to you.*

Friday, December 3, 2021

DIY Christmas Ornaments


Hello crafty friends! Today's blog post will be a bit short, but the project I'm sharing will be a lot of fun to make - especially for the holidays!

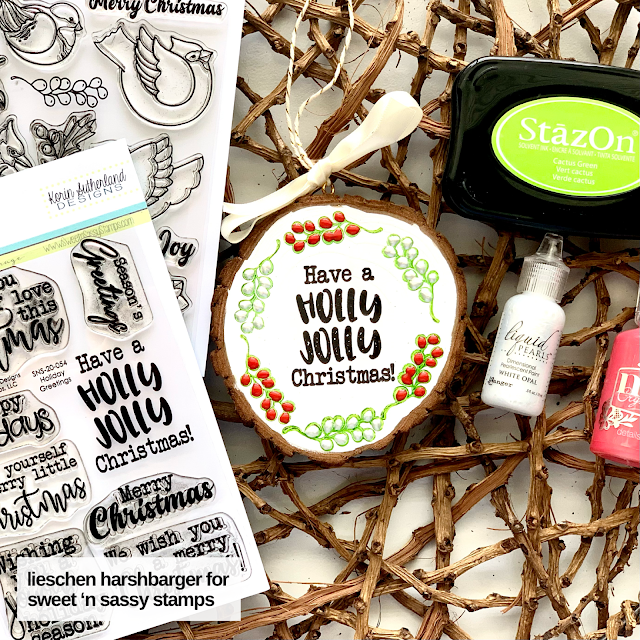
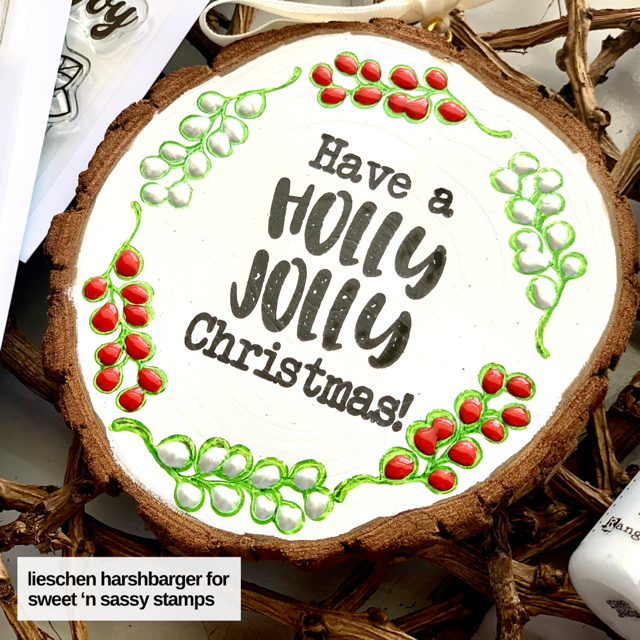
I bought these wooden circles from Amazon a couple of months ago to make some ornaments to give to my family & friends as Christmas gifts. I used the Holiday Greetings and Winter Birds stamps set to make these ornaments. I first used white acrylic paint for the background. Once it was completely dried, I stamp one of the images from the Winter Birds set with Stazon Cactus Green ink.

Then I stamped one of the sentiments from the Holiday Greetings set with obsidian pigment ink. Once I was done stamping, I used some liquid drops to fill in the berry images from the Winter Birds set. To finish, I added some string and ribbon.

I hope you liked today's simple crafty project. It's perfect for the holidays!

I also want to remind you that for the month of December Sweet 'n Sassy Stamps has a challenge on their Facebook Sweet 'n Sassy Stamps VIP Group page. I hope you check it out and join in the fun!


For more inspiration you can follow me on Instagram @harshgurl . See you next time!


*Products mentioned contain affiliated links at no extra cost to you.*

Friday, November 19, 2021

Starry Night on a Hillside


Happy Friday my friends! I hope you're having a great day and that your weekend goes even better.

Today I want to share with you a fun card I made using the Starry Night stencil, the Hillside Edges die set, and the Warm Winter Friends stamps.

I trimmed my cardstock to make an A2 base card. On it, I stamped one of the images from the Warm Winter Friends stamp set to create a background. Then I die cut a semi stitched circle and used my distress inks to color the background. Next, I used the Starry Night stencil with white pigment ink to add those cute stars.
 
 
On a separate piece of cardstock, I die cut the Hillside Edge and used my Copics to color the trees, houses, and hills. Once I finished coloring, I splattered some white metallic watercolor to make it look like snow. To finish the card I heat embossed a sentiment from the Warm Winter Friends stamp set.

Remember! Sweet 'n Sassy Stamps is still celebrating their birthday! This week to celebrate, all of the animal stamp sets and stencils are 20% off! No code needed. You can take advantage of this sale to get the Warm Winter Friends stamp set & the Starry Night stencil I used on today's card.


I really hope you have enjoyed today's crafty project! For more inspiration you can follow me on Instagram @harshgurl . Have fun getting some crafty supplies! See you next time!


*Products mentioned contain affiliated links at no extra cost to you.*

Friday, November 5, 2021

Birthday Party!

Hello crafty friends! Happy Friday! I hope you've had a wonderful week! You know what is making it more wonderful? That we get to celebrate Sweet 'n Sassy Stamps turning 14yrs this month! I, for one, I'm very thankful for SNSS for being part of this wonderful craft community. Do you know how Sweet 'n Sassy Stamps likes to celebrate their birthday? By having some AMAZING deals each week during the month of November!

 For today's card I'm actually showing you a sneak peak of a new stamp coming out next week. It's called Script background, but shhh, don't tell anyone yet! I also used the Make Music stencil with some of my favorite inks on the balloon die cut and a sentiment from the Bold Birthdays set.


 To finish the card, I used sentiments from the Birthday Wordfetti stamp set, added some string to the balloon, and added some colorful sequins.

I hope you have enjoyed today's crafty project! For more inspiration you can follow me on Instagram @harshgurl .


Remember that there's great deals each week. Sunday is the last day to take advantage of 20% on Birthday and Sentiments Stamp sets. No code needed!

Have fun getting some crafty supplies! See you next time!

Friday, October 15, 2021

Wintery Wilderness Wonderland


Hello crafty friends! I hope your week went well! I for one am looking forward to this weekend to do some fun crafty projects.

Have you checked out this month's new release over at Sweet 'n Sassy stamps? It's all so adorable! You need to check it out!

For today's card I'm using the new stamp and die set released this month called Warm Winter Friends. Foxes are one of my favorite animals, so I couldn't wait to make a card with the cute fox that comes in that set!

I created a mini slimline base card measuring 7x6 with scoring on the 7 inch side at 3½. For the front panel I used some watercolor paper measuring 3¼ x 5¾.

I then used watercolors to paint freehand a tree for the background. Then on leftover watercolor paper I stamped the cute fox and ornaments from the Warm Winter Friends set. I colored those with watercolors as well.


To finish the card, I splattered some white pearl watercolor to make it look like snow and glued in place the sentiment and the colored images from the Warm Winter Friends set onto the front panel of the card. I also used some distress glitter to make it look like snow.

I hope you have enjoyed today's post! I really had fun coloring these images with watercolors!

While I have you here, have you checked out our Inspirational Hop over on Instagram? Our team has created some fun projects using this month's new release! Check out my post on Instagram @harshgurl to read more about it and also how you can win a $25 gift code to Sweet 'n Sassy Stamps. I hope you hop along and leave some love on the team's IG posts!


 I hope you get to do some fun crafty projects over the weekend! Until next time!