Showing posts with label Birthday Bash. Show all posts

Wednesday, November 9, 2016

Happy Birthday!

Hello! It's Monika here today with a set of birthday cards.
I needed to make some birthday cards so I decided to go Clean & Simple (CAS) and make a number of cards (several of the same designs). 
 
 
I had the Chunky Alpha clear stamp set out on my desk so I incorporated some of the letters into the greeting. It's fun mixing up your greetings and letters... there are so many different ways you can mix n' match images.
On the first card, I masked off the first letter of the words from the Companion Words clear stamp set, and used the letters from the alphabet set to make it more interesting:
 
 
On my second card, I stamped HAPPY with pink ink and stamped birthday with black ink. It game me a nice contrasting look:
 
 
On my last card, I used 2 different stamp sets to stamp out the greeting. Happy was part of a retirement greeting from the Retirement Sentiments clear stamp set, but I masked off the rest of the words:
 
 
I worked with 2 different shades of the same color... one dark and one light...
The cupcake image came from Birthday Bash clear stamp set. It has a coordinating die set (which is not available at the moment), but you can just stamp up the frosting image, cut it out and use that as a template to make the sparkly frosting. I had a bunch die-cut from ages ago so I used those to make several cards.
 
Thanks for stopping by,
Monika


Thursday, September 1, 2016

Scribble Birthday


Hi Sweet 'n Sassy friends!
It's Ceal here to share a card with you today. As you can see, we just can't get enough of this Scribble Flowers set. This card was inspired by a card that Korin made you can see it HERE, it's gorgeous! 

To make my card I started with a top folding A2 card base and a piece of watercolor paper cut down with a stitched die. I randomly stamped the floral images from the Scribble Flowers set in archival ink and then watercolored them with peerless watercolors. Next I cut the panel diagonally and placed on the card base. For the greeting I used the happy birthday greeting from the Birthday Bash set. To finish the card I added some white highlights using a white gel pen.


Monday, August 3, 2015

Camouflaging Die Cuts Tutorial


Hello Sweet 'n Sassy friends!   I'm glad you could join us for this week's Design Diva Demo.  I have a die cutting technique to share with you today.  It's fun to try new things with all of the supplies we have in our stash, and I don't know about you, but my collection of dies keeps growing!  LOL!  So…let's get started with Camouflaging Die Cuts!

Begin by gathering your supplies...you need just a few...

  • stamps or inks to create a background (I'll be sponging a background strip for my birthday card) 
  • a die (SNSS Birthday Word Die)
  • the die cutting machine of your choice
  • and card stock.


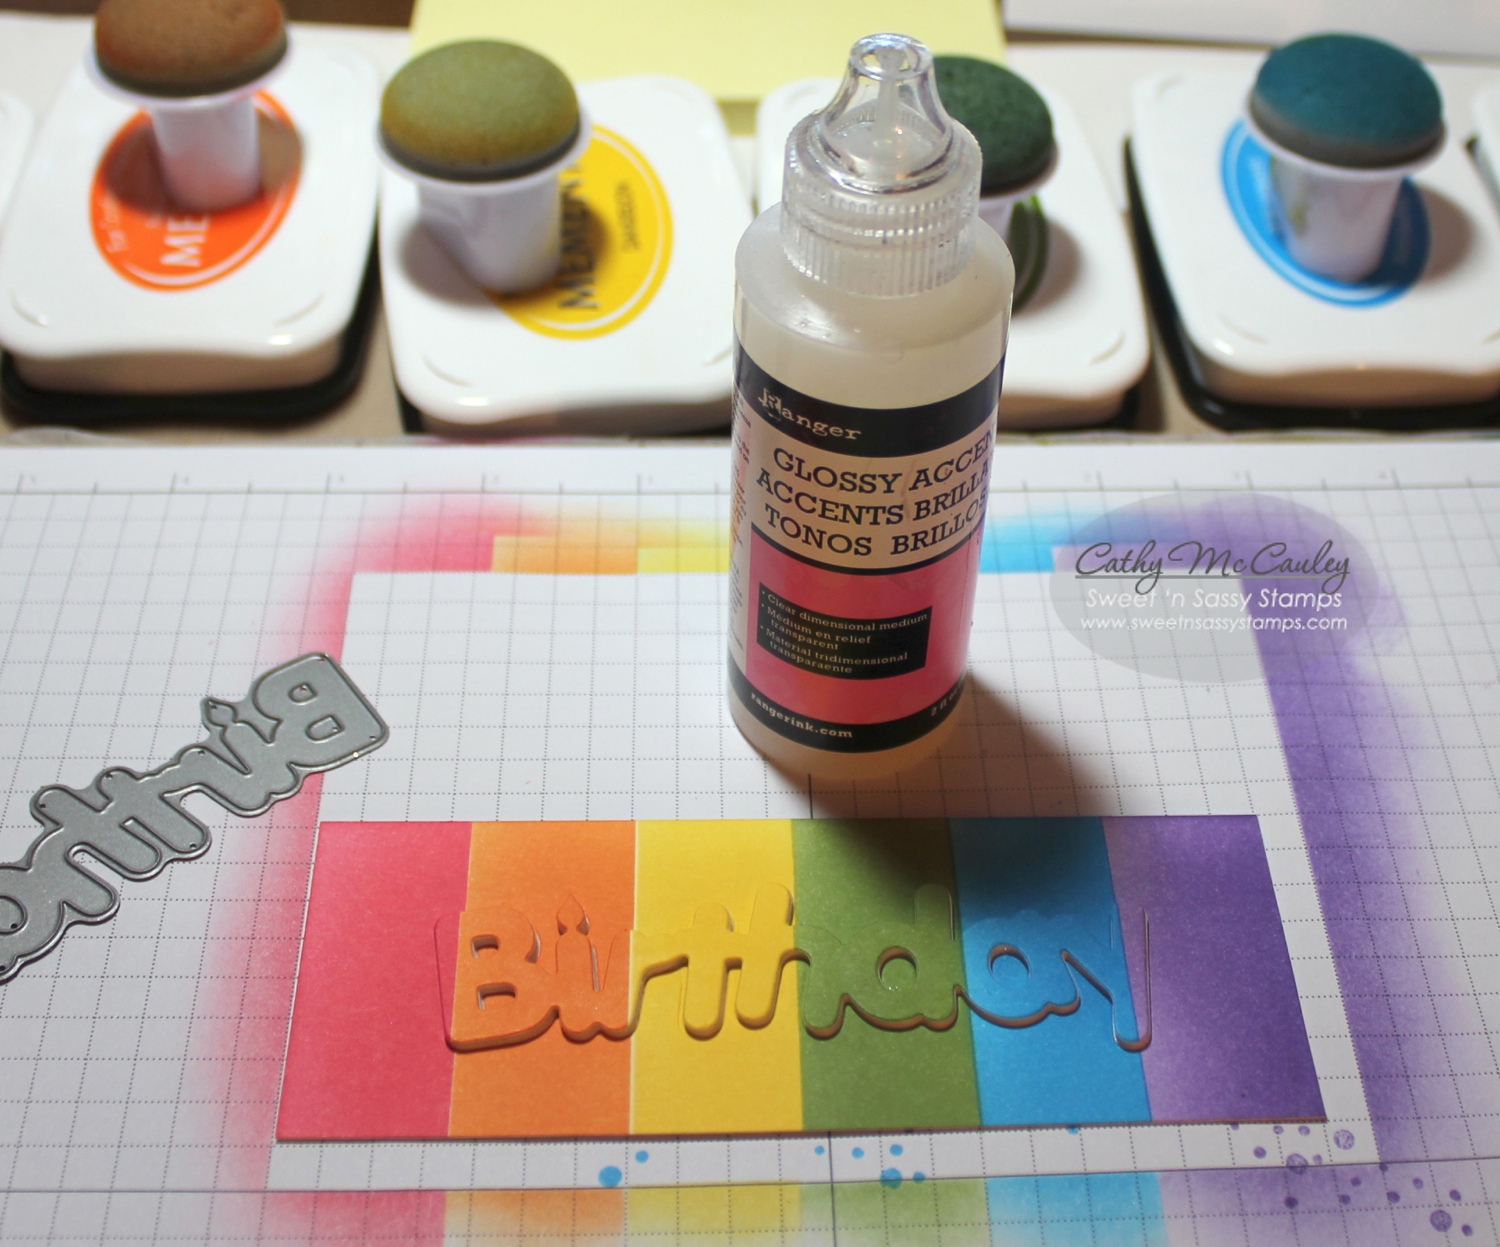
To create a rainbow of color, mask off the first section of your card stock panel.  I just use Post-Its.  Starting on the Post-It and working in circles, sponge on your color until it is smooth and blended.  Keep masking off each section as you work your way across the panel.  Now you have a bright, cheerful rainbow!


Trim your panel to the size you want for your card.  Using your die, cut the word or shape from your decorated panel.  Be sure to save all the little pieces. Then cut more of the same die cuts from scraps of card stock.  I cut 4, but you can make as many as you want depending on how thick you want your word or image to pop off the card.


Cut a second panel the same size as your decorated piece and cover it with adhesive.  I used my Glue Glider, but you can use a Xyron or any adhesive you like.


Adhere the die cut panel to the adhesive panel…


…and pop one of the scrap die cuts in the negative space.


Use the little pieces you saved to fill in the empty spaces.


Layer all of the die cuts, adhering each layer... 

…ending up with the one you cut from your background panel.  I use dots of Glossy Accents to glue the layers together because it gives me a little wiggle room to get the dies lined up correctly.


Finish your card using your Camouflaged Die Cut!  My little grand niece loves sparkles and purple…this card will be for her birthday.


Another sample of Camouflaging Die Cuts using a shape instead of a word die.

Here are the supplies from the Sweet 'n Sassy Stamps Store used to make these two cards:


Hope you'll give this technique a try!  Thanks so much for stopping by!
Have a marvelous Monday!

Saturday, July 4, 2015

Celebrate Independence Day!


Happy July 4th to all my U.S. friends!

My family and I celebrated with a bbq and pool
time at our home yesterday.  It's always so much
fun to have a relaxing day together.

My card today carries on the celebration of the
birth of our nation with a bright, totally 
red, white, and blue sparkly creation 
using Sweet 'n Sassy Stamps and dies.

Credit goes to a family friend who owns a 
print shop and gave me all kinds of wonderful
shimmery card stock.  I hope I was able to 
capture it for you!  Just love that blue and gold paper!

You can find all the marvelous Sweet 'n Sassy products
 below, and everything I used on my card up on my blog.

Wishing everyone a relaxing weekend!

Hugs,

Jenny


Wednesday, January 7, 2015

I've Got Your Number


Happy 2015!
Hi there it's Ceal here to share a card with you that I made for the New Year using sets that are for everyday use.  To make my card I used the set "I've Got Your Number" along with the Number Dies . To give them dimension I die cut each number three times and glued them together, and then popped them up.


I paired it up with another everyday set Birthday Bash for the confetti and the sentiment.


Check back this Friday for our January release and some fun new stamps!

Happy Stamping!


Wednesday, July 23, 2014

Birthday Bash Cupcake...

Hello! It's Monika here, continuing on my birthday card quest, and showing you another sweet birthday card. I find that I am always in need of birthday cards...
Have I convinced you yet, how much you need these 2 birthday sets: Birthday Word Art and the fabulous Birthday Bash clear stamp sets? If not, here is another card to inspire you to have these in your stash:


I love combining the images from the sets... The colors came from The Color Throwdown #302. The sketch was loosely based on Mojo Monday #355.

 The frosting was die-cut with a die from the coordinating Birthday Bash die set. To embellish my card, I made a butterfly, stamping the image from Majestic Monarchs clear stamp set on vellum, and heat embossing it with white embossing powder. The image then was die-cut with the coordinating die from Monarch die set. I also used Borders & Backgrounds die set...


...and here are some of my previous cards, using the same birthday stamp sets, but with different colors:


Thanks for stopping by,
Monika