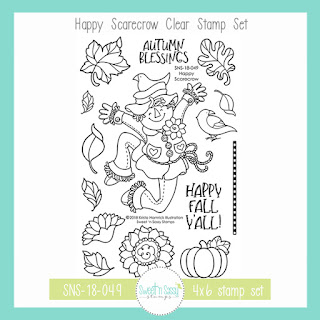
Showing posts with label Happy Scarecrow. Show all posts

Tuesday, September 6, 2022

partial die cut scarecrow

 Hello! Today I’m sharing a card using one of the new die sets from this month’s Sweet ‘n Sassy Stamps release. This stamp set is a previously released one so you may purchase the dies separately, if you have the stamps, or both together in a bundle.

Product links: Happy Scarecrow Die Set, Happy Scarecrow Bundle

This happy fella was stamped in the center of the card front. Since he's not layered on, and I didn't want the coloring to bleed through to the inside, I colored the image with Prismacolor pencils and blended with Gamsol and paper stumps. Then I used the Partial Die Cutting Technique on my card front to cut around just half of the scarecrow.


After die cutting, I used a trimmer to cut above and below the image, where the die cutting stopped. I glued a piece of plaid paper to the inside and added a few more die cut and colored images. The sentiment and pumpkin were popped with foam tape.


Have a great day!
Diane


Tuesday, October 1, 2019

Hooray for Fall!

Hello Everyone!

Whether the temps are cooperating or not, it is fall!  I love walking down the drive hearing the crunch of the acorns and leaves under my feet.  Pumpkin patches and corn mazes make the top ten list of best things about fall as well.  Scarecrows adorn many a front porch. I'm a fan of fall!
I used  Happy Scarecrow for my first fall card.  


This cutie is colored with Copics and fussy cut out.  I was in a color rut and ended up finding a color combo on my Pinterest board.  That saved the day!  Do you get in color ruts?   Tell us what you do to break out of a color rut!
I gave my scarecrow an autumnal background with a wheat stencil.  He is popped up on dimensionals. 

My second card is super CAS.  I challenged myself to make a one layer card with the same set, Happy Scarecrow


I used my MISTI to create the check border.  The sentiment is a sneak peek of a new set which Korin will be releasing next week sometime!
 I hope I have inspired you!  Happy creating!

Lee Ann   

Friday, September 28, 2018

Fall into Christmas

Hello sweet friends!   Now that fall is officially here, I plan to enjoy the crisp mornings and falling leaves even though we are already seeing signs of Christmas!  Cathy here with several cards to share from the SNSS August and September 2018 releases.  First...my fall card:

This jolly scarecrow from the Happy Scarecrow stamp set just make me so...HAPPY!  All of the images were colored with Copic Markers and were mounted to a watercolored panel made with Distress Oxide Inks.  The brown horizontal panel was also made with DOX inks and the Texture Tiles 2 stamp set.  The sentiment was cut with a stitched circle die and some jute twine was added to complete the card.

Now...on to Christmas!

The holly leaves from the Winter Birds set was stamped around the outside border of a panel and colored with Copic Markers.  The center of this panel was cut with a stitched rectangle die.  The sentiment was stamped, a Texture Tiles 3 image was lightly stamped in blue ink and texture was added with an impression plate.  The panel was mounted to black card stock and popped back onto the border.  The dove was colored, cut out and mounted to the center with foam tape and sequins were added to finish the card.

Several stamp sets from the Sweet 'n Sassy Stamps Store were used to create the cards above.


Thanks so much for stopping by...take time to enjoy fall!

Hugs,
Cathy

Friday, September 21, 2018

Autumn Blessings


Hello everyone! Are the fall colors already coloring your world? We thought we would have an early fall here in the Netherlands because it was so dry this summer. But at the moment the first leaves are changing colors, but it's still very green outside. So maybe that's why I turned to my blue markers instead of my orange and brown when I made this card. Even though I love the colors of fall, I decided to use some 'non-traditional' fall colors for this autumn blessings card.


I stamped the birds from the Winter Birds set on marker paper and colored them with my markers. After that I cut them out and I searched for the patterned papers I wanted to use for this card. I used patterned papers with geometric patterns but I decided to use circle shaped die-cuts for them. I die cut a circle from the orange/pink paper and I die cut clouds out of the blue patterned paper. I decided to die cut another small circle to stamp my message on. When I had all the elements for the card it was just a matter of adhering everything together. I used a blue ribbon and sequins to give the card a little bit more sparkle.

http://www.sweetnsassystamps.com/happy-scarecrow-clear-stamp-set/#http://www.sweetnsassystamps.com/winter-birds-clear-stamp-set/

For this card I used the stamp sets Winter Birds and Happy Scarecrow.

I hope you're inspired to create something today!

- Lucinde

Saturday, September 1, 2018

Colors of Fall

Hello sweet friends!  Cathy here sharing two cards using my favorite fall colors.  Now that September has arrived, it will not be long until we start to see the splash of beautiful fall colors displayed on trees and foliage.

Distress Oxide inks were applied to a stencil, spritzed with water, and pressed onto mixed media paper to create the background. The mums from the Autumn Mum Greetings were masked and stamped onto the bottom of the panel.  A rectangle was cut from the panel and the mums on this portion were colored with Copic Markers.  The colored mums were mounted to black card stock and popped back into the card.  Several more mums were colored, cut out, and popped onto the card for additional dimension.  A sentiment from the So Happy stamp set, some twine, and a few splatters were aded to finish the card.

Distress Oxide inks were smooshed onto mixed media paper for another DOX background.  The grid from the Texture Tiles 1 set was stamped onto four panels using four different fall colors.  These were   spritzed with water to cause the inks to bleed.  The maple leaf from the Happy Scarecrow set was stamped four times, colored, cut out, and popped onto each of the grid panels.  The sentiment was added along with several sequins to finish the card.

You can find the stamp sets used to create these cards at the Sweet 'n Sassy Stamps Store.

While you are there be sure to check out the new September Release!

Thanks so much for stopping by...have a wonderful weekend!

Hugs,
Cathy

Tuesday, August 28, 2018

I love Fall!

Hello friends, I have 2 cards for you today using our newest releases.  Fall will soon be upon us, can't you just smell that Pumpkin Pie Spice?  I can!
For my first card today I am using Incredibly Blessed by Rebecca Rios, I colored it up with my watercolors and the design paper is from Jen Hadfield.
This next card is using this adorable scarecrow from the set Happy Scarecrow also by Rebecca Rios.  I am in love with this guy, doesn't he just make you smile?  So fun to color too!  I colored him up with copic markers and the design paper is from my scrap bin.  The little piece of chipboard I have had in my stash for years and it has finally found a home.   You still have time to get our stamp of the month set called Give Thanks free with a $75 purchase (after discounts and before tax).
Happy Stamping!
~Stephanie

Saturday, August 25, 2018

Happy Fall!


Hello everyone! Today I want to share this happy fall card with you. And the 'Happy Scarecrow' stamp set is just perfect for a card like that :)

I stamped the image on marker paper and colored it with alcohol markers. I realized that I didn't have any red markers so I tried to work with green and yellow colors. I miss the red accents a little bit but I had to work with what I have. And on the other hand; a limited color pallet can be nice too. After I colored the images I cut them all out and started to arrange them the way I wanted. I die cut a circle from dark green paper and added that behind the scarecrow. The images of the leaves are behind that circle. This is an easy way to layer your stamps on your cards without having to deal with the masking. And you can still play around with your composition until everything is adhered.


I used a kraft colored card base and stamped a little texture on it with the Texture Tiles 1 stamp set. It's hard to see in the pictures but you can see it a little bit on the close up picture. It has a very subtle look that matches the patterned paper. To finish the card I added a couple of sequins and wooden buttons.
http://www.sweetnsassystamps.com/texture-tiles-1-clear-stamp-set/#
 http://www.sweetnsassystamps.com/happy-scarecrow-clear-stamp-set/
That's it for today! I used the stamp sets Happy Scarecrow and Texture Tiles 1.

I hope you're inspired to make your own cards :)
Have a nice day!
- Lucinde

Tuesday, August 21, 2018

Happy Scarecrow

Good morning! Today I have two cards to share using some Sweet ‘n Sassy stamps from the August Release. Here I used Happy Scarecrow and Texture Tiles 2.
 
For my first card, I stamped the scarecrow in the middle and masked him. Then I stamped the stone texture image and sponged it with gray ink. The top was sponged with a rays stencil. How cute is this happy scarecrow?


The leaves and pumpkin were popped up.


My second card is CAS. I simply stamped in black and layered on the colored elements.
 

Have a great day!
Diane
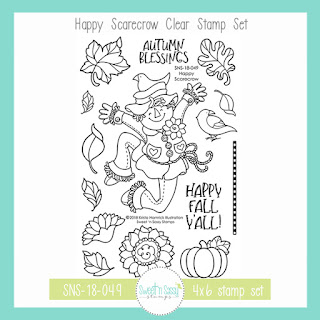
 

Monday, August 20, 2018

Happy Scarecrow Shaker

Hello! It's Monika here today with a shaker card. Have you noticed that I LOVE making shaker cards? It's true... it adds so much to a card, and I love the movement!
I decided to use the cute scarecrow from Happy Scarecrow clear stamp set. It was the perfect focal point to my Fall shaker card.


I started with stamping the images on water color card stock and coloring them with Kuretake Gansai Tambi water color. I stamped some extra pieces of the scarecrow (hat, flower, pockets, the ham of the pants, and the sleeves of the coat) and after cutting all the images out, I adhere the extra pieces onto the main scarecrow image... some with dimensional tape. Can you see the dimension those pieces added to my card?


The background was made with pigment powder, coffee filter and photo paper (check out the tutorial on SplitCoast Stampers). It's a super cool technique and pretty easy to make...
The shaker was filled with sequins and micro beads. I also placed some small stamped leaves inside the shaker. 
The greeting is from Keep in Touch Too clear stamp set. I wanted this to be a 'neutral' card I could use for any reason/occasion during the Fall season, hence the simple greeting...


Thanks for stopping by,
Monika


Friday, August 17, 2018

Autumn Blessings

Hello Sweet Friends!  It's Sheri here today sharing an Autumn themed card I created using the NEW Happy Scarecrow stamp set.  

I fell in love with all the different leaves in the set and decided to create my own background with them.  I picked a few of the different sizes/shaped leaves and randomly stamped them before coloring them with copic markers.  I then stamped and colored the pumpkin before fussy cutting it out so I could pop it up under the sentiment to create the focal layer.


 I have one more to share...

Earlier this month I created this card featuring the super cute Scarecrow in the set.  I kept the layout CAS (Clean and Simple) and used copic markers to color him.  Isn't he a cutie?!?!?


http://www.sweetnsassystamps.com/happy-scarecrow-clear-stamp-set/

Don't forget that the Give Thanks stamp set is the August 2018 Stamp of the Month and is FREE with a $75 order (after all discounts and before shipping & tax) through 8/31/18
 
http://www.sweetnsassystamps.com/august-2018-stamp-of-the-month-give-thanks/

And...


 Happy Stamping!


Friday, August 10, 2018

Happy Fall Y'all!

I am so excited about the new fall images at Sweet N Sassy this month! They are absolutely adorable and make me smile out loud!! Today I have a card using Happy Scarecrow Clear Stamp Set.

I always LOVE the look of color pencils on kraft cardstock, but today I created a little scene and colored it up with my Copics. It is not as vibrant as pencils on kraft or Copics on white paper, but fall colors aren't bright so it makes me happy!
I hope you are inspired! I challenge you to try coloring on a different paper from your norm and see what new awesomeness you discover!

Thanks for stopping by!!

Lyn


Monday, August 6, 2018

Wishing You Sunshine

Hello sweet friends!  Cathy here with a couple of cards featuring some of the new stamp sets just released by Sweet 'n Sassy Stamps.

First up is this fruity card using the Fruit of the Spirit stamp set.  As you can see, this set can be used for creating fun cards as well as for Bible journaling.

Distress Oxide Inks were pressed onto strips of painters tape and applied to the card front in a plaid pattern.  Texture was added with one of the textures from the Texture Tile 1 stamp set.  Texture paste was then applied through the TH Sun Rays Stencil.  A frame was cut with Spellbinder Dies and the fruit from the Fruit of the Spirit stamp set was colored, cut, and applied to the frame.  Scripty Thoughts and the Sunshine Girl Alpha sets were used to make the sentiment.  

My second card was made using the Happy Scarecrow stamp set.

Isn't this scarecrow just the cutest, most happy fellow you've ever seen?  Distress Oxide inks were applied to a panel and the leaves from the Happy Scarecrow set stamped over the colors.  The scene on the left side of the card was colored with Copic Markers.  Texture on the grassy hills was stamped using one of the texture stamps from the Texture Tiles 2 stamp set.  The sentiment was white embossed on a hand cut banner to finish the card.

Look for these wonderful new stamp sets at the Sweet 'n Sassy Stamps Store!


The August Stamp of the Month set, Give Thanks, is free with a $75 purchase.


Thanks so much for stopping by...wishing you sunshine until next time!
Hugs,
Cathy