Showing posts with label clean and simple. Show all posts

Saturday, October 3, 2020

You are Simply Amazing

Happy weekend everyone! I hope you all have a chance to get crafty today for World Cardmaking Day. Today's card features the October Stamp of the Month, My Thoughts of You. This sentiment kit is perfect for sending an encouragement card to someone you love! You will want to add this one to your collection.

This card is clean and simple and I love how the pink and green pop against the gray background.


I started by die cutting the background and sentiment panels (dies from GMD & MFT) from basic gray  and white cardstock. I stamped the sentiment with VersaFine Clair Nocturne ink. Next, I embossed the roses and leaves from True Beauty in white onto Canson mixed media paper. I colored the roses and leaves with watercolor brush markers (Altenew, lime & rubellite). Once dry, I hand trimmed the leaves and flowers out. I assembled the card as seen, popping up the sentiment panel and parts of the leaves and flowers with foam tape. 


Thanks for stopping by and have a fantastic day,

Karen

Friday, November 29, 2019

Never Lose Hope

Hi friends! It's Julee popping in with a couple cards using one of today's Friday Features sets, Choose Faith. This set is just $13.50 today only, after combining the Friday Features and Black Friday discounts!


I started with the background, smooshing broken china and shaded lilac onto some packaging and then spritzing with water and pouncing onto watercolor cardstock. Next I embossed the hope and the never lose stamps with chipped sapphire ink and clear embossing powder.  I then masked off the never lose portion with a post it note and then stamped the flowers from Nature Silhouettes in a combination of shaded lilac and chipped sapphire inks, then embossed in clear. A super quick, fun card.

Next I did a watercolor wash on watercolor cardstock with broken china and cracked pistachio distress oxides. Then I splattered on some of the same colored inks.  When this was dry, I embossed the JOY stamp from Choose Faith in white, then added the trees and snowflakes from the Thrill of Hope set to complete a winter scene. I cut this with a die and matted with navy cardstock.  The back panel is embossed with a snowflake embossing folder.

Thanks so much for stopping by today! I hope you've enjoyed these quick cards.  Be sure to check out all the Friday Features today!


And while you're there, don't forget that everything in the shop is 25% off during our Black Friday/Small Business Saturday sale!

Thursday, September 21, 2017

Quick & Easy Notecard -using Scraps- with Scribble Flowers

It's Gracie Chavez with a new card idea for you! Ever wonder what to do with all those white cardstock scraps? Well, today I have a floral notecard made with just scraps that I used to stamp floral images from the set Scribble Flowers


I stamped a bunch of images on scraps of white cardstock and colored them with Zig Markers and a waterbrush to give them a quick watercolored effect. To add some details I scribbled following the design of the images using an oil based marker in gold. I adhered all the images to a simple white card base to which I added a gold border using the same marker used before. And there you go, a quick and pretty card is ready! 

This kind of card is super practical but pretty and it truly saves you time if you stamp as many white scraps of paper you have color them and save them on a basket, ready to be used on a project. This tip comes in handy especially when there's not much time and you need to send a card as soon as possible!

That's all for today. Thanks so much for stopping by.

Thursday, September 7, 2017

Stamped & Stenciled One Layer Cards with Mason Jar Bouquet

It's Gracie from Graciellie Design with a new cardmaking idea to share. I'm saying good-bye to Summer with a set of colorful stamped and stenciled cards. I had lots of fun making these so I'm happy to be sharing them with you today!


I started out by picking my color palette. I wanted to go for a bright and unique color combo and that is how my first card came to life in yellow and green. I stenciled the backgrounds with a Distressed Details stencil using mostly ink. I did stencil a few patterns with heavy body acrylic paint in yellow and silver metallic.


I stamped and colored the flowers with Spectrum Noir markers and then added a stamped banner with the sentiment. This is a one layered card. I didn't add card panels at all and that is why I love these designs so much. If you use a nice cardstock you are able to add lots of ink and paint layers, but of course make sure to use as little medum as possible.


My second card came about as a consequence of the first one. I thought I should make another card using also yellow and so I combined it with hot pink. I tried to follow the same stencil design I had added to the first one, which is not precisely simple, but I was able to achieve the same look with a similiar stenciling.

Making these cards lifted my spirit on a very hard day, so I hope I they can also cheer you up and inspire you to create something pretty today! Until next time.

Friday, March 10, 2017

A Friend Loveth At All Times

Hello Sweet Friends!  Julie here to share a Mixed Media card that I created with the new Peaceful Peonies Clear Stamp Set designed by NinaB Designs.

Wow, isn’t this a gorgeous stamp set?  I love all of the sentiments as well as the verses and those beautiful flowers, don’t you?

I used a stencil brush with a flourish stencil to apply tumbled glass distress ink onto two pieces of white cardstock, before trimming, die cutting and layering onto black cardstock. 

I stamped the large floral image from Peaceful Peonies with embossing ink and heat embossed with black embossing powder.  Once the powder had cooled, I used water-based markers with a water brush to layer the watercolor. 

I fussy cut the image close to the embossing, cut the leaves off the edges and split the flower near the bottom before layering the split blossom onto the card front with dimensional foam.

I added the heat embossed sentiment from Peaceful Peonies with dimensional foam before adhering and tucking the leaves directly to the card front (behind the blossoms).

I finished off the card by adding shimmer to the petals with a clear glitter pen and adhering a few rhinestones.

I hope I have inspired you today to create something fun this week! Hugs and have a blessed week, sweet friends!

Sunday, October 23, 2016

May God Grant You Peace & Strength

Hi Sweet Friends! 

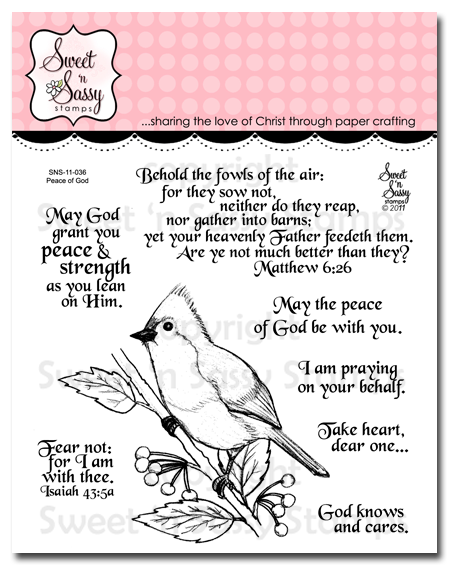
Happy Sunday! Julie, here sharing a Clean and Simple card with Peace of God Clear Stamp Set from Sweet ‘n Sassy Stamps.


I love all of the image, sentiments and verses in the SNSS Peace of God Clear Stamp Set!  My husband and I feed the birds and the Tufted Titmouse is one of our favorites (we affectionately refer to them as "Tufty" or "Tufties").  

This set makes me smile when I create with it as I recall the fun memories of "bird watching" with my sweetheart- we truly have such an Awesome Creator God!!

I started off by stamping the SNSS Peace of God "Tufty" image with archival black ink onto white cardstock,  used a water brush  to color the image with distress inks , die cut with a stitched circle die and mounted onto another stitched circle die cut from cherry cardstock.

I stamped the sentiment onto a piece of white cardstock with archival black ink before scoring a few lines for texture and mounting the entire panel onto the cherry card base.

To finish off the card, I added the focal image with dimensional foam.  Quick, easy and a delight to create!


Thanks for stopping by- I hope all of you have a fabulous week!

Tuesday, June 24, 2014

Clean and Simple Silhouette Birthday


Hi!  It's Cynthia again with a little 
Sweet 'n Sassy inspiration.

It has been such a pleasure and honor to share
with you this month!
I hope you've been inspired to pull out
your silhouette images and give 
the clean and simple style a try.

This week's card uses Sweet 'n Sassy
clear stamp set.

The base was masked with the negative from
a square Spellbinder nestibilities
then layers of Memento inks were sponged.
The images were stamped with Versafine 
tuxedo black ink.

Thanks so much for taking a look!
Don't forget to check out this week's

Tuesday, June 10, 2014

Silhouette Birthday

Hello!  It's Cynthia again and it's my turn to share
a little Sweet 'n Sassy inspiration.

I LOVE the quality of Sweet 'n Sassy stamps.
I especially enjoy the versatility of the 
silhouette stamp line.


This clean and simple design started with
masked ink sponging for the background.
An image from Landscape Silhouettes
was stamped on the background in
Versafine Black ink.

Easy Peasy!

The sentiment is from
by Dina Kowal.

I hope this inspires you to pull
out your Sweet 'n Sassy stamps and
play along!  
This week's challenge is to use scripture
on your project.  You can find all of the
details HERE.

Hope you have a great week!