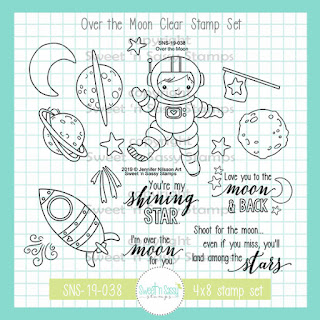
Showing posts with label Over the Moon. Show all posts

Friday, February 26, 2021

Land Among the Stars

Today I have a card using the new Texture Tiles 10 set to create a galaxy look.

First, I heat embossed the star tile randomly over a piece of Bristol smooth cardstock with clear embossing powder. Then I inked up the background with Distress Oxides with the galaxy technique. For this one, I let the background be the main focus of the card. I found a sentiment in the Over the Moon set that was perfect. I heat embossed the sentiment on a vellum strip that I wrapped around the card. I added some acrylic stars for dimension and that is all there is to this one.

It only has a few pieces to it but it has a a lot going on. I love galaxy cards and am always excited to get a chance to create one.

I hope you are inspired to try a new background technique - this one is really fun!

Thanks for stopping by!
Lyn


Monday, August 19, 2019

Clean & Simple Stamping


Hello there and thanks for stopping by.
It's Ceal, here and I am sharing a couple of super CAS cards with yo today. 
My style is clean and simple but this past wee I have been catching up on Dare to get Dirty challenges at Splitcoastsrampers so these two cards are super CAS.


To make these card I simply stamped my images, the Unicorn from the Be Unique set and the rocket from the Over the Moon set and colored them using Copic markers. The greetings on both cards are from the Faith Wordfetti set


Monday, July 29, 2019

Over The Moon


Hello Sweet & Sassy Friends! 
It's Ceal, here to share a couple more cards with you using the Over the Moon set from our July release. 


To create my first card I started with a gray card base and a white panel. I stamped the little astronaut and the masked him off and created the galaxy background by blending some Blue, yellow, and Pink ink around the astronaut using the Life Changing Blending Brushes, next I blended some distress oxide ink in Hickory Smoke and Black Soot over the other colors. I spritzed it with water and then added some white acrylic paint to create the starry sky. 
To finish the card I removed the mask, colored the image using Copic markers and added the birthday greeting from the Scripty Thoughts set


The second card took a lot less time. I started with a white top folding card base and a white panel. I stamped the rocket image also from the Over the Moon set on the panel and colored it using Copic Markers. I used a Star stencil for the background along with yellow ink blended with the Life Changing Blending Brushes. To finish the card I added the greeting in the bottom corner.


I have used affiliate links in my post, what does this mean? If you follow the links or click on the description picture below and shop from them, I will receive a small commission from the sale which is no additional cost to you but compensates me for using the product and my time.
Thank you for your support! 

Saturday, July 27, 2019

Shoot for the moon


Hello everyone! Today I want to show you a card I made with the stamp set 'Over the Moon'.


I colored the images with alcohol markers and cut them out. I made the background with Distress inks and added a couple of drops with sparkling watercolors to create a starry/space look. I die cut a border with a cloudy edge and stamped the message on the 'cloud'. After that all that's left to do is adhering everything to the card.

https://www.sweetnsassystamps.com/over-the-moon-clear-stamp-set/

I hope you're inspired to create!
- Lucinde

Friday, July 26, 2019

To the Moon and Back!

I have a fun card today using the new Over the Moon set and it is so adorable! I created a galaxy background with Distress oxides but with a twist...a big 'ole moon behind the astronaut.


I colored the astronaut with some cool gray Copics. Once I finished coloring him, I went back over his face (yes it is scary) with a white colored pencil and drew parenthesis around his face - to make it look like he was behind a glass bubble. (I hope that makes sense - I am not sure how else to describe it :) )

For my moon, I used the paper towel technique from the TLC at Splitcoast Stampers.
I used the sentiment on the inside this time as I loved my little guy (who looks like he is waving from space) and thought he should be the center of this one!

I hope you are inspired to try a galaxy background. It is a bit messy, but lots of fun and oh so worth it!

Thanks,  for stopping by!

Lyn
Tuesday, July 9, 2019

Over the Moon

Hello Sweet 'N Sassy Friends!  Sheri here today with a card featuring the NEW Over the Moon stamp set.  This set is ADORABLE!!  I had so much fun coloring the images and creating the little space scenes.

***THIS POST CONTAINS AFFILIATE LINKS AT NO ADDITIONAL COST TO YOU***


I thought that I would share how to create a quick & easy Galaxy Background.  Not a lot of supplies or ink blending are required.  You will just need a piece of dark blue card stock, black dye ink, ink blending brush, white paint, black paint and a small paint brush.

1. You will first take the blue card stock, black ink, and blending brush to created the ink blended background.  Work around the edge of the card stock and blend the ink.  Make sure to keep it darker towards the edges and lighter as you move towards the center.  

2. Next you will add splatters with the black & white paint using the paint brush.  I have a splatter box set up to ensure I don't get paint all over.  

http://shrsl.com/1ou1d

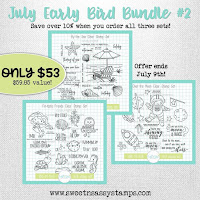
You still have a few hours to take advantage of the Early Bird Bundles!!  
This month there are TWO!!

http://shrsl.com/1ou1dhttp://shrsl.com/1ou1d

If you order $60, you will receive the  
Sentimental Wordfetti set FREE!!


If you order $75, you will receive the
this months Stamp of the Month and FREE US Shipping

http://shrsl.com/1ou1d

Happy Stamping!!

Monday, July 8, 2019

Shoot For The Moon

Hello friends, Stephanie here with a sweet card using one of the newest sets by Jennifer Nilsson called Over The Moon.  For the background I used distress inks then I added some stars with Versamark ink and heat embossed with silver powder. I cut out the moon and ran it through my cuttlebug with an embossing folder.  I colored the little guy with Copics and the background paper is from BoBunny.   You have one more day to take advantage of the early bird bundles, there are 2 this month- See Below. 
You can order either of these by clicking HERE.   Also don't forget about our Stamp of the month! This month is is Sentimental Wordfetti.  Such a fun set to play with and it is free with a $60 this month.

I made a card using the Sentimental Wordfetti and an older set Made New.  First I stamped my butterflies with Versafine and then I used white embossing powder and heat embossed.  My next step was to use distress Oxide inks to add the colors, when you are done applying the ink just use a cloth to wipe it off the stamped images.   Wordfetti is such a versatile set you will find yourself going to it over and over again, great to use alone or use it along with sentiments you already own.  Remember as always, if you spend $75 you get free shipping!
Happy Stamping!

Friday, July 5, 2019

A Good Day to Have a Good Day

Hello, sweet friends!  Hope all of you in the USA had a blast on the 4th of July yesterday!  Today is Friday and it's a good day to have a good day!

***This post contains affiliate links at no additional charge to you.***

Cathy here and I have a couple of cards to share using some of the new products released this month by Sweet 'n Sassy Stamps.

My first card features the Over the Moon stamp set designed Jennifer Nilsson and you will be Over the Moon with all of the fabulous images and sentiments in this adorable set.

Oxide Inks were applied to an acrylic block, spritzed with water and applied to a piece of mixed media paper.  A little more sponging, some white paint splatters and stamped stars complete the galaxy sky.  The rocket and moon were colored with Copic Markers and a little Glossy Accents applied to the window.  The sentiment panel and some gems were added to finish the card.

Next up is a card made with the beautiful Happy Irises stamp set.  This set was the Stamp of the Month last month, but is now available for purchase.

Oxide Inks were sponged onto a piece of mixed media paper, spritzed with water splatters and stamped with the grid texture from Texture Tiles 1.  Another piece of white card stock was impressed with a canvas pattern and stitched to the sponged panel.  The irises were colored with Copic Markers, cut with the Scan 'N Cut and popped onto the card.  The sentiment is from the new Stamp of the Month, Sentimental Wordfetti, and is available free with a $60 purchase.

The stamp sets used on my two cards are available from the Sweet 'n Sassy Stamps Store.


Be sure to stop by often to see more fabulous samples using the new release.
Have a wonderful weekend!
Hugs,
Cathy

Thursday, July 4, 2019

over the moon


Good morning and Happy Fourth of July!
 
If you haven’t noticed, there’s a fun new release at Sweet ‘n Sassy Stamps! Today I’m sharing a few projects with the awesome Over The Moon stamp set. This one is great for both card-making and bible journaling.
 
I created backgrounds for my first two cards with the Acrylic Block Background technique and various ink cubes. I thought it would be a fun, different way to make the galaxy background. I also diecut a circle for the moon and colored it the same way, with only a gray inkpad. A piece of crochet thread tethers the little astronaut to his "rocket".
 
 
The sentiment on my second card is from the Sweet ‘n Sassy July Stamp of the Month, Sentimental Wordfetti. Check it out….this month it is free with only a $60 order. There's a lot of sentiments packed in this little set!

 
My last card is a little different style with some patterned papers to coordinate with the space theme. No matter how you use these stamps, your cards will turn out so cute!

 
Have a great day! Stay safe and enjoy!
Diane