Showing posts with label Back to School. Show all posts

Monday, August 22, 2022

Back to School Tags


Happy Monday! Esther here today sharing some fun tags I created to attach to gifts I'm giving out to my Sunday School kids to celebrate going back to school this fall. 
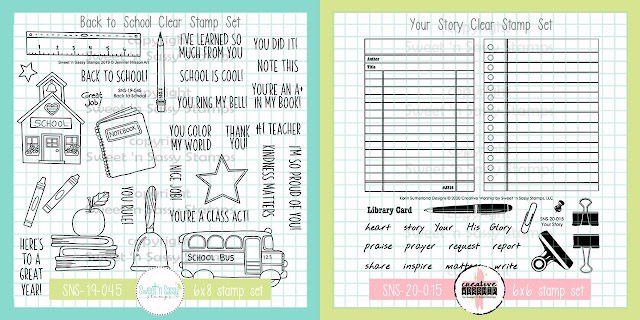
I started by stamping the library card from Your Story in Versafine Clair Nocturne Ink on white card stock and cutting them out. Next, I stamped a bunch of images from the Back to School stamp set on mixed media paper and colored them with Arteza Real Brush Pens. After fussy cutting (because I don't own the Back to School coordinating dies --- yet!), I arranged them on my library cards and stamped various school related sentiments at the top. Each tag has a personal message from me on the back.

~This post contains affiliate links at no extra cost to you~~~


Monday, August 8, 2022

Back to School


Hello friend, Esther here today with a back-to-school card. This was my first time to use gelatos, and I had a lot of fun experimenting with them. To create this background I scribbled a line of gelato in rainbow colors at the top of a piece of mixed media paper. Next I stood the paper up on it's side and spritzed it with water to make the colors run. After heat setting I added the stamped images and die cut sentiment.  The Sweet 'n Sassy Stamps die set I used on this card is BRAND NEW for the month of August!  


~This post contains affiliate links at no extra cost to you~~~

Supplies and Tools:


Monday, August 9, 2021

Back to School


Esther here today with a fun "back-to-school" themed card to share with you using several fun supplies from Sweet n Sassy Stamps! 
 
 
To create that fun chalkboard background I simply inked up the alphabet stamp set (in white pigment ink) while it was still on the stamp backing, and pressed it into my black card stock. I found that laying a book on top and pressing down a bit helped to ensure that all the letters got stamped, and was much quicker than stamping each letter separately! I lightly spot stamped the typewriter text background over top for extra interest.

~~~This post contains affiliate links at no extra cost to you~~~

Supplies and Tools:

Friday, January 31, 2020

Fun Valentines

Hi Sweet 'n Sassy friends! It's Julee, popping in to share a couple of fun valentines I made this month. These were both inspired by the fabulous challenges in our Winter Stamp-a-thon. Did y'all have fun with that? We're hoping to do a few more throughout the year!


My first card uses the darling sloth image from Lots of Love. I colored him with a mix of watercolor markers and copics, then paper pieced the hearts.  I thought the Everlasting Love sentiment from Faith Wordfetti would go well with a sloth, so stamped that on the side of my panel and then doodled a frame.  A bit of Tumbled Glass distress oxide sponged around the edges finished off the stamped panel.

For the background I used 1/2" strips from the Lovestruck Authentique pad, taping together with double sided tape and then finished off my square card with a bit of lace trim. Easy and so much fun!


My next Valentine was inspired by Sheri's theme challenge to use the color red and a heart on a valentine.  I love this you ring my bell sentiment from the Back to School set and thought it would be perfect for a valentine for hubby!  I stamped the bell, colored with Copics and cut out.  The sentiment is stamped and matted to layer behind and I added it to a heart die cut of patterned paper.

I added a little sponging with black soot ink to the designer paper I chose for my background, then taped some thin black washi at the bottom and pulled out the Love Wordfetti set to add in the xoxo valentine xoxo portion in candied apple and black soot inks.


Thanks so much for stopping by today. I hope you're inspired to get inky!

***This post contains affiliated links at no cost to you ***

Tuesday, August 27, 2019

You Color My World

Hello Sweet 'N Sassy Friends!  Sheri here today with a couple cards featuring the NEW Back to School stamp set illustrated by Jennifer Nilsson.

***THIS POST CONTAINS AFFILIATE LINKS AT NO ADDITIONAL COST TO YOU*** 
I just had to make one more card featuring this ADORABLE new set.  I created a 4.25" square card.  For the background I created my own pattern paper by randomly stamping the crayon stamp and then I colored them with copic markers.  I topped it off with a little sentiment strip. I added some twine and attached to a card base.


http://shrsl.com/1r9e8

There's still time to place a $75 order to received this months Stamp of the Month set!

http://shrsl.com/1ou1d


Happy Stamping!!

Monday, August 26, 2019

#1 Teacher

Hello friends, Stephanie here.  Today I have a cute little note card perfect for a child to give a teacher on the first day of school.  I love this new set Back To School by Jennifer Nilsson.  I colored with Copic markers and used a bunch of scraps for my background.
My second card features Singing Praises which is the Stamp of the Month by Nina Brackett.  Oh my goodness, just a precious stamp set so near and dear to my heart because I am a bird lover.  I colored with Copic Markers and again used up scraps.  I fussy cut the little flowers and added some pearls to the center.  You can get this set free for a few more days when you place a $75 order.  Hurry, you don't want to miss out!

Saturday, August 17, 2019

In His Image

 Hello! It's Monika here today with couple of cards using the new Creative Worship: In His Image clear stamp set

My first card also incorporates images from Back to School, Itty Bitty Blossoms, Sentimental Wordfetti and Typewriter Text Background clear stamp sets. I love how it all came together with lots of dimensions and fun elements... without the flowers, this would also make an excellent masculine card!


I stamped the images on water color card stock then colored them with Kuretake Gansai Tambi water colors before cutting them out. The text background was (again) the perfect backdrop... subtle, but still noticeable... 


My second card is filled with images just from In His Image clear stamp set. I used masking technique to stamp the bottom panel... then instead of coloring the images, I stamped them with the splatter image using different colors... it's so much fun to add a splash of color this way...


I hope I have inspired you to craft today!

Thank you for stopping by!

Monika


Thursday, August 15, 2019

Back to School

Good morning! Today I’m sharing a card and project with the Back to School stamp set from the new release at Sweet ‘n Sassy Stamps. Don't forget that SNSS also has a great sale going on NOW on all alpha stamps! Be sure to check it out!


I made a fun collage card with many of the images and sentiments to wish my daughter (who is a teacher) a great year.


I also made her class a pile of pencils to start the year off. Here's a sample of them. The smaller sentiments on the bottom were stamped with Stazon ink using Sentimental Wordfetti. The larger sentiments on the top are obviously too large to easily stamp on the pencils so I stamped them on scraps of clear sticker labels and stuck them on.


Have a great day!
Diane

Friday, August 9, 2019

Here's to a Great Year!

I can't believe it is time for back to school already, but since I am a sister of a teacher (Kindergarten) and have spent a few days putting up posters of numbers, shapes, and colors helping her get ready to welcome another class of cuteness into the wonder that is school, I am ready.

My sister is also an avid scrapbooker so I love make special cards for her because she uses them as embellishments for her scrapbooks and I know they are appreciated and loved (not read and tossed haha!) This month's new Back to School Set is perfect for a special teacher card and I know a special teacher (see above)!

I think she is going to love this one! It has looks of fun embellishments for her classroom scrapbook! It has a fun background and a schoolhouse...


and a school bus...

And the perfect sentiment!


I created the background with an ABC embossing folder and Distress Inks and colored the images with Copics.

I also created a whole set for the elementary aged kiddos in my life - they go in the mail this weekend so they get them next week. I will share more on those and on how I created a set for next week's blog hop... you'll have to join us to see more :)


Thanks for stopping by! I hope you are inspired!
Lyn


Saturday, August 3, 2019

Back to School

 Hello! It's Monika here today with couple of quick cards using the brand new Back to School clear stamp set. I have kids in school so this set is so perfect for me... but today I wanted to make cards that would be somewhat general and could be given to anyone, not just a teacher or a student...

My first card is an encouragement card (maybe for finishing a book, or being a good reader). The sentiment came from Sentimental Wordfetti clear stamp set:


I stamped the image on water color paper then colored it with Kuretake Gansai Tambi water colors before cutting it out. 
The background was stamped with Typewriter Text Background clear stamp. It is such an awesome stamp to have... great image to fill empty spaces with...  on my card, I only pressed down small areas of the stamp (just using my hand, not a stamping block) to get a very blotchy and distressed look.


My second card is super simple... I just used the star images along with one of the many sentiments from the set:


Just like on my first card, I stamped the images on water color paper then colored them with Kuretake Gansai Tambi water colors. The gold star sequins were the perfect embellishments on this card too.

I hope I have inspired you to craft today!

Thank you for stopping by!

Monika


Friday, August 2, 2019

Back to School

Hello, sweet friends!  WOW...it's August already!  That means it's time for a new release AND almost time for the kids to head back to school.  One of the new stamp sets designed by Jennifer Nilsson, Back to School, is perfect for tucking little notes into a child's lunchbox or sending the new teacher a note of appreciation.  I have two cards to share today using this new stamp set.


The design of this card is from the current Mojo Monday Sketch.  Oxide inks were applied to an acrylic block, spritzed with water and stamped onto the upper corner of the card.  The corner was masked off and the Typewriter Text Background was stamped over the color.  The images were colored with Copic Markers, cut out and mounted to the card following the sketch.


The background on this card was created the same way as the card above.  More images from the Back to School stamp set were colored, cut out and mounted to the card.  A little Glossy Accents was added to the windows on the bus and schoolhouse to finish the card.

The following stamp sets from the Sweet 'n Sassy Stamps Store were used to create the cards above:


Be sure to check out the other wonderful stamp sets released this month at Sweet 'n Sassy Stamps.


Thanks so much for stopping by!
Have a wonderful weekend!

Hugs,
Cathy