Showing posts with label You & Me. Show all posts

Friday, February 22, 2019

Girl Power X3 in Red and Teal

Hi Friends! Today I have some fun projects using the new Girl Power 2 set. I have also used other sets (I will point them out as I go) but this one is the focus on all of my projects. I wanted to show how a single stamp could be used in different styles and complexities (is that the right word? I'll go with it :)). To show this versatility, I decided to use the same color pallet on them and red and teal is the color combo I chose. These projects are all different but the each make me smile out loud! So here we go...


My first project is a mixed media art journal page. I saw a 6x6 disc bound journal and felt ready to commit to that as it was less intimidating than a bigger journal with two pages to cover. This is my more complex project as it has acrylics, and archival ink, and texture paste, and Copics, and Washi tape, and a masked (many times over) image. I even pulled out my gelliplate and got so messy and had so much fun. If you haven't tried a journal page - I encourage it. It is very rewarding.
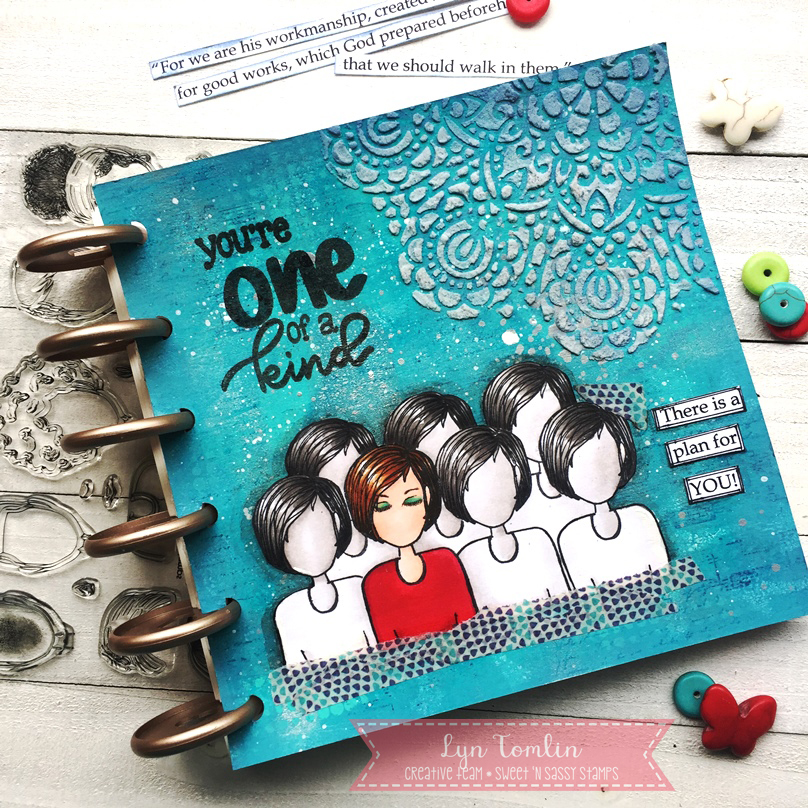
Recipe (in order of use haha):
  • Background - Acrylics Dina Wakley Acrylics Ocean, Turquoise, and Sterling
  • Background stamps - Texture Tiles 1 using Archival Inks Cobalt and Paradise Teal
  • Splatters - White Gesso and Sterling acrylics
  • Corner texture - Stencil with texture cream (Momenta Art-C in Platinum)
  • Sentiment (big) Be Unique Clear stamp set from SNSS, (little) typed on computer
  • Image - Girl Power 2 Masked over and over. Main image colored with Copics R24, R27, R29(shirt), E53, E55, E57, E59 (Hair), E00, E21, E11(skin) Other images colored with warm grays - adhered with Multi Matte Medium
  • Washi Tape - not sure brand
  • Outline image with Stabilo All Pencil and water brush

My Second project is a less complex and uses only a few dies, designer paper (from my stash)some tulle, and sequins. There is a mask though :) It is a shaker of sorts...

Recipe:
  • Spellbinders circle dies (two sizes so I could add the frame on top) This card allows you to see through to the inside
  • Designer paper from my stash
  • Tulle - folded in half filled with sequins and closed up with score tape the taped down between the paper layers and the card base
  • Image - Girl Power 2 (I chose the girl that looks like me) Keep in Touch Too (sentiment) and Home for the Holidays (gift). I stamped the gift first then masked it then stamped the girl.
  • My background paper is cut with A Jillian Vance Design Basic Polka Dot Die


My Final Project is kind of Clean And Simple but still has a few steps. It still uses a mask (I cut them out so I wanted to use them as many times as possible I guess haha!) I cut out some frames, stacked them and colored up my image. to pop into the frame. I wanted this to look like a selfie pic of me and one of my best friends so I chose girls with our hairstyles. For fun I decided to try to video it. It isn't awesome but it is my first time doing this and the video stopped and I had to add in the end...oh well - feel free to check it out if you want to HERE)

Recipe:
  • Spellbinders Rectangle and Square dies (taped together to create a frame and cut multiple times to stack and remain the same).
  • Image - Girl Power 2 Masked over and over. Main image colored with Copics R24, R27, R29(shirt), E53, E55, E57, E59 (Hair), E00, E21, E11(skin)
  • Sentiment - You and Me set from SNSS
  • My background paper is cut with A Jillian Vance Design Basic Polka Dot Die

I hope you are inspired to pick up a stamp set and see what other ways you can create with it. See how you can combine sets for a single project and most of all, this should be fun so make it FUN!!

Thanks for stopping by!
Lyn


Tuesday, January 8, 2019

Happy Valentine's Day

Hello Sweet Friends!  Sheri here today to share a Valentine card featuring the NEW His Love along with the fun You & Me stamp sets.  You could easily change out the sentiment to create an Anniversary card to give you another option for the card design.

Back to my card...first I created my own background paper by randomly stamping the "Love" stamp from the His Love stamp set.  I love how you can create your own custom background papers.  I then cut out a heart from some glitter card stock.  I added a sentiment from the You & Me stamp set by using Versamark ink and heat embossing it in white. 


http://www.sweetnsassystamps.com/creative-worship-his-love-clear-stamp-set/


January's Stamp of the Month is called Filigree Hearts and is FREE with any $75 order (after discounts and before tax & shipping).


AND...


 Happy Stamping! 

Friday, December 21, 2018

Coffee & Donuts

Hello friends, Stephanie here with a cute little card using You & Me.  I just love this set, it is perfect for Valentine's Day..  I colored with copics and added some stickles to the frosting to make it look like colored sugar sprinkles.  The paper is from Simple Stories.  I hope you all have a blessed Christmas!  

Tuesday, February 23, 2016

You Complete Me

Goodness, it's so fun when you organize your stamp room and find things you haven't used yet because they were "covered up" with other things! Like these fun Speech Bubbles dies.  I have had them for a long time, but put them in a place they shouldn't have been, and just rediscovered them!

I had the stenciled background done and in a "to use later" envelope, and it fit perfectly with the little CAS card I had in my head! Both the sentiment and the image are from You & Me.

I plan to give this to a girlfriend whom I am meeting for supper tonight! An actual ten-minute card!


Friday, July 10, 2015

Friday Feature: You & Me

Hello, Sweet 'n Sassy friends! It's time for another Friday Feature! The samples we have to share with you today will bring a smile to your face.  These adorable images are perfect for sending a little note to your honey or a special friend.  

Today's feature is:
You & Me
  • Set measures 4"x6"
  • Includes 5 images & 12 sentiments
  • Illustrated by Korin Sutherland


Here are some darling samples made by the talented Design Divas:


How cute is this card created by Jenny…a swag made by paper piecing the veggies from You & Me, a Mini Tag, and a few Hearts!


The chocolate frosted donut looks so yummy on this card created by Kim!

The black and white papers are used to carry through the idea of salt and pepper on this card created by Cathy.

The images in the You & Me stamp set fit perfectly on the Decorative Plaques Dies as you can see on this cute sample by Jenny!


Peanut butter and Jelly…a winning combination!  Kim's free standing up-up card is just darling!  


YUM!  The smiles on these images are so infectious…don't you think?

You & Me is now available for just $13.50 for a limited time!
No Coupon Needed!

   Head on over to the Sweet 'n Sassy Store and pick up a fabulous deal 
on this delightful stamp set!

While you are there be sure to check out our 
50% off sale!

http://www.sweetnsassystamps.com/discontinued/

Here are just a few of the stamp sets included in the sale along with some samples for each:

Borders & Backgrounds


Just enter CODE:  OLD2015 to receive these wonderful stamp sets for 50% off the retail price!  Now that's a great deal!

Thanks for stopping by…have a wonderful day and happy shopping!

Sunday, June 14, 2015

you & me

Hello Sweet 'n Sassy friends!
 
Today I have 2 cards to share using the cute set called You & Me.  On my first card I used the matching dies which makes cutting them out & popping them up a snap!


I started with a pre-printed card base and added a short banner cut with the Bookmarks & More dies.
 
My second card was made for an anniversary so the image was stamped onto a heart diecut.  I masked off the "& ME" in the sentiment on this one.


I am not a coffee drinker but that is making me hungry for a doughnut!  lol.
 
Have a great start to your week!
♥  Diane


Monday, January 26, 2015

Parisian Postcard Anniversary Shaker Card...

Hello! It's Monika here today, bringing you a tutorial on how I made my anniversary shaker card. I love adding shaker elements to my cards. It might look difficult and time consuming, but it actually can go pretty fast when you learn the basic steps.


I started out stamping my main image, the Eiffel Tower from Parisian Postcard clear stamp set on the white base card and the red panel. (Yes, it seems to be the favorite for the last week or so between the SNSS team members.) I made sure the images were stamped the same place on both card stock, so they would line up when layered on top of each other. I used my trusty Stamp-a-ma-jig to do the perfect job. (If you are leaving a white border, don't forget to calculate that 1/8" extra on the white card.)


Next I die-cut the heart window opening on the red panel, using the biggest die from Heart Die set. 


Next I placed the red heart back in the negative space, and secured it to the white base card with masking tape (you can also use repositionable or washi tape). Then I placed dimensional tape around the heart.


Next I added extra dimensional tape to the white base card. 


Then I added the shaker elements: glitter hearts, gold sequins, and micro beads. The tiny glitter hearts were die-cut with Hearts and Stars Scallop Border Die set. Before I adhered the red cover panel, I taped a piece of window sheet behind the heart window opening.


Finally I embellished my card with stamped postal stamp images, thread (adhered with a glue dot), punched vellum flowers, and more of the glitter hearts.


The greeting was stamped with VersaMark ink, then heat embossed with gold embossing powder. The image is from You & Me clear stamp set

I hope I inspired you to make a shaker card today. 

Thank you for stopping by, 
Monika