Showing posts with label So Thankful. Show all posts

Monday, September 21, 2020

Pastor Appreciation


Hello Sweet 'n Sassy friends!
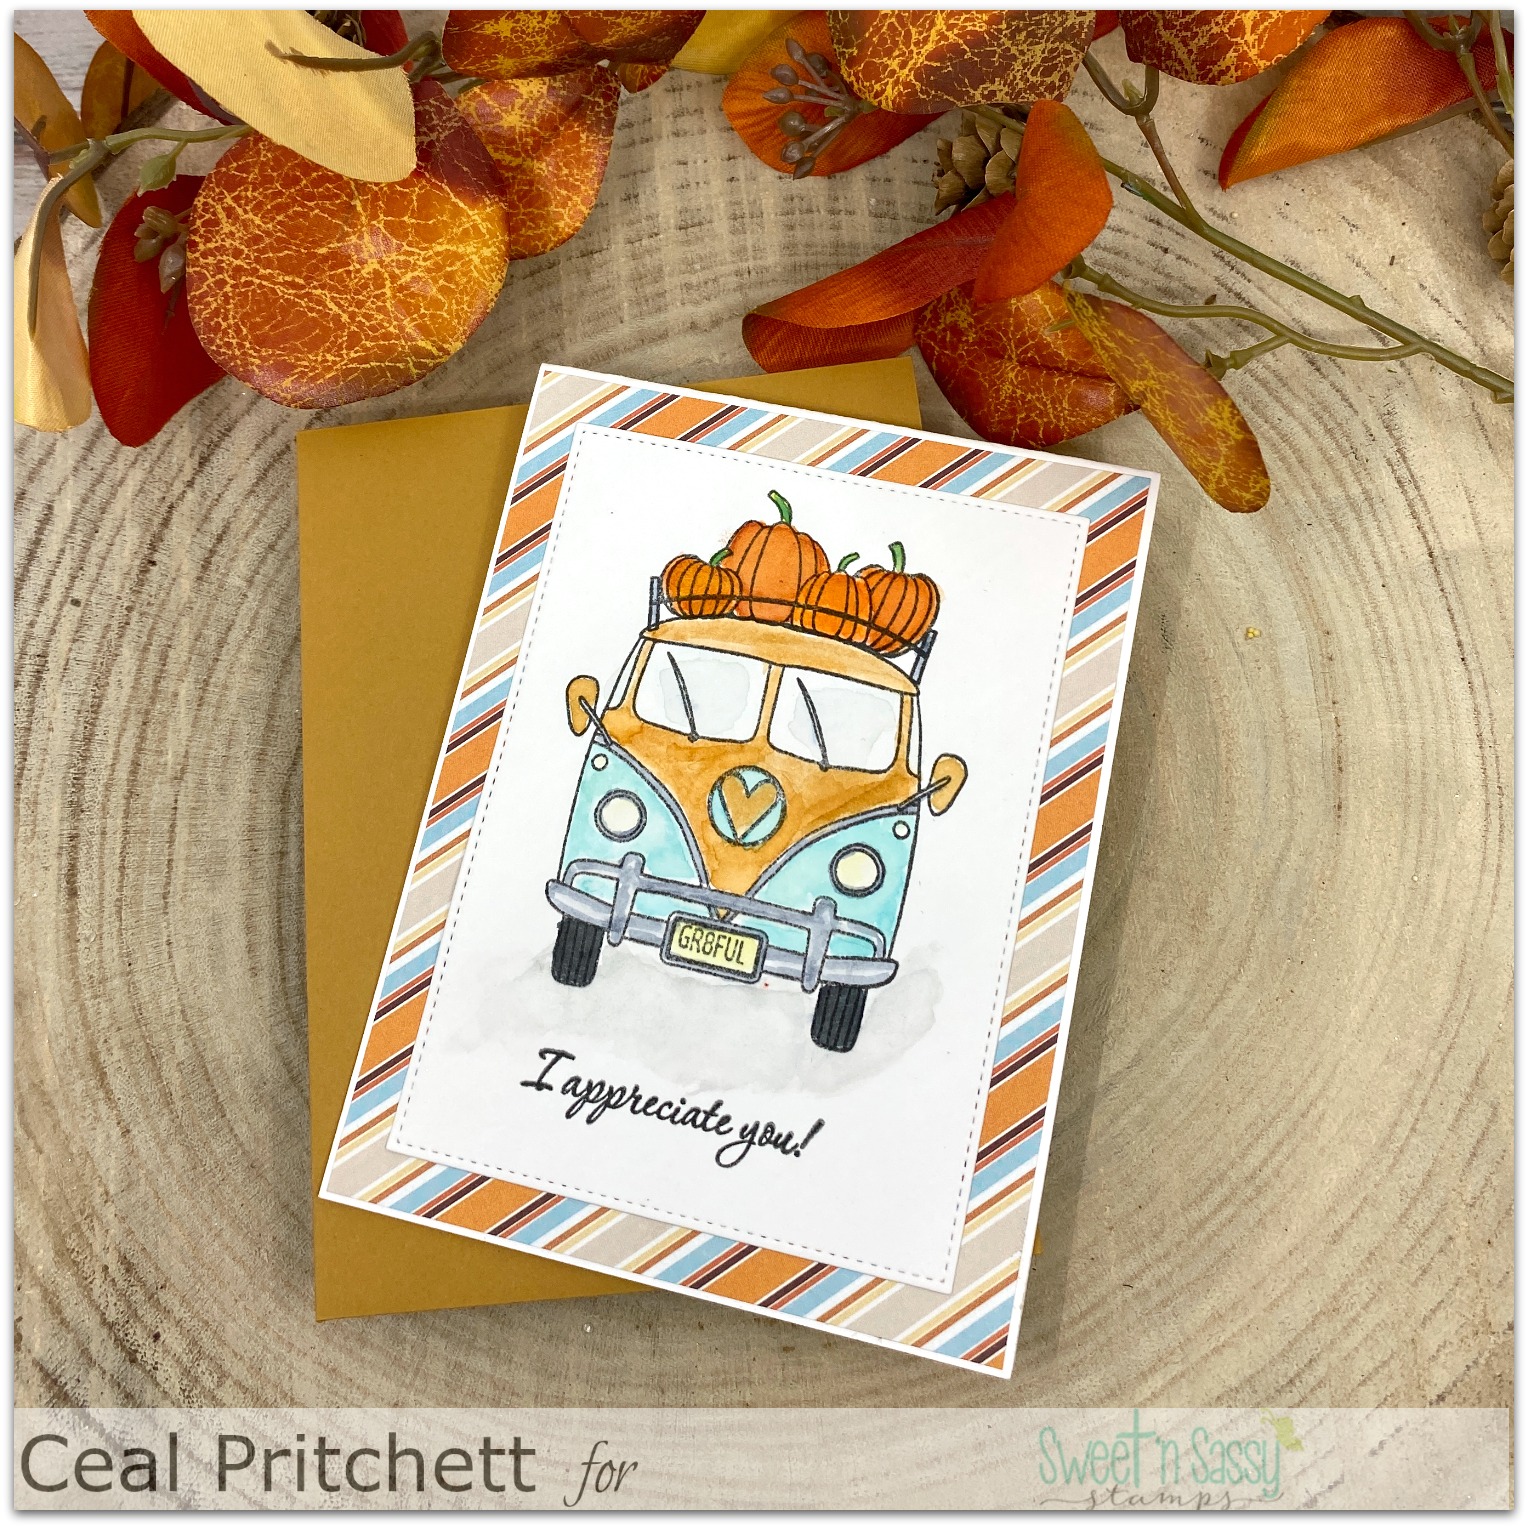
It's Ceal here. Today I am sharing a couple cards I created for pastor appreciation next month.  I love doing fall cards letting my pastors now how much I am thankful for and appreciate them.

To create these cards I started with a white card base, some patterned paper and a white panel. 
For the first card I stamped the Vintage Van on some Bristol and watercolored it using Karin markers. the sentiment is from the So Thankful set. 


The second card I stamped the pumpkin from the Incredibly Blessed set, colored it using Copic markers. The sentiment is from that same set.


Tuesday, May 5, 2020

Begin Again with Butterflies

Hello All!

Have you checked out the May release yet?  Goodness, I just can't stop playing.  I consider myself a colorist, but the large butterfly in the Begin Again Stamp Set has me playing all sorts of ways.  '
The MOJO had run dry so I have been watching videos to try new things and remind me of old things.  I came upon a video highlighting the faux watercolor technique.  This is a super easy and fun technique where you ink up your stamp with ink and spritz it with water, then stamp on your paper (something that will take water well)- I used watercolor paper. This is what I ended up with; and guys, I played and played and played!

I was getting more creative by the time I got to this card and did some splattering as well.  The sentiment is from the new Encouraging Thoughts Stamp Set, which is also the Stamp of the Month.  Goodness, the font!  I just love he font in this set, and as you can see from the rest of the cards, I used many sentiments in the set!  


This sentiment is from the So Thankful Stamp Set.  


This sentiment is from the Sympathy Morning Glories Stamp Set

After playing with this technique, I went a bit further with it, first stamping the sentiment with the technique I had been using, and then stamping with Versamark in and heat embossing with clear embossing powder.  This allowed me to paint on the background without disturbing the main image. 


As this is a distress technique, I used distress inks for all of my cards.  Some are first generation stamping, some are second and some are third.  Some are heat set after stamping and then stamped over again.  Some are stamped over and not heat seat after the first stamping.  They are all different; in other words, just have fun and play to see what you get!  And, sometimes I got mud, lol.  
In then end, I splattered each card with a bit of watercolor paint in a coordinating color.  
Also note that unless you area only going to stamp one time, you need a stamp positioner to do this. I used my MISTI through the whole process which is what allowed me to stamp multiple times on the same image. 
This set of cards is going to be gifted to a friend of mine who buys a lot of my cards.  This stamp and technique is perfect for making a gift set! 
Thanks for stopping by!  I hope you give this a try!

Lee Ann  

Don't forget, Encouraging Thoughts is the stamp of the month and is FREE with your order of $75 or more! 

The new release is currently available at a discounted price as the May Early Bird Bundle -offer ends May 9th!  


Friday, March 8, 2019

Texture Tiles 4 (x3) - Bee Amazing!

Hi Friends!

Today I have some more fun projects using one stamp (well two really) from Sweet N Sassy creating three looks. The new Texture Tiles 4 makes for some great background and to tie my projects together, I added the bee from Sweet as Honey. Of course I have also used other sets (I will point them out as I go) but these are the focus on all of my projects.

My first project is a mixed media art journal page (in my 6x6 journal). This is my more complex project as it uses the most stash supplies and got me the inky-est :)

Recipe:
  • Background - Tim Holtz Tissue Wrap Melange; Distress Paint in Peeled Paint, Mowed Lawn, Broken China, Cracked Pistachio, Mermaid Lagoon
  • Background stamps - Texture Tiles 1 using Archival Inks Manganese Blue
  • Splatters - White and Black Arcylic Dylusions
  • Corner texture - Tim Holtz Stencil with Black Modeling Paste (TCW)
  • Sentiment (big) God is For You Clear stamp set from SNSS inked with Gina K Black Amalgam Ink, (little) From Tim Holtz Small Talk sticker book.
  • Border Image - Texture Tiles 4 stamped repeatedly around the edges over and over.
  • Bee image from Sweet as Honey stamped with Gina K Black Amalgam and colored with Copics Y17, Y19, Y15 and W0, W1, W3, W5 (with Wink of Stella on wings)- popped up with foam felt and adhered with Multi Matte Medium
  • Highlights added with White gel pen

My Second project is a less complex and uses the four plaid tiles to create "quilty" look.
I used a circle stitched die from Simon Says Stamps and a Circle die from Spellbinders to cut out the image using the out of the box die technique. I added a foam dot under the bee's wings to make them look more dimensional.
Recipe:
  • For the Bee, I used a circle stitched die from Simon Says Stamps and a Circle die from Spellbinders. For the squares, I used square stitched die from Simon Says Stamps and a square die from Spellbinders.
  • Bee image from Sweet as Honey stamped with Gina K Black Amalgam and colored with Copics Y17, Y19, Y15 and W0, W1, W3, W5 (with Wink of Stella on wings).
  • Background Image - Texture Tiles 4 - all four stamped with Gina K Black Amalgam Ink on Neenah Solar White
  • Sentiment - So Thankful
  • My background paper is cut with A Jillian Vance Design Basic Polka Dot Die

My Final Project is a Clean And Simple card on kraft.
Recipe:
  • My rectangles are all cut with A Jillian Vance Design Basic and/or Polka Dot Dies
  • Background Image - Texture Tiles 4 - stamped with Versa Mark for a tone on tone look
  • Bee image from Sweet as Honey stamped with Gina K Black Amalgam and colored with Polychromos pencils. I stamped right on top of the plaid background and colored over it.
  • Sentiment - "Bee" from Sweet as Honey and "Amazing" from Bitty Minnie Alpha
  • I added twine and enamel dots then popped the center panel up with foam felt
I hope you are inspired - see how you can stretch your stamps by trying multiple ways to use it. And no matter what else you do, HAVE FUN!!

Thanks for stopping by!
Lyn


Friday, February 8, 2019

Forever and Always!

Happy Friday! I can't believe we are in February already. Time is flying and I am madly working on hard on Valentines so I can get them in the mail this weekend. Today's cards are fun additions to the collection!

For your inspiration, I have two cards featuring a new stamp set called Forever and Always. This is a great set with lots of hearts/textures and so many possibilities. I decided to showcase it in two, extremely different ways...

The first card is clean and simple but has some fun features. I cut a postage stamp die cut from a card panel and before I took the cut-out away from the die, I lightly inked the background with distress ink. I stamped the solid heart from the set with Distress Oxide and once it was good and dried, I embossed the sentiment on top of the heart and hand wrote the word "forever" in the bottom corner (so it would look like a US postage stamp.) I die cut the postage stamp in black five times and glued them together and popped my image piece on top. This gives the card dimension as well as  a black "outline" that highlights my "postage stamp".


My second card uses a technique called Joseph's Coat Technique. I inked up some Neenah cardstock with distress inks in pink, red, and yellow. Once it was dry, I clear embossed the hearts (I used all of the hearts in the set) randomly over the inked panel. Then I inked over everything with black soot distress ink. 

Inking it over with black freaked me out at first because I L-O-V-E-D the colors and just the embossed hearts (which looked like tone on tone) was so fun...BUT when I wiped the black ink off the embossed hearts the fun color popped like crazy and it was still awesome! I created a sentiment banner using the words "You have My" from the So Thankful stamp set, then adding a heart to finish the sentence and coordinate with the card theme.


I hope you were inspired today and see just how versatile this sweet set is. While it is perfect for Valentines, I could see it being great for anniversary, or just-because cards too.

Have a great day and thanks for stopping by!
Lyn

Friday, August 24, 2018

Give Thanks - Tags

Every year my women's club hosts a luncheon to fund raise for an awesome organization called For Her Glory. They provide wigs and such for women with cancer who can't afford them otherwise.

We each host a table that we decorate and sell seats to and then we lunch. It is a wonderful day full of friends and fellowship.

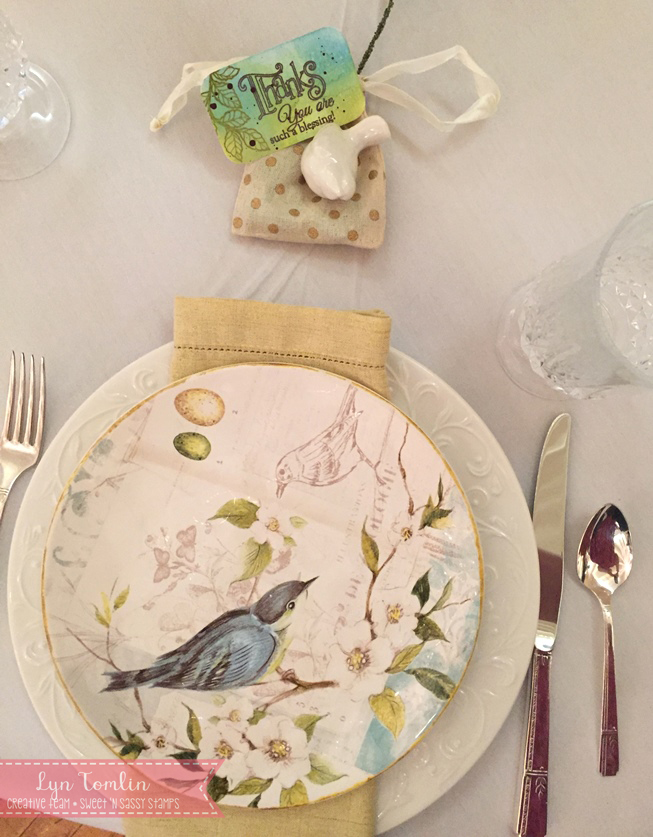
Here is our table setting.

We had a small gift for our friends:

I used Distress Oxides to match the colors from the dishes and the combination of the new GIVE THANKS set and the SO THANKFUL set was PERFECT for my "thank you" tags.

I hope you are inspired! Thanks for stopping by!!

Lyn


Tuesday, December 1, 2015

December 2015 Happenings

Hello Sweet 'n Sassy friends!  Phewwwww!!  What a busy November we had!  I hope you enjoyed all the contests, the Birthday Party Hop, the throwback features, and specials.  We want to thank all of you for helping us celebrate eight wonderful years.  After such a busy November, we will be taking it easy for the month of December as we all prepare for Christmas.

Prize Announcements
Be sure to join us this Friday, December 4th as we will be posting all of our prize winners for the month of November.

*****************************************************************
The Design Divas will continue to post amazing cards on the Sweet 'n Sassy Stamps Blog every day, but we will not be doing tutorials for Monday's Design Diva Demos during the month of December.  We will resume our tutorials in January as we kick off the new year!  2016…REALLY?? 

Be sure to check in often as you never know when Korin might throw in a sizzling special!

THANK YOU!!
The directions for this Decorative Corner Card can be found HERE in the tutorials section of Splitcoaststampers.  After making the card base and lining each of the panels with decorative papers, circles were die cut for the pop up element.  The mums from Autumn Mum Greetings were stamped on mixed media papers that had been colored with Color Burst pigments spritzed with water.  The coordinating Autumn Mum Dies made it easy to cut and layer the flowers which were adhered to the circle piece.  The sentiment from So Thankful was stamped on a Banner die cut.  Pearl flourishes and Prills were added to the card base and the centers of the mums to finish the card.

These products from the Sweet 'n Sassy Stamps Store were used to make the Decorative Corner Card:


Thanks so much for stopping by…until next time!

Tuesday, September 2, 2014

'Bokeh' water-color cards...

Hello! It's Monika here today, bringing you couple of colorful cards. I am absolutely smitten with water color techniques these days, especially with the 'Bokeh' technique. HERE is a great video on how to do one of the versions. 

On my first card, I used bold Fall colors:


I used yellow, orange and crimson water-colors (any type of inexpensive water color set will work) on the background. The secret is to use water color paper! Just like in the video, I created my own  circle template out of window sheet. I die-cut the circles using my Spellbinders dies. 
The heat embossed greeting is from So Thankful clear stamp set. The leaf was die-cut with one of the dies from Season of Change die set.

The second card is just as bold, but with different colors (you might have seen this card on Split Coast Stampers): 


Here, I used yellow, blue and green colors. The sunflower and greetings came from Prim Blessings clear stamp set. The leaves were die-cut with one of the dies from Small Leaves die set.

I hope I have inspired you to try this fun technique or just make something fun today...

Thanks for stopping by,
Monika


Thursday, June 12, 2014

So Thankful ~

Hi everyone, Mary here to share with you a card that reminds me of Canadian Lakes and sunsets.

I am sharing the new cattails die and the So thankful stamp set. What makes this new stamp set so versatile is the ability to pair different sentiments to create the perfect card...AND a variety of fonts makes this set a must have!

I started by masking a circle to create a sun and sponged colours to achieve the look I wanted. I randomly sponged colours to create a water/or hill and then die cut some cattails to give it dimension and a beautiful silhouette. I love how it turned out. 
Materials Used:
Stamps: So Thankful
Inks: Ranger Inks - Mustard Seed, Crushed Olive, Spiced Marmalade, Fired Brick, Pine Needles, Faded Jeans, Versafine black
Paper: SU
Accessories: SNSS cattail dies, SU circle punch

Thank you for stopping by and have a wonderful day!

Monday, June 9, 2014

sending some sunshine

With the lovely weather we've been blessed with lately, I've been having fun making some sunny cards.  Sweet 'n Sassy has lots of fun summertime stamp sets that are perfect for this time of year!

On my first card I used Happy Happy and So ThankfulThe rays were randomly scored and then I sponged over them with yellow ink to highlight them.


For my second card I used Bee Happy Rhubarb to make a card for a sweet friend who makes honey.  I hope she likes it!


Have a sweet day and enjoy the sunshine!
♥ Diane

Saturday, June 7, 2014

Such A Blessing!


Hi there it's Ceal here to share a card with you today. This one goes out to Korin the owner os SNSS she is such a blessing to me and a pleasure to work for and I just wanted to give her a shout out!
I used a couple of the newest releases on my card Thankful Blooms and So Thankful sentiment set.

To make my card, I stamped the roses and leaves with versa mark ink and embossed them with white embossing powder , next I sponged distress inks around them.  Sorry for the not so good photo I normally take my pictures in the daytime and this one was taken at night.