Showing posts with label Give Thanks. Show all posts

Thursday, September 15, 2022

giving thanks

 Good morning! Today I am featuring another one of the new coordinating die sets from this month’s Sweet ‘n Sassy Stamps release, Give Thanks Dies. This stamp set is a previously released one so you may purchase the dies separately, if you have the stamps, or both together in a bundle. I also used Falling Leaves (the September Product of the Month) and Cheerful Hexies.

Product links: Give Thanks Dies, Give Thanks Bundle, Falling Leaves, Cheerful Hexies.

I started today's cards by making a fall card without autumn colors. I really liked the blue falling leaves background that I stamped and decided to "paint" the die cut leaves with other fun colors too. Various inks were dabbed onto my table (it's an old table!) one at a time and spritzed with water. Then I picked the inks up by smooshing a piece of watercolor paper onto them. Let it dry between colors. When completely dry, I stamped and die cut the leaves.


I had a few leftover leaves that I saved and wasn't sure what I would do with them...until I needed an anniversary card! Here I Die cut a square from the white panel, then embossed the square in a woodgrain embossing folder. I then stamped yellow leaves onto the white panel and popped it up onto a card front with foam tape. The embossed square was glued back into place and two leftover die cut leaves were popped up on top.


I have a third card today...for this one I created a background by stamping the Cheerful Hexies first, then the leaves over top with black ink. The photo makes it look a bit busy, but it looks really cool in person!


Be sure to check back tomorrow as SNSS will feature other new products for the second half of the month. ;)
Diane


Tuesday, September 13, 2022

Give Thanks

  PRODUCT LINKS BELOW CONTAIN COMPENSATED AFFILIATE LINKS AT NO COST TO YOU

Hello Sweet Friends! Sheri here today with a Thank You card featuring the Give Thanks stamp set and NEWLY added coordinating dies that were part of the September 2022 Fall Release!

For my card I did a combination of a little ink blending, copic coloring and die cutting!

Steps to Create Card:
  • Cut White A2 Top Fold Card Base: 4 1/4" x 5 1/2" (4 1/4" x 11", scored at 5 1/2")
  •  Cut White Panel: 3 3/4" x 5"
  • Take White Panel and ink blend with green ink. You will be heavy handed around the outer edges and lighter towards the center. I used Gina K. Designs Fresh Asparagus. 
  •  Add texture to you ink blended panel by using the splatter stamp in Texture Tiles 1 stamp set with the same green ink and randomly stamp the panel. For extra texture I added gold splatter with a paint brush. Set aside and let dry.
  • On a piece of white card stock you will stamp 3 sets of leaves from the Give Thanks stamp set. I used alcohol friendly ink and colored with Copic markers. Next I cut out with the coordinating die set. For texture I added a gold splatters.
  •  Cut the word "Thanks" out using the Thanks Word Die in gold card stock. Cut an additional 2 out in white card stock. You will stack and glue together for dimension.
  • Assemble card. I trimmed the edges of the leaves off the card panel for a clean edge.
  • For embellishment I added a few gold pearls. 
Card Measurements: 
White A2 Top Fold Card Base: 41/4" x 5 1/2" (4 1/4" x 11", scored at 5 1/2")
White Panel: 3 3/4" x 5"


 -----
 
 
Happy Stamping!!

Saturday, September 3, 2022

Give Thanks

Happy Saturday! It's the beginning of September and that means the fall creating can begin. I love this time of year! Today's card features Give Thanks and the brand new coordinating dies.


For the wreath, I ink blended marmalade, buttercup and parsley inks onto white cardstock and splattered with gold and brown paint. Next, I stamped the leaf image with wheat ink over the background and die cut the images out. I stamped the berries with wheat onto brushed gold cardstock and die cut. Originally I left them plain, but decided to add paint splatters to them too.

I embossed the thanks sentiment with gold powder, die cut and stacked with 3 more plain die cuts to create depth. I assembled the wreath as seen, adding more paint splatters afterwards. I glued the word in place, added foam tape to the back and set aside to make the background.

The background is really easy. I die cut the panel, placed the Leaf Branch stencil over the top and inked with antique linen distress ink. I splattered with gold and brown paint and stamped the sentiment with walnut stain distress ink. I matted the panel with dark brown, put it on a white card base and attached the wreath to the front. 


Give Thanks Bundle


 Leaf Branch Stencil


I hope you enjoyed today's card and thanks so much for stopping by!

Monday, August 29, 2022

For My Friend


Hello Sweet 'n Sassy friends! 
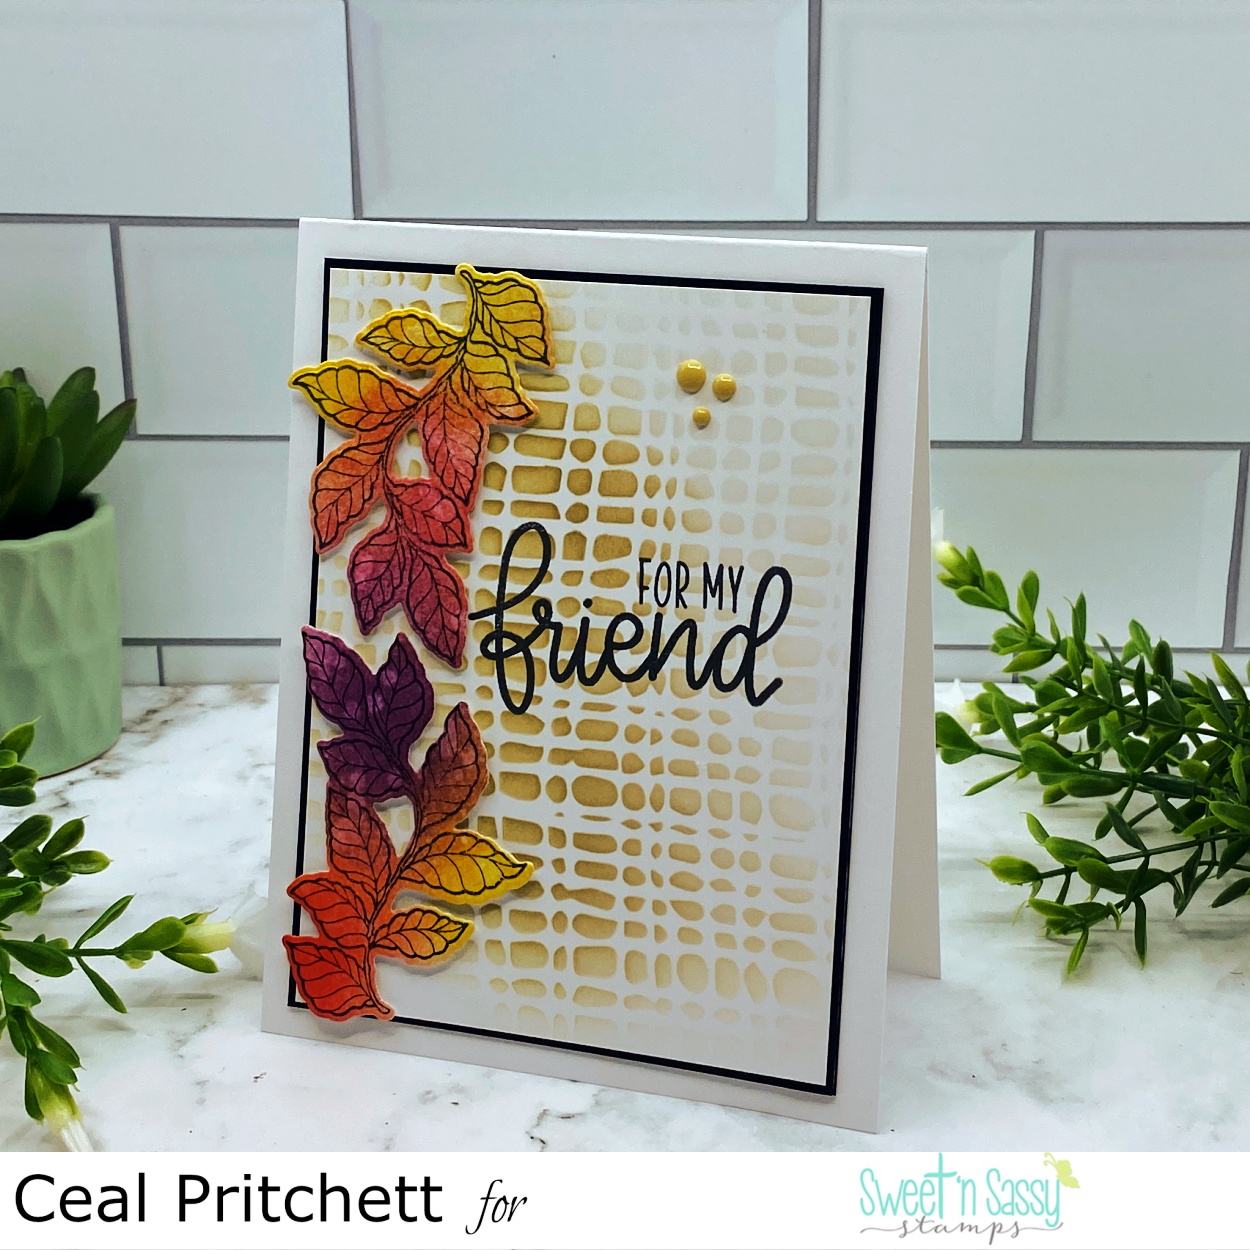
It's Ceal, here. Today I am sharing a card with a little sneak peek of something that is coming in September. 
To make this card I started with a top folding white card base, a black panel and a white panel.  I used the Grunge Grid Stencil for the background. I stamped the leaves from the Give Thanks set and ink blended them with distress inks and then cut them out. 
I finished the card with a sentiment from the Everyday Greetings set. 


Saturday, September 21, 2019

Give Thanks

Hi Sweet 'n Sassy friends! It's Julee Tilman popping in this fine Saturday morning to share a couple of the creations I've been working on this month.


Both cards today feature the gorgeous Give Thanks set. I love the leaf imagery in this set. I started by smooshing some Shimmerz inks onto watercolor cardstock, then embossed the leaves in copper over the smooshed background and fussy cut. I then created a simple backdrop by inking up a long acrylic block with coordinating distress oxide inks and then spritzing with water and stamping onto the watercolor paper. I left the block in place with something heavy on it for 5 minutes to make sure I'd get a vibrant transfer of ink.


Once this was dry, I embossed the sentiment from Keep in Touch, Too in white on the panel and cut down to pop up on my card base. I then layered the leaves in a falling formation to finish off the card.

For my second card, I used the rest of the smooshed background leaves I had embossed and fussy cut, adding a bit more vibrancy by spraying with more of the Shimmerz inks.  I tucked in a few leafy sprig die cuts painted in copper and a bit of enamel dots for accent.  The sentiment is from the beautiful Inspirational Word Art 1 stamp set.

If you haven't shopped our Sweet & Sentimental Sale, you should definitely check it out. Both of the sentiment sets I used today, along with a whole host of other stamp sets are included in the sale. The more you buy the more you save!


Thanks so much for stopping by!

Monday, September 16, 2019

Singing Praises


Happy Monday, Sweet 'n Sassy Stampers!
It's Ceal here to share with you today a couple cards using the Singing Praises set with two different looks.

The first card I stamped the image with embossing ink and watercolored it with Zig watercolor markers. I stamped the Wood slice from the Wood Backgrounds set as the background. The greeting is from the Thoughtful Words set. 


The second card uses the same set Singing Praises but this time I created a fall card with it. I stamped the bird and masked off the branch and then stamped the leaves from the Give Thanks set. I colored them all with Copic markers. The greeting is from the Incredibly Blessed set.


Thursday, September 13, 2018

Give Thanks

Hello Sweet Friends!  It's Sheri here today with some Autumn inspiration using the NEWLY released Give Thanks stamp set.  Did you know that if you missed earning a Stamp of the Month set that you can purchase them the following month?  Well the Give Thanks set has just been added to the store and is definitely a must have for your Autumn/Fall projects!

For my first card I randomly stamped the leaves on the left side of the card panel and then used copic markers to color them in with.  Nothing says Fall like shades of brown and rust.  I also added a little twine for some texture.


For my second card I created a wreath with using a couple of the smaller images in the set along with a tiny leaf from the Happy Scarecrow set.  I then colored all the images with copic markers.


http://www.sweetnsassystamps.com/happy-scarecrow-clear-stamp-set/

 Don't forget that the Christmas Poinsettia stamp set is the September 2018 Stamp of the Month and is FREE with a $75 order (after all discounts and before shipping & tax) through 9/30/18.

http://www.sweetnsassystamps.com/september-2018-stamp-of-the-month-christmas-poinsettia/
  
And...


 Happy Stamping!


Friday, September 7, 2018

Thanks!

Hello everyone! I'm in love with the colors of fall. The leaves that are turning yellow and red. And that are exactly the colors I'm missing in my alcohol markers haha. But now I know which colors I have to add to my collection. I did have some brown tints, so that's what I used to give this card a bit of a 'fall feeling'.
I stamped the message and the images on marker paper. I didn't overlap any of the images so I didn't have to mask anything. I colored the images with alcohol markers and die-cut the frame. I added a black die-cut frame behind the images to make them stand out. I searched for a matching background paper and added a couple of sequins to finish the card.
http://www.sweetnsassystamps.com/give-thanks-clear-stamp-set/
I used the stamp set 'Give Thanks' for this card.

I hope you're inspired to create something!
- Lucinde

Thursday, September 6, 2018

Fruits of the Spirit

I have been seeing some great sentiments lately and I L-O-V-E the look of mixed fonts in a sentiment. I dug through my Sweet N Sassy sets to see what combos I could make for some 4″x4″ cards. It was lots of fun and a great way to stretch my stamps!
All of my cards use the fruits from the Fruit of the Spirit Stamp Set. Then I used Be a Flamingo, Give Thanks, Skinny Caps Alpha, and Bitty Minnie Alpha for my Sentiments. Some watercolor splashes in the background complete the look.
Here are my samples:
I hope you are inspired! 
Thanks for stopping by!!
Lyn


Friday, August 24, 2018

Give Thanks - Tags

Every year my women's club hosts a luncheon to fund raise for an awesome organization called For Her Glory. They provide wigs and such for women with cancer who can't afford them otherwise.

We each host a table that we decorate and sell seats to and then we lunch. It is a wonderful day full of friends and fellowship.

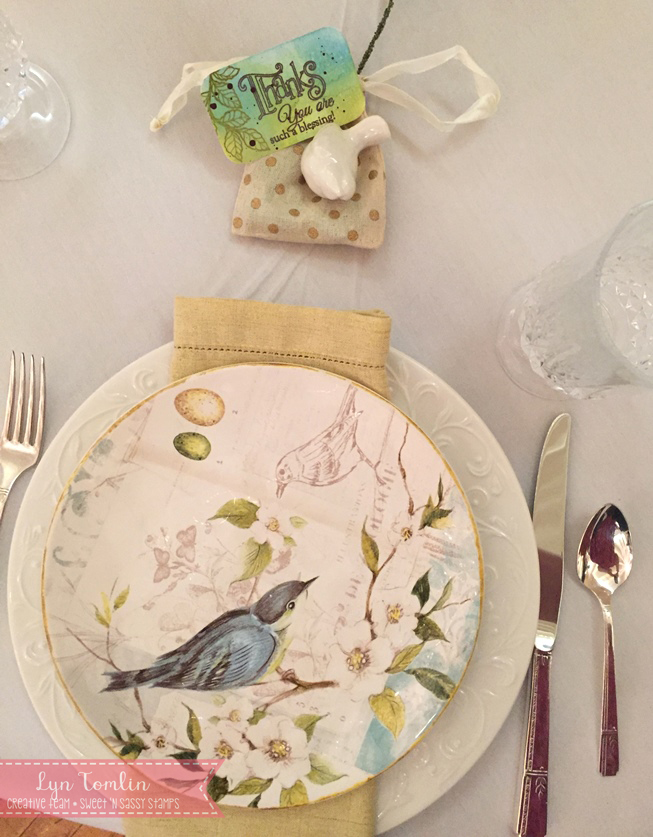
Here is our table setting.

We had a small gift for our friends:

I used Distress Oxides to match the colors from the dishes and the combination of the new GIVE THANKS set and the SO THANKFUL set was PERFECT for my "thank you" tags.

I hope you are inspired! Thanks for stopping by!!

Lyn