Showing posts with label Leafy Flourish Background & More. Show all posts

Sunday, November 6, 2016

Faith Quotes and a Birthday Celebration!

Hello Everyone! 

Happy 9th Birthday to Korin and Sweet 'n Sassy Stamps!  So many fun things are going on this month! 


We will have weekly and daily deals in our appreciation of your support and business over the years.  The current weekly special is~


And of course there are new sets being released.  I have used the fabulous new set, Faith Quote Blocks, for my card today. 


As I love this scripture verse and all of the gorgeous fonts, I wanted to keep the card relatively simple.  I opted to create a background panel with the Leafy Flourish Background and More Stamp Set, using a technique I have been wanting to try.  First, I sponged green, aqua and coral inks on cardstock.  The Leafy Flourish Background stamp was stamped in Versamark ink and clear embossed.  Using a Black Soot Distress Ink Marker, I colored in the non-embossed areas.  A simple matted sentiment panel makes the sentiment pop. 

That's it for me today!  I hope I have inspired you to get creative today! 

Lee Ann  :)

Monday, May 9, 2016

Winnie's Garden... thinking of you

Hello! It's Monika here today, with a sweet garden card. I love the new Winnie's Garden clear stamp set. With it's 20+ images, you sure to find something to your liking. I love the whimsy style of the sweet images.
I have a simple 'thinking of you' card:
 
 
The gardening can seems to be a popular image with the DT girls. LOL! It's really great for any occasions.
I stamped the images with Jet Black Archival ink, then water colored them... I stamped an extra butterfly and spade, colored them, cut them out... then adhered them to the main images with dimensional tape. The border was stamped with a swirl image from Leafy Flourish Background & More clear stamp set.


I hope I inspired you to create something today.

Thank for stopping by,
Monika


Friday, January 8, 2016

New Beginnings

Hello Sweet 'n Sassy friends!  Cathy here with a card to share as we say good-bye to 2015 and welcome a new year.  The sentiments in the New Beginnings stamp set offer a note of encouragement and are perfect for looking forward to what the Lord will do in 2016.


It's difficult to see in the photo, but the large background from the Leafy Flourish Background and More stamp set was clear embossed over the butterflies on the My Mind's Eye DP adding some subtle texture.  Distress inks were sponged on the circle panel which was then stamped with images from the Nature Silhouettes and Nature Silhouettes 2 stamp sets. The butterflies were die cut, sponged, and stamped along with the sentiment from the New Beginnings stamp set.  This week's Mojo Monday sketch provided the inspiration for the card design.


Here are the Sweet 'n Sassy stamp sets used in the card above:


"…but one thing I do, forgetting those things which are behind and reaching forward to those things which are ahead…"  (Philippians 3:13)

Thanks so much for stopping by…enjoy your weekend!

{{{Hugs}}}
Cathy

Friday, October 30, 2015

Thankful for You!

Hello Sweet 'n Sassy friends!  Cathy here, sharing a card using the Harvest Blessings stamp set and the coordinating Harvest Blessings Dies which have just been added to the Sweet 'n Sassy Stamps line.


I recently took a Gelli Plate class with Mary, my Design Diva sister, and had a blast creating over 20 colorful mono prints.  One of them is peeking out from behind this cornucopia from Harvest Blessings.  The background for my thankful card was made by clear embossing one of the flourishes from the Leafy Flourish Background & More set.  One of the things I love about using clear stamps is that you can bend them on your block making it possible to take a straight sentiment and bend it around a curve or circle which is what was done with this sentiment from the Keep in Touch, Too set. 

Here are the stamp sets from the Sweet 'n Sassy Stamps Store used to make this card:

This card was made with you, our faithful, supportive, customers and blog readers in mind!  Sweet 'n Sassy Stamps be celebrating our 8th birthday during the whole month of November and we wouldn't be here without you!  Thank you!


Be sure to check back with us each day so you don't miss any of the fun activities and specials we'll be offering throughout the month of November!

Thanks so much for stopping by…have a blessed day!

Saturday, October 17, 2015

Hope In The Lord


Hello Sweet 'n Sassy friends,  it's Ceal here, to share another new release sample with you. This card uses the new Bible journaling set Message of Hope. I wanted to show you, you don't have to be a Bible journal to use these sets, they also make beautiful cards. I also used an older set Leafy Flourish Background.
To make my card, I randomly stamped the word hope from the Message of Hope set across my panel. I embossed it with clear embossing powder and then stamped the Leafy Flourish Background in versamark ink as well, but didn't emboss it, instead I sponged some Pan Pastels over it. To finish it I stamped the greeting all from the Message of Hope set on a tag and placed rhinestones in the center of the flowers.


Monday, August 3, 2015

Camouflaging Die Cuts Tutorial


Hello Sweet 'n Sassy friends!   I'm glad you could join us for this week's Design Diva Demo.  I have a die cutting technique to share with you today.  It's fun to try new things with all of the supplies we have in our stash, and I don't know about you, but my collection of dies keeps growing!  LOL!  So…let's get started with Camouflaging Die Cuts!

Begin by gathering your supplies...you need just a few...

  • stamps or inks to create a background (I'll be sponging a background strip for my birthday card) 
  • a die (SNSS Birthday Word Die)
  • the die cutting machine of your choice
  • and card stock.


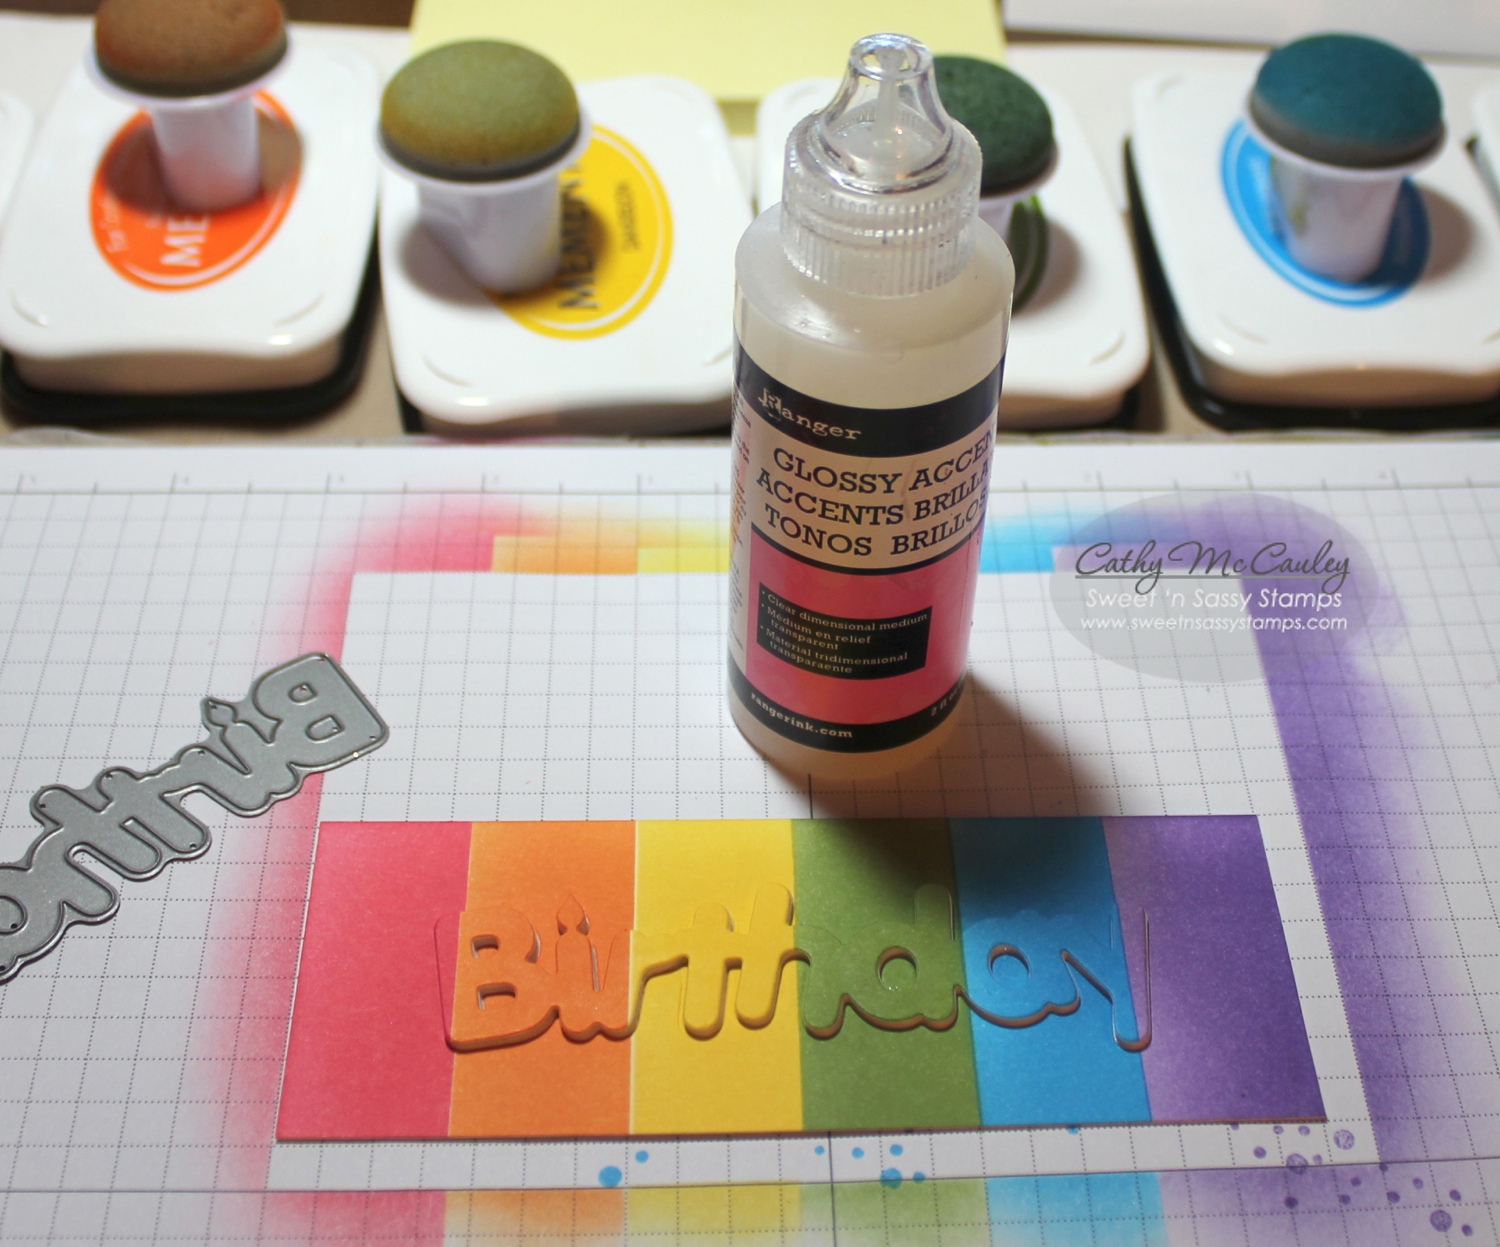
To create a rainbow of color, mask off the first section of your card stock panel.  I just use Post-Its.  Starting on the Post-It and working in circles, sponge on your color until it is smooth and blended.  Keep masking off each section as you work your way across the panel.  Now you have a bright, cheerful rainbow!


Trim your panel to the size you want for your card.  Using your die, cut the word or shape from your decorated panel.  Be sure to save all the little pieces. Then cut more of the same die cuts from scraps of card stock.  I cut 4, but you can make as many as you want depending on how thick you want your word or image to pop off the card.


Cut a second panel the same size as your decorated piece and cover it with adhesive.  I used my Glue Glider, but you can use a Xyron or any adhesive you like.


Adhere the die cut panel to the adhesive panel…


…and pop one of the scrap die cuts in the negative space.


Use the little pieces you saved to fill in the empty spaces.


Layer all of the die cuts, adhering each layer... 

…ending up with the one you cut from your background panel.  I use dots of Glossy Accents to glue the layers together because it gives me a little wiggle room to get the dies lined up correctly.


Finish your card using your Camouflaged Die Cut!  My little grand niece loves sparkles and purple…this card will be for her birthday.


Another sample of Camouflaging Die Cuts using a shape instead of a word die.

Here are the supplies from the Sweet 'n Sassy Stamps Store used to make these two cards:


Hope you'll give this technique a try!  Thanks so much for stopping by!
Have a marvelous Monday!

Wednesday, June 17, 2015

Inspired by......

Hello, friends!

Angie here with a card inspired by, of all things, my bathroom!!!

I recently gave my bathroom a decor makeover that makes me smile every time I walk in!  As I pondered my next Sweet N Sassy project I thought it would be fun to see if I could recreate the black and white drama of my shower curtain. 

Here's my Inspiration:

For my project, I ended up switching the accent color to pink instead of the dusty lavender because my cardstock in shades of purple didn't lend enough pop.

I inked up the gorgeous background flourish image from Leafy Flourish Background & More Clear Stamp Set and used the Splitcoasstampers sketch challenge, SC544 for my design.   


I created multiple butterfly layers with the New Creature Die Set and embossed the top layer.


Fine Details:


Thanks so much for looking, I hope you are inspired to get inky!

Angie


Saturday, June 6, 2015

One for the girls...

Hello! It's Monika here today, bringing you a card for the girls. Yesterday we had a blog hop for the boys, so it's time for something more feminine. 

I've been making water color backgrounds, but sometimes they don't turn out that well... I have a pile of backgrounds and I found the perfect way to hide those imperfections and use up my scrap pile. Stamping the big flourish image from Leafy Flourish Background & More clear stamp set will give you a beautiful background. 


I didn't want to cover up all the pretty flourishes, so I just added a strip with the greeting (Be Encouraged clear stamp set). Easy to make, but looks nice. My background also had some white circles that did not really show up on the water color background, but by stamping the image with Onyx Black VersaFine, the circles show up lightly.


Thanks for stopping by,
Monika