Showing posts with label Star Dies. Show all posts

Monday, August 9, 2021

Back to School


Esther here today with a fun "back-to-school" themed card to share with you using several fun supplies from Sweet n Sassy Stamps! 
 
 
To create that fun chalkboard background I simply inked up the alphabet stamp set (in white pigment ink) while it was still on the stamp backing, and pressed it into my black card stock. I found that laying a book on top and pressing down a bit helped to ensure that all the letters got stamped, and was much quicker than stamping each letter separately! I lightly spot stamped the typewriter text background over top for extra interest.

~~~This post contains affiliate links at no extra cost to you~~~

Supplies and Tools:

Wednesday, November 22, 2017

Bought With Love

Hi Everybody, Regina here..... 

I was planning a visit to see my Mother In Law in the hospital and wanted to take something to her so I bought this cute snowman in which you can track the days until Christmas.  I told her she could use it in the meantime to track the number of days until she could come home.  :)


The only bag I could find was plain white with handles. Well that wasn't going to work, so I decorated it simply to look like a snowman to match what I was giving her.  You can add hair, earmuffs, etc.  

I used this stamp set from Sweet 'N Sassy Stamps called Christmas Tag Sentiments.  These sentiments are all so great!  They are a nice size and fun to use.  She always brags about how I make her everything so I love this stamp that says made and scratched out, bought with love. 

Here's what the stamp set looks like


I made two tags.... first  I made this red and green one.  I love how these inks look on this tag.  I used Colorbox Cherry and Jalapeno.  The tag is cute but kind of blended in too much with the white bag so I made another one that looks like chalkboard.  


For the black tag, I used Gina K Designs Black Onyx Cardstock and her white pigment ink.  This ink provides excellent coverage and dries pretty fast. I went around the edge with the white ink and added a few enamel dots from the Eyelet Outlet. The black and white gingham ribbon is also from Gina K Designs. The red and white twine is from We R Memory Keepers. I glued a snowflake from my stash on top of the ribbon and twine to add some sparkle and interest and added some white dots with a Sigmo Uniball White Gel Pen. 


I used Gina K Designs Heavy Base Weight White Cardstock for the other tag, the Colorbox Inks mentioned above, went around edge with the red ink and added a few enamel dots from Eyelet Outlet.  I needed some sparkle so I cut out a few stars from red and green glitter paper using the Star Dies. The beautiful red and white ribbon is from Really Reasonable Ribbon.  They have a monthly ribbon club and put together a beautiful assortment of ribbons that coordinate together.  I used the Christmas Assortment.  I am really impressed with the quality of the ribbon from this company.  

Go ahead and buy the solid color bags with the handles from a dollar store and decorate it yourself.  Another idea I had was to stamp the sentiments all over the bag. Tags make your gift more interesting and they're quick and fun to make.

I hope I inspired you to make some tags for your gifts this year.

For more inspiration, please visit my blog at http://cardsbyregina.blogspot.com

Thank you for stopping by and have a great day!


Regina

Saturday, September 30, 2017

Christmas Blocks

Hi Everybody,

Have you started making your Christmas cards?  Hopefully I will inspire you to start them with this super cute stamp set from Sweet 'N Sassy Stamps.

The stamp set I used is called Christmas Blocks, the blocks are easy and quick to color and so many ways to use them.


I used kraft card stock for the base, layering white for bottom layer and cherry red card stock for the plaid die, all card stock from Gina K Designs.

I decided to go with a star theme since the reindeer has stars in his block.  I used Copic Markers to color the blocks and added a little shine with a clear Spectrum Noir pen.  I used Gina K Designs cherry red ink to match the card stock, don't you just love when things match like that? I stamped the sentiment on a banner die using the MISTI.  To add a little more embellishment, I used the Star Dies from Sweet 'N Sassy.  Matter of fact, the star dies are currently on sale.  I cut them out with red glitter paper. 

This card has several layers but is an easy card to make.  I hope I inspired you to start your Christmas cards in September lol. 

For more inspiration stop by my blog at http://cardsbyregina.blogspot.com

Thanks for stopping by and have a great day!

Regina

Sunday, January 8, 2017

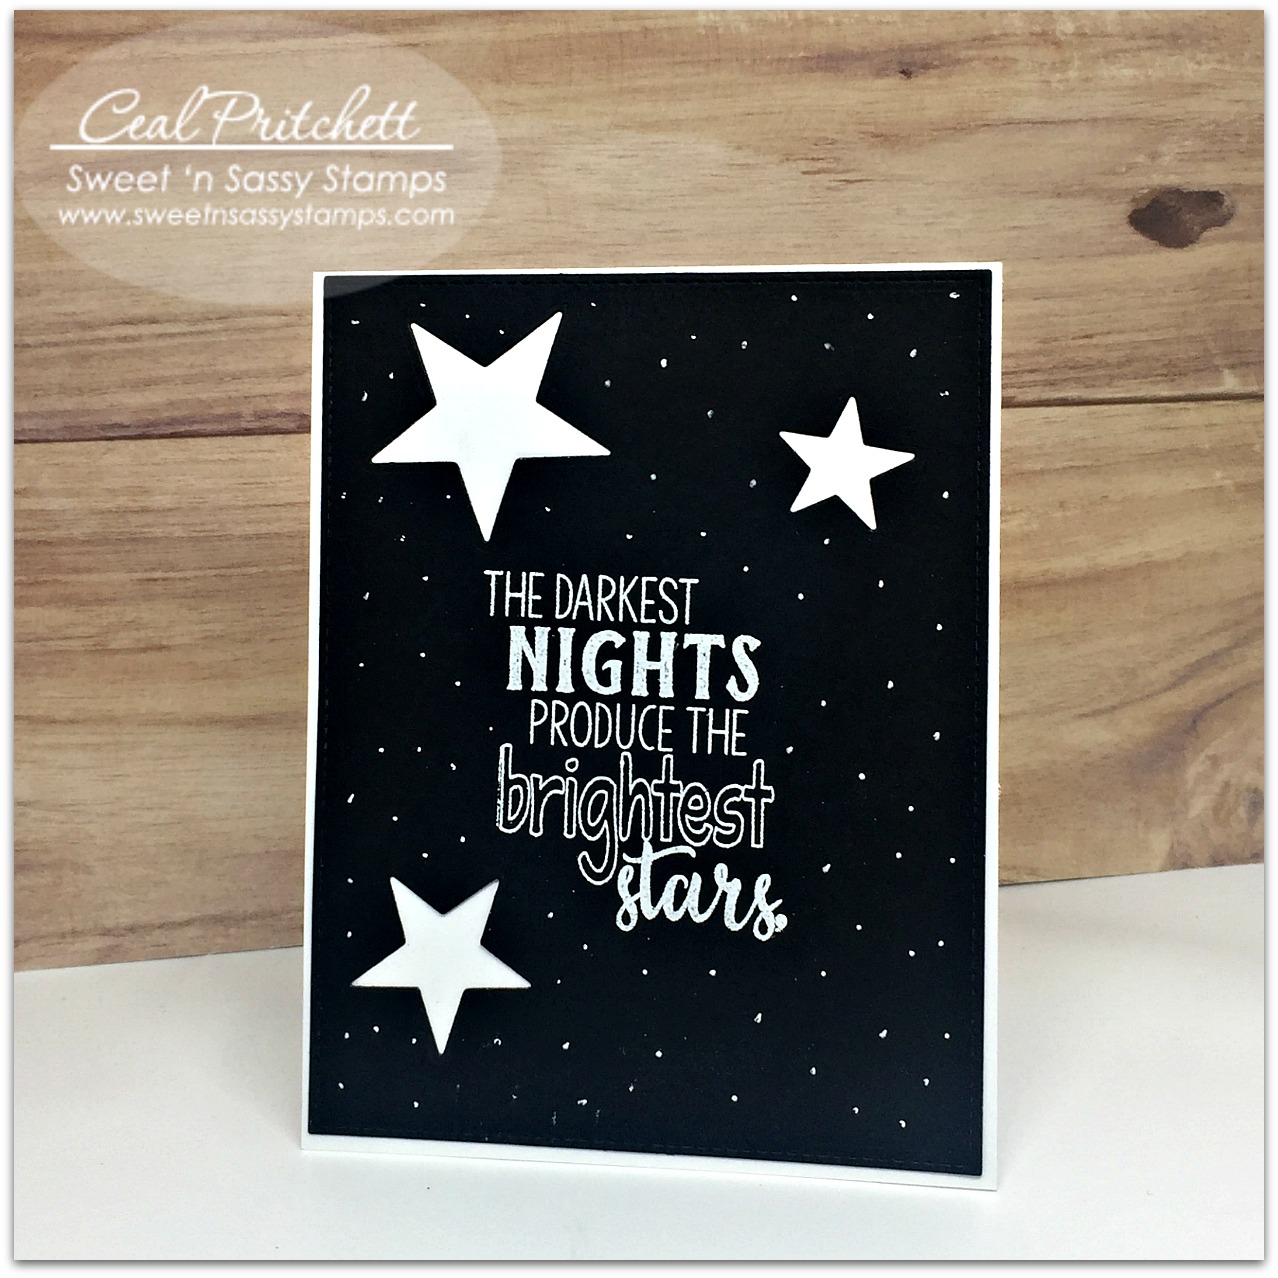
Brightest Stars


Happy Sunday! 
It's Ceal here to share with you today.
 I hope everyone had a Merry Christmas and a blessed New Year!
One of my goals for the new year is to send out more handmade kindness.  I have several friends going through tough times and needed some encouragement cards and this set was perfect!  I started with a white top folding card base and a black panel. I embossed the greeting from the Inspiration Word Art 2 with white embossing powder and then diecut three different stars using Star dies  and used the negative space and added the smaller (galaxy) stars with a white gel pen.  Easy card with an encouraging message.


Monday, October 27, 2014

It's Your Day...........

Good Morning Friends!!  How are you?  Jacquie here, to share with you!

I have found that I am all about the simple creations these days.  I just LOVE the way they look!  So, I have a lot of pre-made card bases and even a lot of FIRST layers ready to go.  That being said, this card is right up my alley.  Hope you like it, as much as I do!


I used my green polka dotted base and layered a piece of GP white cardstock on top of it.  Then I used the SNSS GRUNGE ELEMENTS clear stamp set, to make my paint swatches.  I stamped my sentiment, from the SNSS BIRTHDAY WORD ART clear stamp set, and used my SNSS STAR DIE SET to cut out some matching stars.  I finished my project off with a clear Wink of Stella brush marker on the top star, Orchid twine,  and some pearls/rhinestones.  Easy Peasy!

Thanks for stopping by and have a WONDERFUL day!


Thursday, July 3, 2014

Celebrate!

Hello friends! Giovana here today bringing you a super easy card. Tomorrow is a very important day to all of us who live in the USA! I am not American, but this is my adopted home {wink, wink} so I created a super 4th of July card!!
Here are the details:

  • Create a card base from white cardstock. A2 size.
  • Cut a panel from raspberry cardstock. 4.75" x 3.5". Mist the top part of panel with Taxi Mist color (yellow), then stamp the image from Landscape Silhouetttes in Coffee Archival ink.
  • Stamp sentiment in Blue ink and stars in Electric Pink and electric Yellow ink. 
  • Add washi tape.
  • Die-cut a couple of stars in red and blue. Add them to card panel.
  • Add panel to card base with dimensionals.


Hope you like it!
Have a great day!!

Wednesday, May 28, 2014

Stenciled Stars


Hi there it's Ceal here to share with you today. This is a card I made for Memorial Day and used a technique that Korin has a video tutorial on Splitcoast Stampers today. It is called Die Cut Stencils and it is a fun technique when you do not have any stencils or you do not have a particular stencil you can make your own. It's really a simple technique you just use your die cuts, I used our Star Dies on my card. You lay them out like you want and then simply run them through your machine. Next you take your ink and sponge over the cut out area and that's it. Easy peasy huh?
Make sure to go over and watch Korin's video HERE

Monday, May 26, 2014

Thankful for You ~

Good Morning SNSS fans and family! Mary here to share a holiday card with you.  At Sweet'nSassy we are so thankful for all the Servicemen and women in the Armed Forces on this Memorial Day. We remember the Fallen and the families left behind. Their sacrifice will not be forgotten.

My card uses the recently released You're a Star and used the matching stars die to create my layers of stars. To create the border I used the stars border from the hearts and stars border dies and layered it on the scallop border die. The background is embossed using provocrafts CB folder. The sentiment is from the Flower Blocks2 set and the banner is trimmed and cut by hand. 

Materials Used:
Stamps: You're a Star, Flower Blocks2
Inks: SU Not quite Navy
Paper: Miscellaneous DP, SU
Accessories: CB folder, SNSS Dies - Stars, hearts and borders, scallop border

Thank you for stopping by! Have a wonderful Holiday.


Friday, May 16, 2014

Friday Feature & Challenge #12: Congrats

Hello sweet friends and welcome once again to Sweet 'n Sassy Stamps 
April Release Friday Feature!
The Design Divas have some fun samples for you to see today as we feature one of our new stamp sets and matching dies available at the Sweet 'n Sassy Store.
You're a Star is a fun set perfect for creating cards for many different occasions!

Before we get started, let's take some time to congratulate our last 
Friday Feature challenge winner!

The random winner of our Polka Dots Challenge is #22
Andrea LaVigne

Here is her sweet Cocoa card complete with polka dots:


Andrea, please send an email to jacquie@sweetnsassystamps.com to claim your $10 Gift Certificate

Please join us for our April Release Blog Hop Feature and Challenge!
Today's features are:
You're a Star & Star Dies
                   
         
  • Set includes 5 images & 17 sentiments
  • The large star measures approximately 1 7/8" x 2"
  • Designed by Korin Sutherland
  • Coordinates with Star Dies
  • Stamp set priced at $15
Our challenge to you this week is to make a Congrats card.


The first 11 cards in the hop were created for your inspiration by the design team.  As you hop along, leave a little love behind, then create your own Congratulations card and use the linky tool to add it to the gallery!

Just a few guidelines to remember as you play:
            
- You don't have to use a Sweet 'n Sassy image to enter (although we sure love when you do!)
 - You'll have until Thursday, May 22nd at midnight EST to enter
- We'll draw 1 winner from this week's challenge to receive a $10 credit to Sweet 'n Sassy Stamps!
- Please use code SNSFFC12 when uploading to Splitcoaststampers or other galleries 
Share a link to your creation below.

Thanks for joining us today!  Be sure to check back again on Friday, May 23rd to see if you won and to check out the next Friday Feature & Challenge!