Showing posts with label dragonfly dreams. Show all posts

Monday, May 18, 2020

Dragonfly Dreams


Hello Sweet 'n Sassy Stampers!
It's Ceal, here to share a couple cards with you today using the Dragonfly Dreams stamp set and coordinating dies

Korin is testing the waters with dies and I am glad that she choose the Dragon Dreams set to have matching dies. You get the large and small die in the set. 

To create my cards I started with a top folding white card base, a couple of white panels and some bristol cardstock for the images. 
I ran the dies cuts through the Gemini Jr and then using the Misti, I placed the die cut back into the negative space and stamped the different layers in color and then for the second layer I embossed with Chrome embossing powder. 
I used a stencil for the side border on the top card and as a background on the bottom one. 
The greetings are from the sets In This Together and Sentimental Mash-up.


Monday, March 30, 2020

Dragonfly Dreams


Hello Sweet 'n Sassy friends!
Ceal here, to share a couple cards with you featuring Dragonfly Dreams from our February release.  I love how the wings on the dragonfly are so realistic. 

To create the card above I started with a white top folding card base, a white panel and a purple panel. I randomly stampd the dragonflies masking them off as I stamped them in Wild Lilac, Lovely Lavender and Sea Glass. On the two larger ones I embossed the bodies in Lilac Shimmer and Under the Sea embossing glitters by WOW embossing. The sentiment is from the Sentimental Wordfetti set.  


The card below uses the same Dragonfly Dreams set but this time I gave the card a little more mixed media look. I started with a white top folding card base, a purple panel for a mat and a white panel for the focal panel. 
I stamped the parge dragonfly and then masked it off and randomly stamped portions of the Psalm 23 Background in a light purple and then added some texture in a darker purple using the Texture Tiles 2 set.  Next I used a stencil to create the flourish background. I added a second set of smaller wings and embossing them with Lilac Shimmer embossing powder. To finish the card I added some epoxy drops to the body and the sentiment from the Scripty Thoughts set. 


I have used affiliate links that are no additional cost to you, for all links please head over to my blog, Simply Beautiful.  

Monday, March 23, 2020

Background Stamps Two Ways


Hey friends, Esther here sharing two cards with you featuring the new Psalm 23 Background stamp. On the first card I used it for it's intended purpose -- as a background. On the second card I created a scenic background and used it as the main feature!


To create my first card I  embossed the dandelion in white embossing powder on blue card stock, and then added some random leaves in a moonlight white ink. I distressed the edges and inked them in chipped sapphire distress ink. Since I love lace and doilies, I added a pretty strip of white lace to one side before adhering it over my Psalm 23 background. The dragonfly was embossed in blue, colored with real brush pens, and then made to sparkle with some Nuvo glitter drops.

~~~This post contains affiliate links at no extra cost to you~~~
Supplies and Tools:
  • Blessings In Disguise (Sweet n Sassy Stamps)
  • Psalm 23 Background (Sweet n Sassy Stamps)
  • Dragonfly Dreams (Sweet n Sassy Stamps)
  • Canson Mixed Media Paper
  • Real Brush Pens (Arteza)
  • Crochet Thinlits (Sizzix - Tim Holtz)
  • Versamark Watermark Ink
  • White Embossing Powder
  • Lapis Embossing Powder (Stampendous)
  • Brilliance Moonlight White Ink (Tsukineko) 
  • Faded Jeans Distress Oxide (Ranger)
  • Chipped Sapphire Distress Ink (Ranger)
  • White Blizzard Glitter Drops (Nuvo)
  • Foam Mounting Tape


For my second card I created a scene using three different scene silhouette stamp sets before embossing the new Psalm 23 Background stamp over top. I wanted to keep this card fairly simple so a paper crimped background and some elegant photo corners were all I added.


(You can purchase these three silhouette sets as a bundle and save money!!  CLICK HERE for the Woodland Bundle)


Supplies and Tools:

Monday, February 24, 2020

Blessings & Love


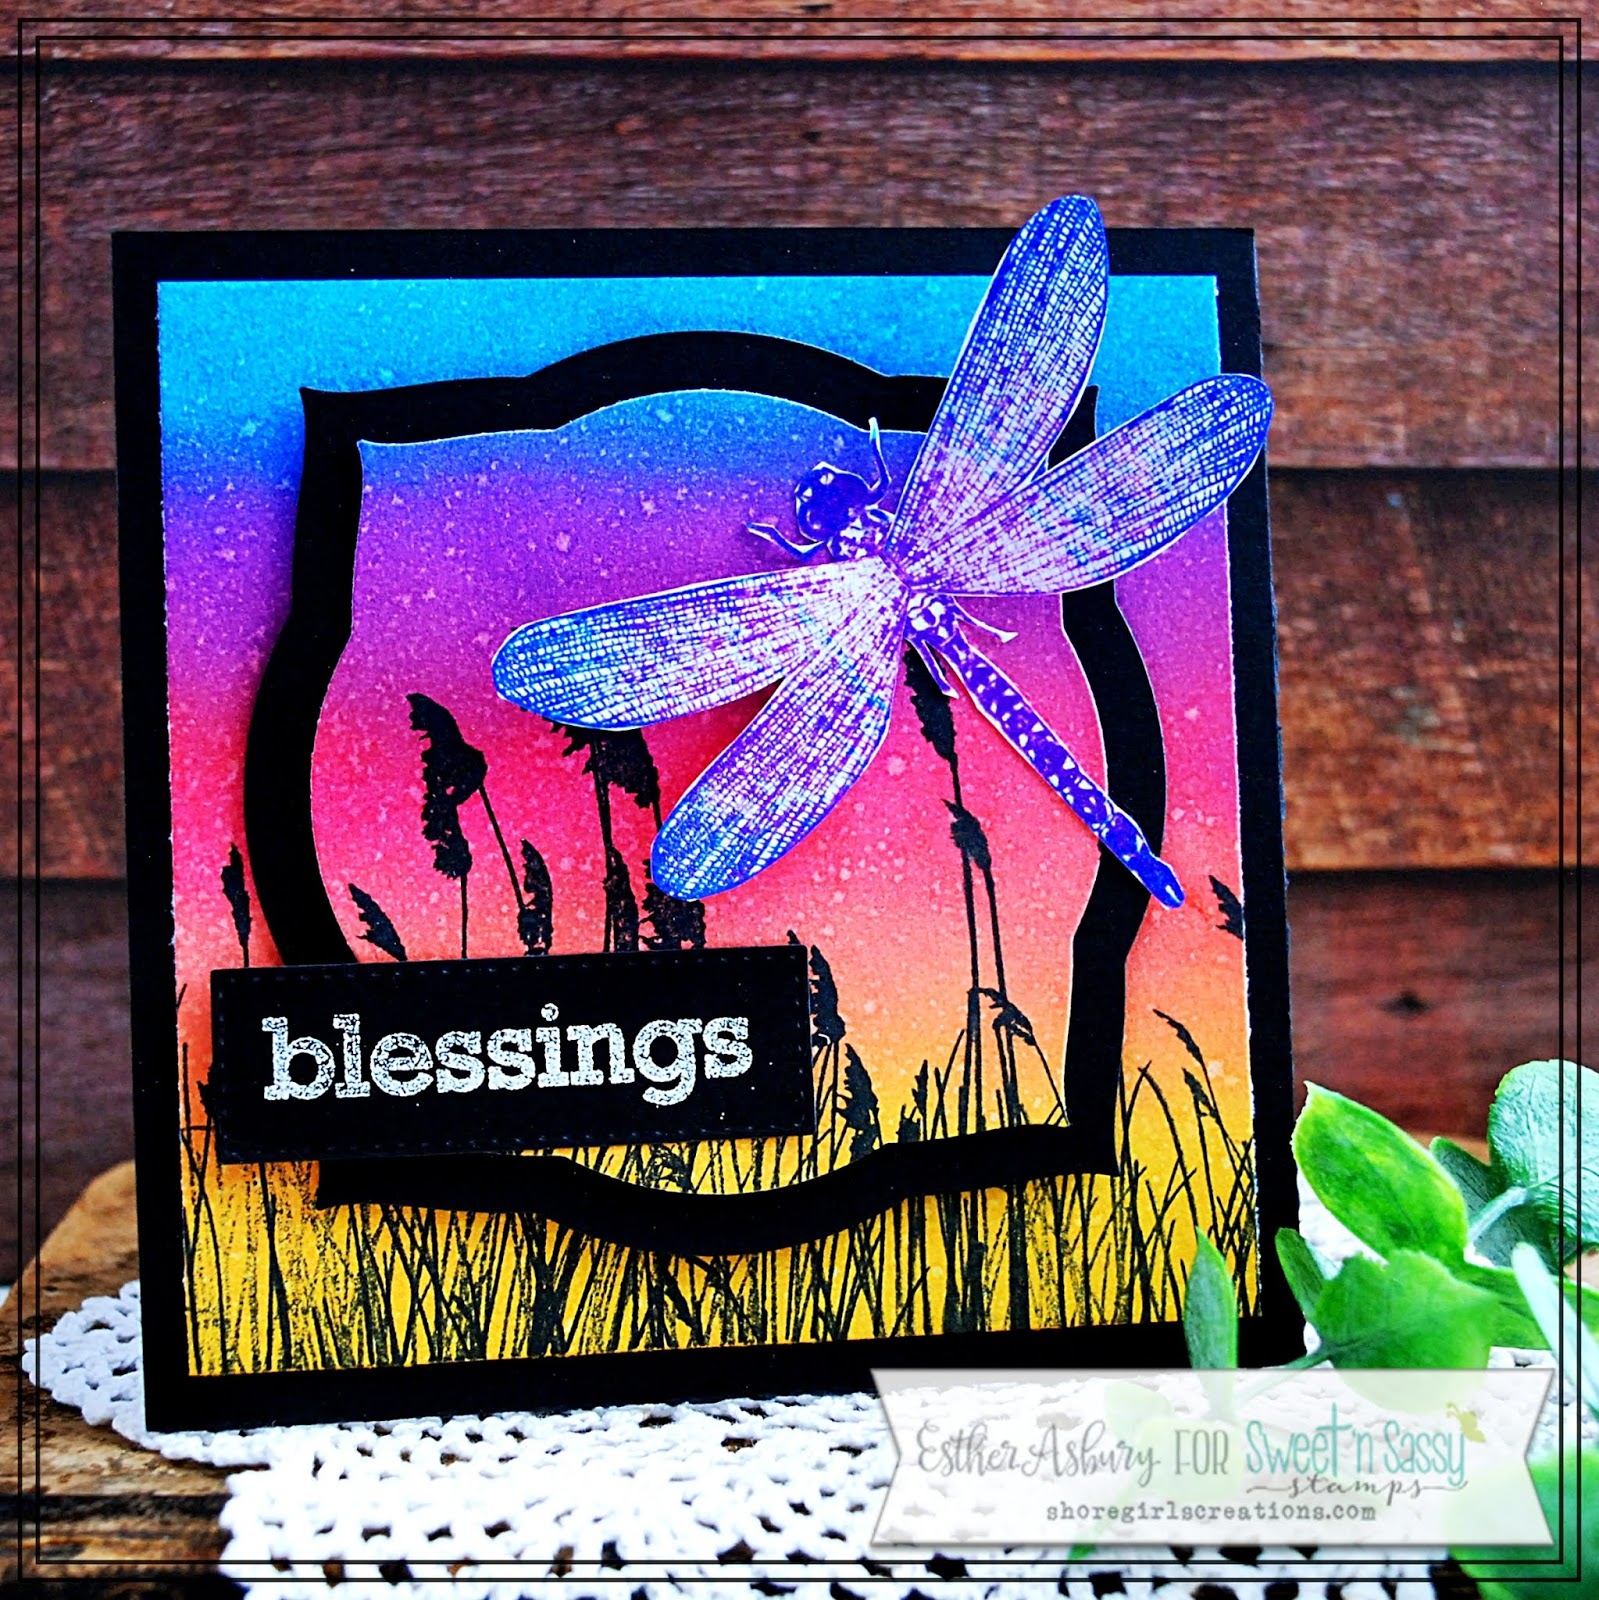
Hello friends. Esther here with two cards to share with you. One features the just released "Dragonfly Dreams" and the other an older stamp set. For this first card I did some ink blending on mixed media paper to create a sunset scene. After stamping the tall grasses along the bottom, I die cut and matted the center to create a focal point. The dragonfly was stamped in wilted violet distress oxide and then just the tips of his wings and parts of his body was re-stamped in salty ocean distress oxide. (Yay for stamping platforms that allow you to layer colors without the worry of lining things up right!)

~~~This post contains affiliate links at no extra cost to you~~~
Supplies and Tools:


My second card features the Hymn Word art stamp set, some pretty designer paper, and my favorite embellishment - a paper doily! I love making cards like this to send to names on the card ministry list I belong to. 


Supplies and Tools:
  • Hymn Word Art (Sweet n Sassy Stamps)
  • Boho Vibes Paper Pack (The Paper Studio)
  • Scallop Basic Edge Dies (My Favorite Things)
  • Doily Die (Sizzix - Tim Holtz)
  • Circle Nestabilities (Spellbinders)
  • These colors of Distress Oxide (Ranger)
    • Broken China
    • Abandoned Coral
  • Large Flower Punch
  • Small Flower Punch
  • Baker's Twine
  • Mini Pearls


Friday, February 21, 2020

Dragonflies

Hi Sweet 'n Sassy friends! It's Julee Tilman popping in to share a couple cards I created with the Dragonfly Dreams set.


For my first card, I started with a randomly stamped background of dragonflies, stamped with pigment inks.  I stamped the solid wings in a mint color and the detailed wings in a teal color, then added the detailed bodies in brown.  When I was done with this, I stamped one more dragonfly on white cardstock and quickly trimmed around to accent my sentiment panel.


The scripture is from the By the Sea stamp set, and I embossed it onto a white circle die cut, then matted with brown cardstock.  I adhered this to the center of my panel, then used the two green inks to make some splattres on the page.  I finished off with the dragonfly accent and a few holeless sequins for a bit of shine.


My next card uses the same dragonfly stamps, but I inked up the solid wings on my Misti with green and turquoise ink then stamped and spritzed to get the colors to blend. Once I had a nice blend, I stamped in brown with the detailed wings, and then stamped the body. I realized I had postitoned the wings too low, so repeated the process above with the wings and fussy cut them out to pop up a little further up the body to give the appearance of fluttering wings. These are painted with a glitter pen brush and absolutely shimmer.


I then stamped the sentiments from Sentimental Mash-up in the corner, one in two shades of green and the other in black.  I finished with lots of splatter in the colors of ink I had used.

Thanks so much for stopping by today! Hope you have a fabulous day!

***This post contains affiliated links at no cost to you ***

Saturday, February 15, 2020

Dream Big

Hello Sweet 'n Sassy friends! Today I am sharing a card I made using the new layering set Dragonfly Dreams and Texture Tiles 5.  I have always loved layering sets and this one is beautiful! 


To make this card I utilized a layout created by fellow design team member Lee Ann Barrett and the first technique in Korin's live video from the January stamp-a-thon in the VIP Group on Facebook.

I used canson xl watercolor paper, artist loft watercolors, round paintbrush, black embossing power, circle dies and VersaFine Clair Nocturne ink. For this technique you want to start with wet paper. Then dip your wet paintbrush into your first color and dab it over the paper (mine was an A2 size), repeat with other colors. Then dry your piece and add more layers of color as desired.


Korin only used two colors in the video and she picked her piece up and tipped it in different directions letting the colors run together. I was afraid to do that for fear I would have a muddy mess. I did dry and add more color until it was bold enough for me. Korin's background had the more traditional watercolor look to it and mine does not. My bolder more defined lines works for this design.

Once it was dry, I used Texture Tiles 5 to add black dots. Then I used double stick tape on the back, positioned it on the front of my card and trimmed around the edges. Next, I stamped the words onto yellow cardstock, die cut out and attached to black circle. I thought the blue strip of paper was too plain and decided to stamp the words I believe in you on it. Finally, I heat embossed the dragonfly with black embossing powder on blue paper, fussy cut out and attached it and the words to front of card. I hope you will watch Korin's video and give her background techniques a try.

Until next time, I hope you have an awesome day!
Karen

Friday, February 14, 2020

Dragon Fly Dreams on Valentine's Day!

Happy Friday and Happy Valentine's Day! I can't believe we are celebrating Valentines already! Spring is just around the corner and it is beautiful here today (finally no rain!) So...for your inspiration, I have two cards featuring a new SPRING-ish stamp set at Sweet N Sassy Stamps called Dragonfly Dreams. I also used an anytime, all occasion Sentimental Mash up set which is the free with purchase Stamp of the Month for February. This is a great set with lots of possibilities.

As I often do, I decided to showcase my Dragonfly Dreams in two, extremely different ways...

The first card is clean and simple but has some "elegant" features. I cut a stitched panel from watercolor paper and stamped the solid dragonfly with Distress Oxide Peacock Feathers and Cracked Pistachio (randomly inked up both on the stamp) I lightly misted it it and then once it was dry, I stamped the "skeleton" stamp with Versamark and embossed it with copper powder (I think copper and turquoise are awesome together!) Then I stamped and embossed the sentiment and added fun foam to the back for dimension. I cut another panel bigger than the main one but smaller than my A2 sized card (all of which are water color paper). I "inked" along around the edges of the second panel with Versamark and embossed with the same copper powder! It is really pretty in real life!


My second card uses a technique called Joseph's Coat Technique. I inked up some Strathmore Bristol Smooth card stock with Distress Oxide inks in peacock feather, seedless preserves, and crushed olive. Once it was dry, I sprayed it with water to get the spot look and dried it again. Then I clear embossed the solid dragonfly body and wings randomly over the inked panel.

Then... (don't panic!) I inked over everything with chipped sapphire distress Oxide ink. Inking it over with the darker color always gives me pause at first because it looks so good (kind of looks tone on tone, but when I wiped the dark ink off the embossed areas the awesome colors pop off the page! I created a sentiment banner from some turquoise card and the Sentimental Mash up stamp set. I used the copper embossing powder again because it was on my desk and it makes me happy :) Then I used the same turquoise to mount the panel onto before popping it onto my A2 card base.

I LOVE this one soooo much!


I hope you were inspired today and see just how versatile this set is. You could truly use it for any occasion!

Have a great day and thanks for stopping by!
Lyn

Friday, February 7, 2020

Springtime ATC Coins

Hi Sweet 'n Sassy Friends! It's Julee Tilman popping in to share a little of what I've been creating with the new release.

During our Winter Stamp-a-thon, Lyn's challenge was to make ATC Coins, which are 2.5" circle pieces of art you can trade with other artists. I didn't have time to create any during the challenge window, but couldn't wait to try them out once I found a little me time!


At the end of the session I had six ATC Coins. I started with a 8.5 x 11 piece of cardstock and coated with one layer of gesso to prime it for paint.  Then I squirted on some distress paint in chipped sapphire, evergreen bough, salty ocean, and tumbled glass, blending in with my fingers.  I then added some brick stenciling randomly across the page with white Dylusions paint.  Once this was dry, I randomly added bits of stamping using the Texture Tiles 1 set and archival ink.  When everything was dry, I cut six circles from the page with a 2.5" circle die, placing the die where I thought it would give the most interest.  These top two coins are made with the Birthday Borders set and have already been sent out for trade!  The sweeter sentiment is from the So Sweet Cocoa set and much love is from Sentimental Mash-up.


The rest of my coins use the adorable new Springtime set. I stamped the butterflies and boots a few times on cardstock, then colored with Copics and fussy cut.  For the spring has sprung coin, I then colored in the white space on the image cut out so it appeared more natural. I softened the  coin up a bit with some white stamping with the hearts from Texture Tiles 5, then stamped my sentiment in archival ink.  The dream big sentiment is from Dragonfly Dreams and I stamped the butterfly in archival ink directly on the coin, then cut out the butterfly I had colored minus the antennae and popped up the wings.


The thinking of you sentiment is from Birds & Blooms and I used the same treatment with the butterflies, adding a bit of thin washi tape to break up my design.  My final coin uses the lovely boot image and I paired it with a sentiment from the Sentimental Wordfetti set.

I traded a couple of these, but also thought they would work great on card fronts, so created a couple cards using them.


For this one, I matted the coin with a black scalloped circle, then divided my pattern paper in half, adding a die cut border to break things up.  I stamped the flowers from the boot image at the bottom and lightly colored in, then added a few more butterflies to finish off the card.


My second card uses the same scalloped circle to mat the coin, but a few more layers of patterned paper.  I stamped one with the dots from Texture Tiles 5 and then finished off with a butterfly accent.

Thanks so much for stopping by today! I hope you have a fabulously creative day!

***This post contains affiliated links at no cost to you ***