Showing posts with label Springtime. Show all posts

Saturday, April 25, 2020

Springtime!


Hello everyone! Today I want to share two springtime cards with you. I love the cute little chicken with the flowers and colored it twice to make these cards.


I colored the images with alcohol markers and cut them out. I colored a couple of leaves from the itty bitty blossoms stamp set too, so I could use them in the background of my first card.


I used a lot of stickers and patterned papers to give the cards more color and a real springtime feeling.


I added a yellow ribbon and some sequins to finish the cards and that's it :).

https://www.sweetnsassystamps.com/springtime-clear-stamp-set/

https://www.sweetnsassystamps.com/itty-bitty-blossoms-clear-stamp-set/#

I hope you're inspired to create!

Lucinde / Lucilight

Wednesday, February 26, 2020

Springtime Blessings | #SNSSVIP0220

Hello Sweet Friends!  Sheri here today with a card featuring the NEW Springtime stamp set.  I also played along with our VIP Challenge over on SNSS VIP Facebook page.  You can find more detail on how to play along HERE.

***THIS POST CONTAINS AFFILIATE LINKS AT NO ADDITIONAL COST TO YOU**


http://shrsl.com/24s2khttps://www.facebook.com/media/set/?set=oa.2825654950834420&type=3 

There's still a few days left to take advantage of this months Stamp of the Month!
 
 http://shrsl.com/1ou1d
http://shrsl.com/1ou1d


 Happy Stamping!!


Saturday, February 22, 2020

Time for Spring!


Hello everyone! Today I want to show you two cards I made with the Springtime stamp set.


The proces for these cards is pretty simple. I colored the images with alcohol markers and used a die to cut the rectangles out (this safes me the struggle with small details when cutting them out ;)).


After that I searched for some matching papers that represented the springtime feeling too. I layered a couple of patterned papers on the card with the boots. For the card with the little chicken I used a kraft colored doily.


On this card I stamped the message 'springtime blessings' with a brown ink. Of course I had to add a couple of sequins to finish the card.

https://www.sweetnsassystamps.com/springtime-clear-stamp-set/

I hope you're inspired to create!
- Lucinde 

Thursday, February 20, 2020

hello spring!

Good morning! Today I have some cards to share using the Springtime and Sentimental Mash-Up stamp sets from this month’s release at Sweet ‘n Sassy Stamps. This cute spring set is a must have and the sentiment set will be a great go-to set for your cards! First I stamped the boots image and accented it with the little ladybug. The blue cardstock layers were leftover from die-cutting the frame for this card. I embossed them with a subtle texture embossing folder.


I've been wanting to try the Bridge Card fold so that's where my inspiration for my second card started. I wanted the bottom piece across the front to be grass and the pieces all fell into place from there. These are SO fun and easy. I can see many more in the future!


This card does lay flat and fit in an A2 envelope for mailing!


There are a few variations on these, including horizontal and vertical cards. The measurements I followed are to start with a 4 1/4" x 8" base, scoring each end @ 1 1/4" and 2 1/2". The Bridge piece is 5 1/2" wide x however tall you want it. Mine is about 1 3/8" at the tallest peak after die-cutting the grass edge. My patterned paper layers are 1 1/8 x 4 1/8 and 2 7/8 x 4 1/8.


Have a great day!
Diane


Wednesday, February 12, 2020

February New Release Blog Hop + Giveaway

Welcome to our February Release Blog Hop!

We've got a spring in our step with the new February release and are so excited to share the projects we've been working on with you! Read on for a bit of inspiration and a little walk through of our new release, then hop along to the blogs linked below for all sorts of papercrafting inspiration.

Plus, there's a GIVEAWAY! Leave a little shout out in the comment section on each stop along the way for a chance to win a $10 gift voucher to the Sweet 'n Sassy Stamps shop. Winner will be announced here on the SNSS blog, Wednesday, February 19.


Here's the official hop list. If a link misbehaves along the way,
hop on back here to pick  up where you left off.


February is my big masculine birthday month with both hubby and my dad celebrating around Valentine's day.  I was so excited to see the  Birthday Borders set in this release, along with a more masculine themed sentiment builder set in the Sentimental Mash-up set.  The Birthday Borders comes with 4 border stamps. They're repeating patterns, so they're easy to match up to extend further if you want. Or in my case, it made the decision to do a little stamp surgery easier!


I cut the last three candles from the candle border individually as well as the final cluster of confetti from that border strip and then proceeded to stamp them randomly in blues and greens as the background for my card.  Next I stamped the presents border and colored with Copics.  I fussy cut just the first section of presents to pop up on my card.  I stamped the birthday and wishes stamps from Sentimental Mash-up on a white panel, then matted with blue and added a die cut border to finish things off. Easy peasy!

Korin made some absolutely adorable cards with our new alpha set. I love how the SNSS alphas are the perfect size for cardmaking as well as journaling!


In this gorgeous notecard, she pairs the new Springtime set with the Loop da Loop Alpha and Lots of Love.  A few ink splatters and a doodled frame and this card is ready to hit the mailbox!


If you watched Korin's fun live stream during our Winter Stamp-a-thon you might have seen how she made this totally rad watercolor card.  The card features Loop da Loop Alpha, Love Wordfetti, Vintage Love, Texture Tiles 5, and Texture Tiles 1. Isn't it fabulous?


Aren't these sweet little Valentiness from Guest Designer Jill Holdorf featuring the Loop da Loop Alpha just so cool? Love those layered hearts!


Okay, the next stop on the hop is my blog, Poetic Artistry

Here's a little look-see at the sets included in the FEBRUARY release...

First up is the January stamp of the month, Sentimental Mash-upOur February stamp of the month is another must-have in your stamping collection. It includes a lovely collection of builder sentiments in mixed-fonts that are perfect for both masculine and feminine creations. This set is available for purchase for $15.95, OR you can get it as a FREE gift with a $75 purchase (after any discounts and before shipping and tax) during the month of February! Just add it to your cart and the discount will automatically apply once you've qualified.


Jenn Nilsson brings spring to life with her adorable Springtime set. Chicks, rain boots, an umbrella, and flowers, now all we need is winter to go away!


Dragonfly Dreams indeed! This set by Korin is just so breathtaking. The definition on the wings and bodies is amazing!

Our Creative Worship set this month is the whimsical Loop da Loop Alpha from Rebecca Rios. These sketchy scripted letters are so much fun!


Our final set for February is the fun Birthday Borders set from Korin. Balloons, cupcakes, confetti, and presents... who's ready to celebrate?


That's our February Release in a nutshell! So many fabulous sets to choose from! What's your favorite? 


May you be blessed today and always!

Monday, February 10, 2020

Shape Cards & Birthdays


 Hello everyone! Today I'm sharing two fun cards featuring three newly released Sweet n Sassy stamp sets! For my first creation I decided to make a mini shape card using the Springtime set. If you look closely you'll see a bit of white ink smeared on my black circle to create a chalkboard effect.  (The second photo shows it up better.)

~~~This post contains affiliate links at no extra cost to you~~~
Supplies and tools:
  • Springtime (Sweet n Sassy Stamps)
  • Canson Mixed Media Paper
  • Sonnet Water Colours
  • Prismacolor Pencils
  • Petals and Blooms Paper Stack (The Paper Studio)
  • Teardrop Circles Dies (Spellbinders)
  • Circle Nestabilities (Spellbinders)
  • Small Scallop Circle Nestabilities (Spellbinders)
  • Crochet Dies (Sizzix  - Tim Holtz)
  • Christmas Quilt Embossing Folder (Couture Creations) 
  • Brilliance Moonlight White Ink (Tsukineko) 
  • Versamark Watermark Ink
  • White Embossing Powder
  • Black Embossing Powder
  • Baker's Twine


My second card is a bright and cheerful birthday card using both the Birthday Borders and Sentimental Mash-Up sets. I used gel pens to color in my confetti - just to make it a little more fun and exciting looking! 


 Supplies and tools:


Friday, February 7, 2020

Springtime ATC Coins

Hi Sweet 'n Sassy Friends! It's Julee Tilman popping in to share a little of what I've been creating with the new release.

During our Winter Stamp-a-thon, Lyn's challenge was to make ATC Coins, which are 2.5" circle pieces of art you can trade with other artists. I didn't have time to create any during the challenge window, but couldn't wait to try them out once I found a little me time!


At the end of the session I had six ATC Coins. I started with a 8.5 x 11 piece of cardstock and coated with one layer of gesso to prime it for paint.  Then I squirted on some distress paint in chipped sapphire, evergreen bough, salty ocean, and tumbled glass, blending in with my fingers.  I then added some brick stenciling randomly across the page with white Dylusions paint.  Once this was dry, I randomly added bits of stamping using the Texture Tiles 1 set and archival ink.  When everything was dry, I cut six circles from the page with a 2.5" circle die, placing the die where I thought it would give the most interest.  These top two coins are made with the Birthday Borders set and have already been sent out for trade!  The sweeter sentiment is from the So Sweet Cocoa set and much love is from Sentimental Mash-up.


The rest of my coins use the adorable new Springtime set. I stamped the butterflies and boots a few times on cardstock, then colored with Copics and fussy cut.  For the spring has sprung coin, I then colored in the white space on the image cut out so it appeared more natural. I softened the  coin up a bit with some white stamping with the hearts from Texture Tiles 5, then stamped my sentiment in archival ink.  The dream big sentiment is from Dragonfly Dreams and I stamped the butterfly in archival ink directly on the coin, then cut out the butterfly I had colored minus the antennae and popped up the wings.


The thinking of you sentiment is from Birds & Blooms and I used the same treatment with the butterflies, adding a bit of thin washi tape to break up my design.  My final coin uses the lovely boot image and I paired it with a sentiment from the Sentimental Wordfetti set.

I traded a couple of these, but also thought they would work great on card fronts, so created a couple cards using them.


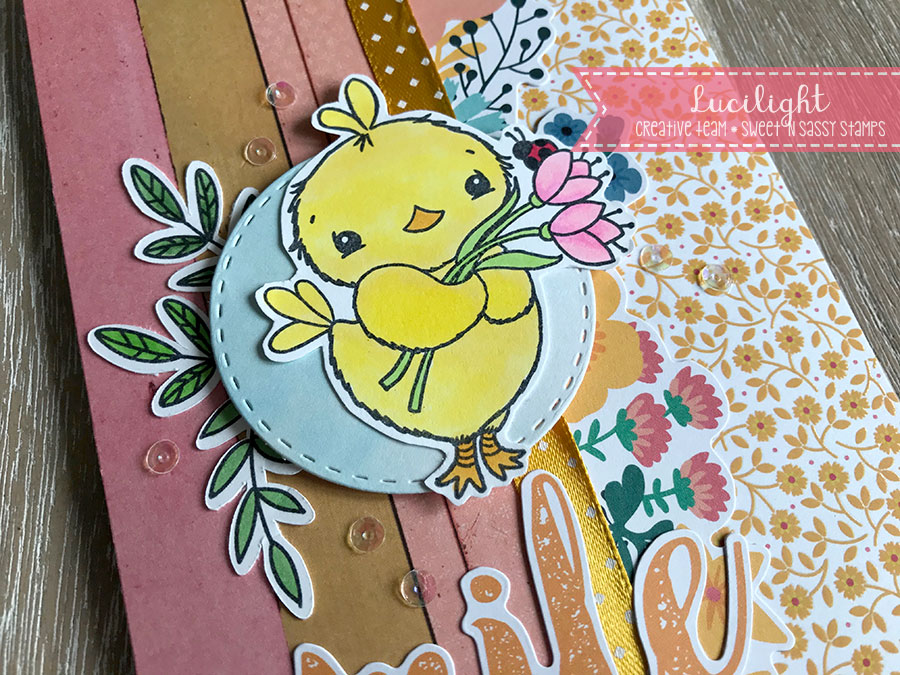
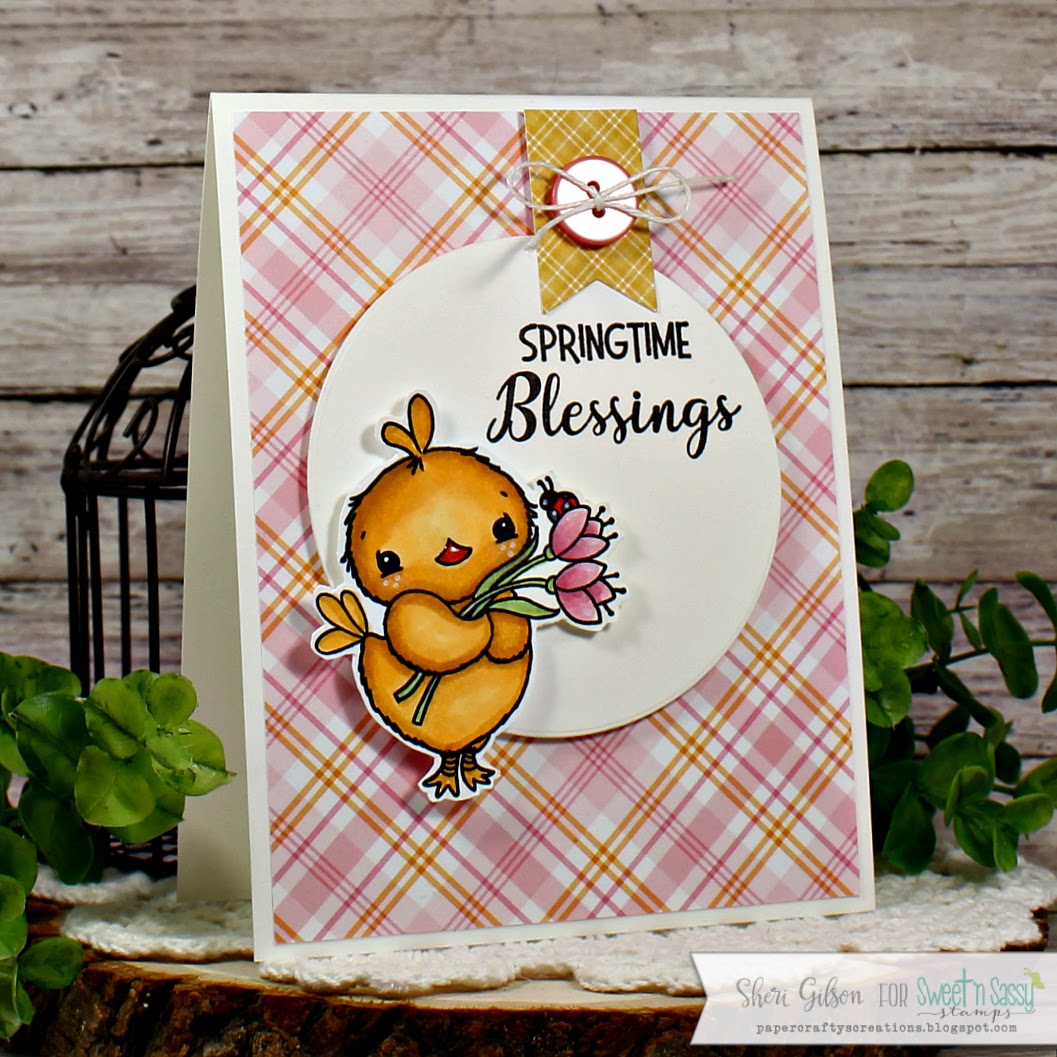
For this one, I matted the coin with a black scalloped circle, then divided my pattern paper in half, adding a die cut border to break things up.  I stamped the flowers from the boot image at the bottom and lightly colored in, then added a few more butterflies to finish off the card.


My second card uses the same scalloped circle to mat the coin, but a few more layers of patterned paper.  I stamped one with the dots from Texture Tiles 5 and then finished off with a butterfly accent.

Thanks so much for stopping by today! I hope you have a fabulously creative day!

***This post contains affiliated links at no cost to you ***

Saturday, February 1, 2020

Boots & Sketch Challenge

Hello Sweet n' Sassy friends! I am sharing a card today made with the cute new set Springtime.
I used the sketch for the February SNSS VIP Group Challenge on Facebook designed by our very own Julee Tilman. If your not already a member we would love to have you join us!


 The sketch I used to create my card.


I started by looking through my pattern paper until I found something that would work with the boots. I was super excited to find the bee paper!  I stamped the images on Canson XL watercolor paper with VersaFine Clair Nocturne ink. I used my Arteza Real Brush Pens to color them (sunset yellow, bumblebee yellow, wisteria purple, rouge pink, green tea, ice blue, elephant gray and red). Afterwards, I die cut the boots with a wonky stitch circle die and fussy cut out the butterfly and ladybug. I also die cut out another circle for matting  and found a coordinating piece of scrap cardstock for the banner.

I stamped the polka dots from Texture Tiles 5 onto my banner and attached the butterfly. I stamped the sentiment from Love Wordfetti onto a scrap piece of white cardstock. I chose those words because I like having cards in my stash that can be used for anything.  I assembled the pieces as seen, glued the ladybug on and added some white string to finish off my card.

I know, I added something to the sketch by adding a strip with the words to it. It was the only way I could figure out how to add a sentiment. I do have an idea for another card that will follow it exactly.


For more cards made with the sketch check out the Facebook group throughout the month to be inspired. Why not create your own and enter it in the VIP group for a chance to win a gift code to Sweet n' Sassy Stamps

Until next time, I hope you have an awesome day!

Karen