Showing posts with label Hillside Edges. Show all posts

Tuesday, December 8, 2015

Snowy Friends

Hello Sweet 'n Sassy Friends, It's Ceal here to share a card with you today. I am in the process of unpacking and decorating for Christmas and I am also needing to make Christmas cards to send out so, I made this one to send to a dear friend using Welcome Jesus,  Snowy Hello for the greeting and a couple diecuts, Welcome Jesus die set and the Hillside Edges.
We are also having one amazing sale, 50% off the entire site, so go forth and shop! You must enter code MERRY15 to receive the discount.


Tuesday, November 10, 2015

Winter Blessings

Happy Tuesday Sweet 'n Sassy friends!
 It's Ceal here, I hope you enjoyed our birthday hop yesterday and if you don't know what I am talking about scroll down and hop along to see some beautiful eye candy. It's  our birthday month and all month long we are going to be sharing some throwback inspiration of some of our older products. and some fun facts from the design team. 
I am featuring the Bare Tree Die. This die is very versatile, You could use cut it out in brown add some flowers to it to be a spring tree, add some leaves to be a summer or fall tree or use it as a winter tree as I did. 
Excuse my photo, I am in the middle of a huge move and they packed my room today so I had to make due with a place to photograph my cards.

To make my card I used the Bare Tree Die, the Hillside Edges and one of our newer sets Winter Blessings 


Wednesday, September 30, 2015

Home is Where You Are...

Hi friends! Kim here sharing a card that I created using the super cute Happy Home stamp set. (PS - This set would go great with the Hillside Edges dies!)

For my "scene," I started by cutting out a few hills from the Natural paper pad from Authentique (aren't those colors perfect for hills?)  I then used the Wendy Vecchi Sunburst stencil, and Wild Honey Distress Ink, to stencil the rays onto a piece of text paper (also from Authentique).  The house and trees were stamped on cardstock and watercolored, using Distress Markers and a water brush.  Then it was time to assemble!  The hills were faux stitched and the house and trees were tucked under the hills.  The last item was to add two clouds, cut out using the Clouds and Raindrop dies.  The sentiment was stamped on the bottom hill.

So, friends, this is going to be my last post for a while. I stepped down from the design team, for an undetermined amount of time. My hubby just received a job offer, after looking for six long months, in another state. Boo.... My craft supplies have been packed and our house in on the market so I need time to make the transition before jumping back in to regular crafting.

A great BIG thank you to Korin and the wonderful SNSS design team...Love you all! And thanks to the wonderful SNSS customers who support Korin's business! 

Sending hugs and kisses!

Monday, January 12, 2015

Grateful.


Good morning!

Jessica here with a card to share today along with some step by step photos of my card making process.  Nothing earth-shattering per se, but I took photos as I worked of the steps to make today's card.  They are pretty self-explanatory, so I'll leave you with the photos below.  If you have any specific questions, please feel free to leave a comment.

A few notes of my design process:

I was wanting to create a winter scene with a sunrise/sunset landscape with clouds behind the sun.  I'm always in need of thank you cards, so I decided to use a thankful sentiment, tucked into the ribbon/twine treatment.  I find that I like to use vellum for snowflakes, but like them better when they are backed with a solid card stock as it helps them stand out a bit better.


Sweet'n Sassy Stamps Products Used:


Have a great Monday!
Jessica


Saturday, January 3, 2015

winter ATC frame

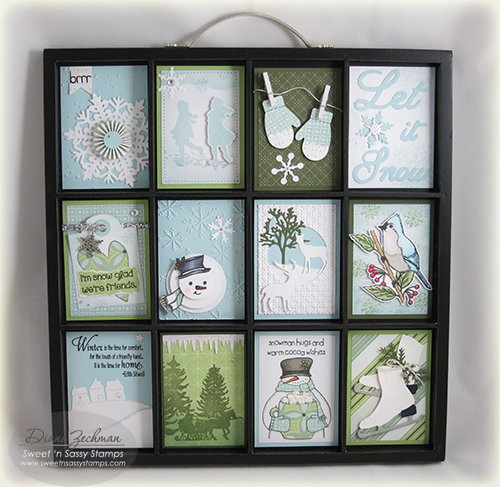
Hello friends! I have a special project to share today that I made for a Christmas gift. I wanted the recipient to be able to enjoy it all winter long, though, so I went with a snowy/winter theme. Each little card in my frame is ATC size (2 1/2 x 3 1/2 inches) and I used lots of my favorite Sweet 'n Sassy stamps and dies.

SNSS ATC frame diane zechman
I wanted to be able to switch out the ATC's for each season/holiday or whatever theme I want...so they were attached in the frame with Removable Glue Dots. I found these to work perfectly for the right amount of adhesion needed, yet still be able to be easily removed.
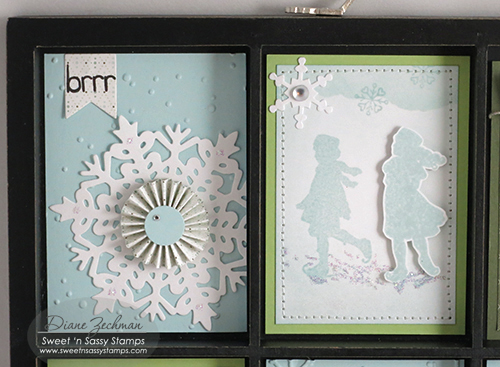
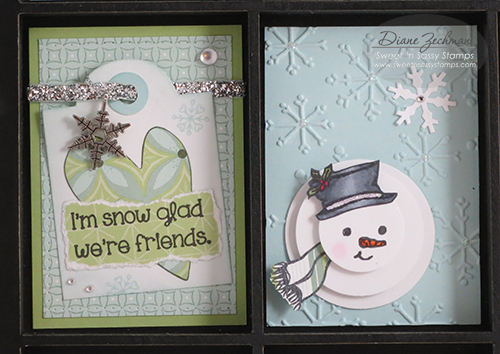
Here's some close-ups of each ATC. For the first one I scored and folded a rosette and centered it onto a Sweet 'n Sassy Large Snowflake diecut. The "brrr" is from my Snowman Soup stamp set.
The second one has some stamped skating friends from the SNSS Winter Silhouettes stamp set, with one popped up for dimension. There's a few tiny snowflakes from my Snowy Hello stamp set lightly added to the top. The edges of this one were stitched on my sewing machine.
SNSS ATC frame 2 diane zechman
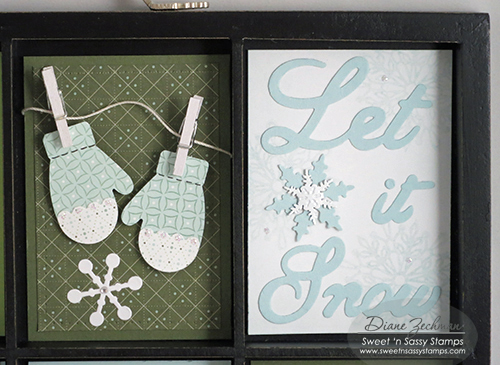
The mittens were made with a punch I had and the white tiny clothespins came from Michael's.  Crochet thread was perfect for the string.  I faintly stamped snowflakes in the background of the Let it Snow words from the Spectacular Snowflakes stamp set.
SNSS ATC frame 3 diane zechman
On the left, below, I used one of the Bookmarks & More dies to create a tag. The heart was cut from the Heart dies and the tiny snowflakes and words are from my Snowy Hello set.
On the right, 3 circles were punched and popped for dimension. The snowman's face, hat and scarf are from the Warm Hello stamps.
SNSS ATC frame 4 diane zechman
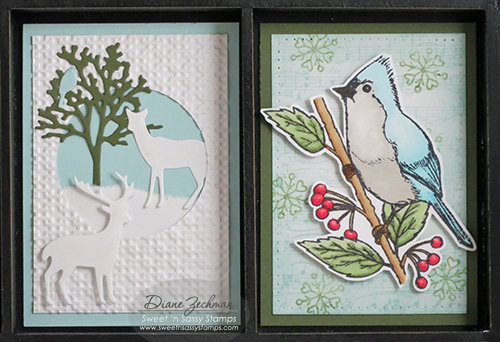
The tree, deer, and bird, below are from Forest Silhouettes dies. On the right, I lightly stamped the Music Background. More Snowy Hello flakes were stamped (this time in green) and the bird from Peace of God was popped up.
SNSS ATC frame 5 diane zechman
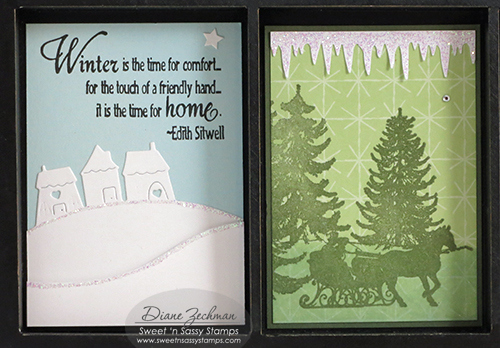
The Hillside Edges dies made a cute snowy scene and the words from Winter Silhouettes went with it perfectly.  For the next one, I stamped the sleigh ride image from one of my fave Christmas sets, Old Fashioned Christmas.
SNSS ATC frame 6 diane zechman
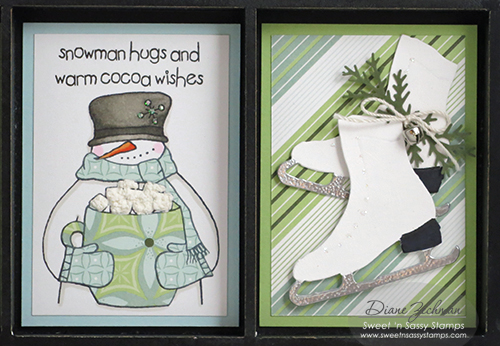
The words and snowy fella below, drinking hot cocoa, is from my Snowman Soup set. The mug, scarf, and mittens were paper pieced. Then I applied a Puffy Velvet Fabric marker (like Liquid Applique) to the marshmallows and heat them with a heat tool to puff them up.
The skates are a die I had. The blades were heat embossed with silver e.p. and the branches, along with a tiny jingle bell, finished them off.
SNSS ATC frame 7 diane zechman
Lots of glitter and bling were added to each one to make this frame sparkle!
Have a great start to the New Year...thanks for popping in! 
Here are the Sweet 'n Sassy products that I used...
♥ Diane

Sunday, December 28, 2014

Peaceful Winter Silhouette~

 
Peaceful Wishes for all in the coming Year! Mary here to share with you the nostalgic feel of the Winter Silhouettes designed by DKdesigns. I combined it with the Hillside edges die to create this wintry skating scene of yesteryear. To give the snowy hillsides some depth, I sponged the edges. The title is pulled from Vintage Ornaments. To finish the card with a bit of sparkle, I pulled out my mini rhinestones from CTMH. 

See you all in the New Year! Sweetn'Sassy Stamps has great things in store for the coming year!  
Materials Used:
Stamps: Winter Silhouettes, Vintage Ornaments
Paper: SU, MME
Inks: SU, QQ powder puff inks, versafine ink
Accessories: SNSS Hillside dies, rhinestones


Sunday, December 14, 2014

snowy scene tag

Christmas will soon be here...are you ready? I hope you are enjoying the holiday preparations. May you have peace and joy as we celebrate the true meaning of Christmas!

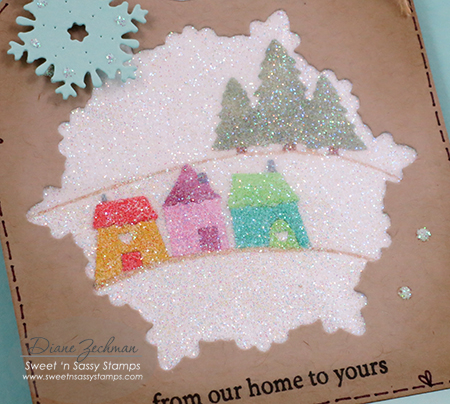
Today I have a snowy tag using the Sweet 'n Sassy Hillside Edges dies, Spectacular Snowflakes dies, Small Snowflakes dies, and Christmas Silhouettes stamp set (sentiment). The snowy scene was created with an old technique using packing tape and ultra fine glitter.

hillside edges tag diane zechman

hillside edges tag close diane zechman
 
To create this tag, I started with a 3 1/2 x 8 1/2 inch piece of cardstock and scored it at 4 1/4". The fold will be at the top of your tag.
 
To make the tag shape, I cut a 1 inch square in half diagonally and traced one of the pieces on each top corner and cut on the traced lines.
 
Next I diecut the second largest snowflake die (Spectacular Snowflakes dies) from the front of the tag.
 
At this point you can decorate the "inside" of the tag however you want. I used the Hillside Edges dies and colored them with markers.
 
Now the fun part...adhere clear packing tape to the inside of the front layer, making sure you completely cover the diecut opening. Then apply ultra-fine glitter to the front of the tag (it will stick inside your diecut window where the packing tape was placed).
 
Adhere the front to the back with double-sided tape (Scor-Tape works great!) and finish as desired. I used a Small Snowflake diecut and a sentiment from Christmas Silhouettes.
 
Thanks for visiting our blog...have a wonderful day!
♥ Diane