Showing posts with label Jenny. Show all posts

Monday, October 12, 2015

Baby Gift Bag Tutorial


Hello Sweet 'n Sassy Peeps!

Jenny here with a quick and easy baby gift
bag using the stamp set Little One.
This stamp set is just super sweet and
I love the sentiment.

I don't always have baby gift wrap or bags
stored away, so I thought it would be fun
to make my own. You could use the bag to 
include your gift or even use a smaller bag to hold
party favors at a baby shower.  This bag just
 happens to be an over sized lunch bag.  
I have a sixteen year old boy I pack lunches for.
Need I say more?!  Lol!

Okay...let's get started.
Here are the very basic supplies you will need,
plus whatever inks you choose.


I choose some pinks and a purple for my bag.
You may want to test the colors out on
another bag first.  The color always looks
different stamping on Kraft like paper.


I folded the bottom of the bag down so
I could eye ball where I wanted my images
to go.  Folding it down also keeps the bag
out of your way while stamping.


Now would be a good time to tuck in
the goodies in your bag.  If you forget to
add something, no worries, this easily can
be opened back up.

Next, take a large doily and fold it in half.  
Set it aside and fold the top of the paper bag 
toward the back.  Unfold the doily so half
 covers the front of the bag and the other the back.  
Then punch each end of the center of the
 doily through the folded bag.


Slide each end of the ribbon from the back to
the front and tie in a bow.  If you happen
to have a fun clothespin, attach that through
 the center of the bow.

You can find the supplies I used for my gift
bag up on my blog, and the link for the Little One
stamp set below.

Hope you find time in your day 
for some crafty-ness!

Hugs,

Jenny


Saturday, September 19, 2015

Thankful for You


Happy weekend friends!

Jenny here with a CAS fall card to share.
I am not a fan of Fall....only because I know
what comes after it!
I'm a total summer girl, however, I do
love to create with Fall colors and textures.
Burlap is one of my favorites to use and I was
happy to make it work with this card.

Using shades of brown distress inks, 
I sponged around a grid stencil to create my 
subtle background.  Before I added too many layers 
on my card I stamped my sentiment from 
Leaf Silhouettes by Sweet 'n Sassy Stamps. 
 Next I stamped a few of the leaves from the same set
 in various colors.  Matching dies made
cutting the leaves a snap!  I just happened to have a 
burlap scrap on my desk :) so that went on next. 
All that was left to do was arrange and adhere the leaves
and add some sparkle with sequins and seed beads.

You can find all the products I used on my card
up on my blog.  For your shopping convenience the
 Leaf Silhouette stamp set and dies are one click away below.

Hope you can sneak in some craft time this weekend!

Hugs,

Jenny


Thursday, September 10, 2015

Hope


Hello Friends!

I'm here with a sweet CAS card using
the Joy to the World stamp set.
Today is the very last day you can purchase
this set and two others with matching dies
 at the discounted Sweet Perks Club bundle rate.
So...what are you waiting for, matching
dies makes life easier and gives you
many more creative options to explore!

Did you notice the little, oh so adorable,
hope banner on my card?  I couldn't resist
a tiny sneak peak at one of our new
sets for tomorrow's September release
called Words of Life Collection 1.
Did I mention, the design team has been busy 
whipping up amazing creations for you? They
 are absolutely gonna knock your socks off!
So be sure to stop back tomorrow!
Meanwhile, click on any of the bundle
photos below to get a sweet deal today only!

Hugs,

Jenny 


Monday, August 17, 2015

Color Kissing Tutorial


Good morning sweet friends,

Jenny here today with a super fun tutorial using
some of my favorite Sweet 'n Sassy products!

Sometimes I like to add a pattern to
my solid image stamps.  Color kissing is
the perfect way to achieve that effect.

To start you need a solid image stamp.
Think balloons, butterflies, houses, flourishes,
pretty much any solid image will work.  I picked
a mini gift tag from the Mini Tags and Sentiments Set.

Next choose a patterned border or background stamp.
I like the fact that with a background stamp you
don't have to worry about kissing your stamp more
 than once to cover your solid image if it's large.
My choice was the Floral Pattern Background stamp.
 I also used a sentiment from the new Little One Set.


Enough said...let's get this started!
Stamp your solid image onto white 
card stock.  I found that this technique works
best by using a lighter shade of ink for your solid image.


Next ink up your background stamp or border
with a darker ink.


Then take your solid stamp that has been cleaned,
and stamp (kiss) it onto your inked up patterned background.


Now you are ready to stamp your "patterned" solid
stamp to your image.  Line up carefully.


Here is my result after die cutting
my tag with the Mini Tag Die Set.

Now my tag is ready for my card.


I adore the pop of pattern on my CAS card!
The Decorative Frame Stamp Set provided me
with the word "for" on my card.  I love to mix up
different fonts and text sizes.


The design of my card was inspired by


To give you more ideas on how
you can use this technique and different 
color combos, I brought
out my You're a Star stamp set.
By the way....with school starting this
set is wonderful to use to create 
teacher cards, tags and gifts!


How fun are these stars now?


Great to have ready to use on a card,
gift tag, or punch holes on the tops
and string a banner.

You can find all the Sweet 'n Sassy stamps and dies 
I used today below.  Just click an image to shop.
All other products are listed on my blog.

I hope my tutorial inspired you
to try this technique.  I had so much
fun sharing it with you!

Hugs,

Jenny

---------------------------------------------------------------------------------
Click on an Image to Shop.


Wednesday, August 5, 2015

You Are My Sunshine


Hello Sweet 'n Sassy Fans!

I've got a super fun CAS card to share with
you today based on the sketch from
CAS(E) this sketch this week.


I choose the set Happy Places for my card
 because it was one of my absolutely must have sets!
When my children were small I often sang the song
"You are my Sunshine" to them.  So this set
brings such precious memories to mind for me.
There are also several other options to end
the words "You are my" in the set which
means I will get plenty of use out of it!

You can find all the products I used on my card
up on my blog and the stamp set right below.

Have a fabulous Wednesday!

Hugs,

Jenny


Saturday, July 4, 2015

Celebrate Independence Day!


Happy July 4th to all my U.S. friends!

My family and I celebrated with a bbq and pool
time at our home yesterday.  It's always so much
fun to have a relaxing day together.

My card today carries on the celebration of the
birth of our nation with a bright, totally 
red, white, and blue sparkly creation 
using Sweet 'n Sassy Stamps and dies.

Credit goes to a family friend who owns a 
print shop and gave me all kinds of wonderful
shimmery card stock.  I hope I was able to 
capture it for you!  Just love that blue and gold paper!

You can find all the marvelous Sweet 'n Sassy products
 below, and everything I used on my card up on my blog.

Wishing everyone a relaxing weekend!

Hugs,

Jenny


Tuesday, June 16, 2015

Ruff Day??


Hello Sweet 'n Sassy Friends,

Jenny here with a lighthearted card
to give a friend that could use a smile.


I just love all the animal sets that
Sweet 'n Sassy carries... I especially have a
soft spot for doggy stamps... I even like the cat
ones...however, don't tell Korin but kitty 
cats are not my favorite animal to
 have around - totally allergic to boot!

This little guy is colored with distress inks,
and then die cut with the matching die set.
The design was inspired by Retro Sketches.


You can find my complete supply list plus
the Retro Sketch up on my blog.

Hope your day is fabulous!

Hugs,

Jenny


Sunday, May 17, 2015

Birthday Fishies


Hello Sweet 'n Sassy Friends!

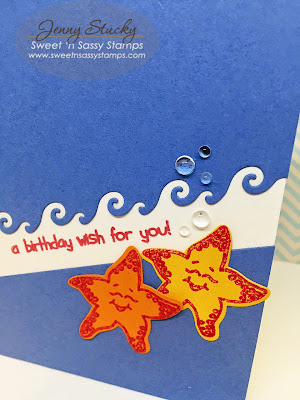
Jenny here today with a fun CAS birthday card.
If you are like me you never have enough
birthday cards.  This year I've been trying
to work ahead to keep up and thought this would 
be a perfect card for a sweet little 
boy I know with a summer birthday.

My card design is based on two challenges.
I brought out the Happy Ocean Friends stamp
set which is chuck full of adorable water
creatures and sentiments.  I choose the sweet starfish.
The matching dies for this set made the fish
 super easy to cut.  I heat embossed both fish
which give them added dimension and sparkle.


Using a die from the Waves set I created
a spot for my sentiment.  All that was left was
to pop on some Raindrop "bubbles".

Have a "fin"tastic week :)

Hugs,

Jenny


Sunday, May 3, 2015

Flora For You

Hello Friends,

Jenny here today on this glorious Sunday.


It's been just gorgeous Spring weather here
this weekend, so I wanted to celebrate that 
fact with a bright flowery card.

So easy to put together with matching
designer paper and the lovely 
Long Stem Silhouettes stamp set and dies by
Sweet 'n Sassy.  I didn't even feel the need to 
stamp the flower silhouette before die cutting it.  
With so much other color on my card, 
I left it simple and elegant.


However, I couldn't pass up the sweet 
polka dot bow tie and a little bling. (tee-hee)

Enjoy a creative week my friends!

Hugs,

Jenny