Sunday, November 11, 2012

Thank You


Hello, Jennie here with a CAS card to share today using Leaf Silhouettes.  For this card I stamped the leaves in Memento ink and added some pearl bling.  Very quick, very easy which is key this time of year :)

Thanks so much for stopping by and I hope you have a wonderful day! 
Blessings,


Saturday, November 10, 2012

Sew Happy Cocoa...

Hello! It's Monika here today, bringing you a sweet Cocoa card. Sew Happy Cocoa seems to be very popular around here!

I decided to make a 'one-layer' card, using the brand new sketch from The Sweet Stop, SSS184.


I stamped the image from Sew Happy Cocoa clear stamp set on white card stock, and colored it with Copic Markers.
I ran into some bleeding, so I decided to do some shading around the image and bland the bleeding in with the shading. It also gave Cocoa a somewhat rustic/shabby look.
Since my goal was to keep it without too many layers, I only added one dry embossed strip that I stitched on top, and used the yarn on the bottom to hide the seams... giving the illusion that it is a one layer card.
The greeting (which is originally 2 lines) was stamped on one line. First I drew a pencil line on my card, then inked up the top line and stamped it... then inked up the rest of the greeting, and using a piece of Scotch tape, I masked the top lane, and stamped the rest of the greeting.


To give some dimension to my card, and still keep it 'one layer', I cut the side of the spool image (with a craft knife) and wrapped the spool image with yarn. I used a needle to do it.
I did my usual distressing around the edges with brown ink and my handy tool, my finger nails... also spritzed some light yellow color all over the card.

Don't forget that all Cocoa and Cookie in stock clear stamp sets are on SALE right now. 

Thanks for stopping by,
Monika

Friday, November 9, 2012

Cocoa Mouse stamps are on sale!


Good morning!
Today I have a couple of Cocoa mouse cards that I made in honor of this week's Sweet 'n Sassy Stamps sale event going on in celebration of SNSS's 5th birthday!

I used Sew Happy Cocoa on my first card and Fall Time Cocoa on my second card below.  

Don't look at my coloring too closely though... I stamped the images in Memento Espresso ink, colored with Copics and then trimmed - all the while not loving the ink color.  I've decided that I can't stamp in brown inks when I color with Copics - it has to be black!  So, I went over the sentiments and images with a Copic multiliner black pen but due to the details of the stamp images, my tracing wasn't perfect.  I didn't have time to redo them, sorry...! agggh!

\\

But, as you can see Korin's Cocoa Mouse is pretty adorable anyway!  Check out her awesome sale page HERE and grab some sets while they are available for such great prices!

Have a great day!
Jessica

Wednesday, November 7, 2012

Cocoa's Peppermint Latte ~

Good Morning everyone! Mary here with a hot peppermint Latte from none other than Cocoa!!! Isn't he sweet? I pulled him out for this card because in the next few days, you will be seeing a lot more of him with the Cocoa and Cookie sale beginning tomorrow through Nov. 14th. So be sure to check back in the AM. This has to be my favourite Cocoa set simply because I love coffee everything!

I paper pieced Cocoa's Latte with some Christmas design paper and it sure got me excited for the upcoming holidays! Shhhhh, did I just say that?!!! I coloured Cocoa himself using copics and die cut the image using spellbinder dies. He is trimmed using baker's twine.

Have a great day! 

Paper: basic grey, SU
Inks: copics, memento, versafine
accessories: spellbinder dies, pearls, bakers twine, EF  


Tuesday, November 6, 2012

Leaf Silhouettes with Laura Williams

Hello! I am so happy to be here at Sweet 'n Sassy this month!
I have a trio of projects to share with you today, which will help you get all ready for Thanksgiving. 

I used the Leaf Silhouettes stamp set to create napkin rings, placecards, and a thank you card.  


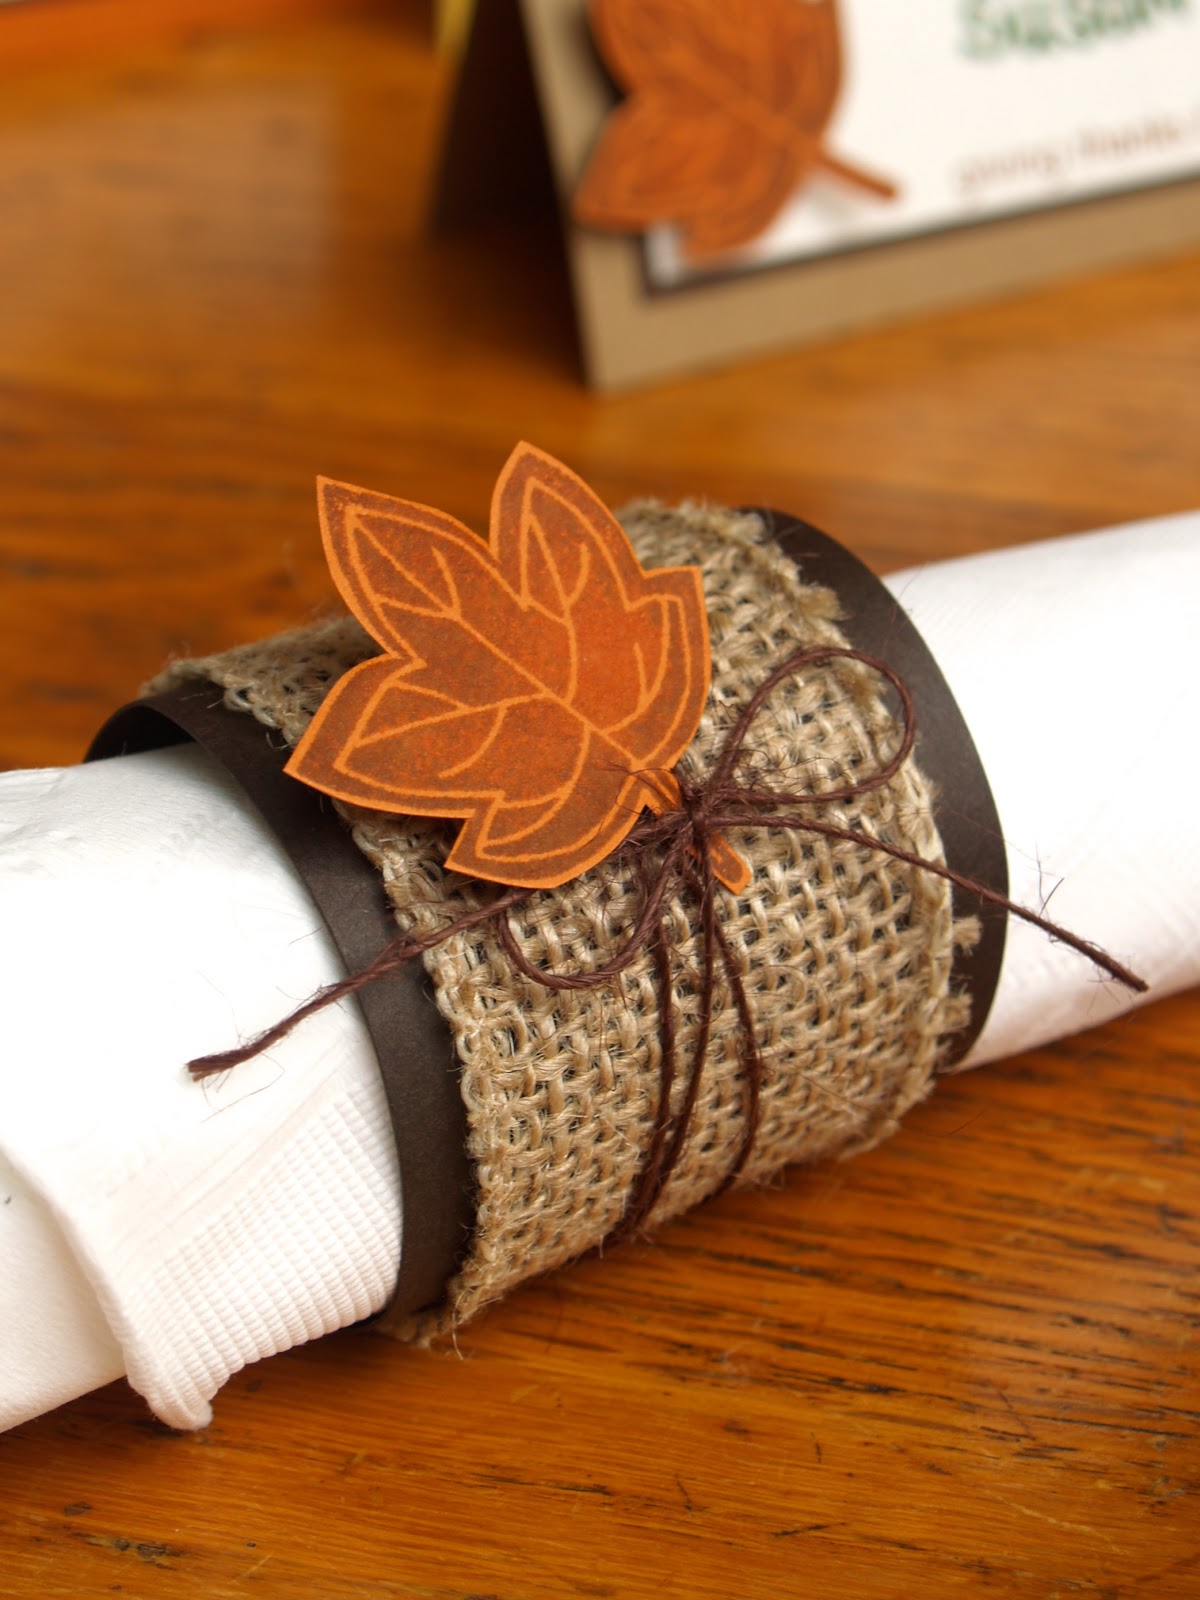
To create a simple napkin ring, trim a strip of cardstock (I usually do mine about 1.5x6 inches.) Roll it gently, and add adhesive.  I then wrapped mine with a layer or burlap ribbon, twine, and then tucked my stamped leaves into each one. (I added a dot of foam tape behind each leaf to secure it.)

I stamped the leaves on colored cardstock, and used two colors of ink on each one.  The trick is to start with the lightest color. Dab it on the ink, and then roll the edges of your stamp in the darker colored ink.  It creates a fun look and creates unique leaves that are never exactly the same.

Using matching cardstock and ink, I whipped up placecards. (Any size you prefer will work, but i generally cut a 4x4 inch square, and fold it in half.) Twine, and the oh-so-cute stamps make this quick and FUN work! I followed the same basic format for a sweet and simple (and sassy) thank you card. 

I can't wait to come back next week! I have a holiday card to share with you using a non-holiday stamp set.  Goodness knows, by the time Thanksgiving rolls around, we better be working on our holiday cards, so hopefully this will get you moving, if you aren't already!

Thanks for being here with me, at the Sweet 'n Sassy blog today! 
xoxo
Laura, 

Monday, November 5, 2012

A Passion for Poinsettias


Hi, it's Bridget here on our first Monday in November - I've started working on Christmas cards recently! 
Don't you just love poinsettias with their deep rich color and thick velvety leaves and petals?  I've been having fun with the set Poinsettia lately - here I stamped it on card stock three times, once on green for the leaves, and three times on deep red for the flower, so I could layer it up.  I also slightly curled the leaves with the handle of a thick paintbrush.  All edges have been sponged with ink to provide a bit more dimension.  I wanted the flower to pop against a lot of white space, so simply added a small strip of dp and a banner sentiment.  Embossing a white or cream background is a good way to add interest without losing all that clean, crisp space!  Don't forget, this set and all of the sets featured in the Design Team Favorites Blog Hop are on sale at 25% off until November 7!  Be sure to check out all the birthday surprises and giveaways over at Sweet 'n Sassy Stamps!
I hope you're having a great Monday, thanks for stopping by!
Supplies include:
My Favorite Things Fishtail Flags Die-namic
Spellbinders M-bossibilities Elite embossing folder
Stampin Up Cherry Cobbler, Lucky Limeade card stock
Stampin Up Cherry Cobbler, Lucky Limeade ink
Memento Tuxedo Black ink
Pearls
Stampin Up Festival of Prints dp

Sunday, November 4, 2012

Poppy Greetings

Hello everyone!  Cathy here with another DT Favorite!  I just love the variety of floral images available at the Sweet 'n Sassy Store.  I'm not alone when I say that Poppies and Greetings is one of my favorites.


The color scheme and the layout of this card, which also happens to be the Sweet Stop Sketch for this week, were kept pretty clean and simple to show off the beauty of the poppies.  The rich tones on the flowers were achieved with Copic Markers, and several poppies were colored twice, cut out, and popped up for dimension.  Sponging, stitching, and some subtle texture on the background layer were added for interest.  The best thing about this stamp set is that you can get it now at the Sweet 'n Sassy Store for 25% off, as well as all of the other DT Favorites, until November 7th.  Our favorites are probably your favorites too, so don't miss this opportunity to add some of these much loved sets to your collection!

Thanks so much for stopping by...have a blessed Sunday!
Hugs,
Cathy

Saturday, November 3, 2012

God Bless You

Hi everyone!  My apologizes for the late post this morning.  Time got away from me! :-)  Did you all enjoy this week's DT Favorites Blog Hop?  Wasn't it filled with some many beautiful cards?  Love seeing all the different designs and those beautiful stamps.  My card featured Everyday Miracles but I thought today I'd share one of my other fav sets...Vintage Postcard.  Love the versatility of this set! 

For this card I also used the Friendship Script background set and then layered images from the Vintage Postcard set on top of the script.  Even the cute stamp cut out is from this set.  The little butterfly is from the Natures Silhouettes set.  Fun stuff!

Be sure to check out the DT's creations this week and share your favorite SNSS set with us!

Friday, November 2, 2012

Just Bee-cause


Happy Friday everyone!
It's Makiko and it is my turn to write something here. Have you hopped around the DT's Favorites blog hop? All of the DT's favorite sets are on sale 25% off now through Nov 7th, including the set I used for my card above :)
You also don't want to miss any of the wonderful sales and events throughout a month of November!


I used the sketch from SCS Sketch Challenge 409 (SC409) for this card. I stamped the one of the images from Bee Happy Rhubarb and colored it with Copic markers. The card was designed with the colored cardstock, two different designer papers for the border. To finish off, I stamped the sentiment and embellished the ribbon with button.


Happy Creating!

Maki


Thursday, November 1, 2012

DT Favorites Blog Hop

It's hard to believe Sweet 'n Sassy Sassy Stamps is celebrating 5 fabulous years this month.  Time sure flies when you're having fun!

We have a lot planned this month in honor of our 5th birthday starting with today's special DT Favorites Blog Hop.  The best part about this hop is that all of the sets the DT is featuring are on sale---25% off today through November 7th!!!

I hope you enjoy the beautiful creations shared today featuring our favorite Sweet 'n Sassy Stamp sets!!

Here's the list of blogs you won't want to miss:


When you are done hopping stop over and grab some of YOUR favorites from this hop during our DT Favorites Sale!