Saturday, September 30, 2017

Christmas Blocks

Hi Everybody,

Have you started making your Christmas cards?  Hopefully I will inspire you to start them with this super cute stamp set from Sweet 'N Sassy Stamps.

The stamp set I used is called Christmas Blocks, the blocks are easy and quick to color and so many ways to use them.


I used kraft card stock for the base, layering white for bottom layer and cherry red card stock for the plaid die, all card stock from Gina K Designs.

I decided to go with a star theme since the reindeer has stars in his block.  I used Copic Markers to color the blocks and added a little shine with a clear Spectrum Noir pen.  I used Gina K Designs cherry red ink to match the card stock, don't you just love when things match like that? I stamped the sentiment on a banner die using the MISTI.  To add a little more embellishment, I used the Star Dies from Sweet 'N Sassy.  Matter of fact, the star dies are currently on sale.  I cut them out with red glitter paper. 

This card has several layers but is an easy card to make.  I hope I inspired you to start your Christmas cards in September lol. 

For more inspiration stop by my blog at http://cardsbyregina.blogspot.com

Thanks for stopping by and have a great day!

Regina

Friday, September 29, 2017

Birthday Animals

Hello everyone! Today I want to share this cute birthday card with you. I combined two animals from different stamp sets but they look so sweet together that you wouldn't even know that they're from different sets.

I started stamping my scene on watercolor paper. I die cut the clouds on the top of my paper to see how high I could stamp the bunny. I started with the deer and masked him off to stamp the bunny. After that I masked the bunny too so that I could stamp the tree underneath him. You want to stamp the images you want to be on front first so that the other images can go 'behind' it. When I stamped the scene I stamped the sentiment and I could start coloring the images. I used watercolors to color the images and to finish my card I added it to a kraft colored card.

For this card I used the folowing stamp sets:
- Lucinde

Thursday, September 28, 2017

Mini Note Cards


Hello Sweet 'n Sassy Stampers!
It's Ceal here to share with you today a cute gift Idea, Christmas will be here before we know it so I am getting started on some gifts to give to my friends. The Christmas Blocks set is perfect to make cute little 3x3 notecards with.

 I stamped the Moose image on some pieces of Neenah solar white 80lb cardstock, and colored it with Chameleon pens. I chose some plaid design paper to use because I think it goes well with this image. Next I fussy cut the moose out and before placing them on top of the plaid designer paper I added a little linen thread under each image and foam tape to pop them up.
 Next I put the envelopes with the notecards and tied them together with some juste twine. For the mini pizza box I added some of the plaid design paper to the to and cut out another moose image for the top of the box. The greeting for you is from the Christmas Wishes set.


Tuesday, September 26, 2017

Prim Blessings Shaker

Hello! It's Monika here today with a shaker card. I love making shaker elements... they add such a COOL touch to a simple card. Here, I turned a sunflower into a shaker embellishment.
It was so much fun to make the shaker part... I stamped the big sunflower from Prim Blessings clear stamp set on watercolor paper, twice... then colored the images with ZIG watercolor brush markers. (If you don't like to color, you only have to do the petals of one image and the middle part of the second image.) I filled my shaker with microbeads, chunky glitter and flat sequin pieces.  


The greeting is from Keep in Touch, Too clear stamp set. The background was water colored with green pigment powder (Nuance from Magenta).


Thanks for stopping by,
Monika


Monday, September 25, 2017

Naughty or Nice


Hello friends, I have a quick and easy card for you today using one of our new release sets Christmas Blocks by Krista Hamrick.  This set is just the sweetest, with 10 stamps.  There was barely any coloring on this one.  The paper is from The Paper Studios.  Make sure you check out the sales going on in the discounts section HERE, some really good sales for you to get in on.
Hugs,
Stephanie

Saturday, September 23, 2017

Christmas Topiaries

Hello Sweet 'n Sassy  friends!  Christmas Topiaries, a recently released stamp set designed by Krista Hamrick, includes four beautiful topiary images and five little sentiments perfect for creating delightful Christmas cards.  Two of the images were used on the following cards.

 Christmas papers by Echo Park and a winsome Christmas Tree image from the Christmas Topiaries stamp set were used to create this charming Christmas card.  The images were colored with Copic Markers, sparkle added with Wink of Stella, and dimension added with Glossy Accents.  

Love the little poinsettia border included in the Christmas Topiaries set that coordinates with the poinsettias on this topiary.  Both were colored with Copic Markers.

This charming stamp set is now available at the Sweet 'n Sassy Stamps Store.


Thank you so much for stopping by.  Be sure to check out all the wonderful Christmas sets available for your Christmas card creations at the Sweet 'n Sassy Stamps Store!
Have a wonderful weekend!

Hugs,
Cathy

Friday, September 22, 2017

peace on earth

Good morning!
 
Today I am sharing this card using the Peace on Earth and Christmas Botanicals stamp sets.  I think they coordinate together nicely.
 

My plan was to stamp the dove to show through the oval cutout (as in the photo) but to emboss the words in white on the blackberry panel.  I just couldn't envision how to complete it and I really wanted to also emboss the panel with this pretty embossing folder, so I decided to skip the embossed words and add a sentiment strip instead.  The flower and leaves were popped with foam tape and I added some pearls to finish.
 
Have a great day!
Diane
 

Thursday, September 21, 2017

Quick & Easy Notecard -using Scraps- with Scribble Flowers

It's Gracie Chavez with a new card idea for you! Ever wonder what to do with all those white cardstock scraps? Well, today I have a floral notecard made with just scraps that I used to stamp floral images from the set Scribble Flowers


I stamped a bunch of images on scraps of white cardstock and colored them with Zig Markers and a waterbrush to give them a quick watercolored effect. To add some details I scribbled following the design of the images using an oil based marker in gold. I adhered all the images to a simple white card base to which I added a gold border using the same marker used before. And there you go, a quick and pretty card is ready! 

This kind of card is super practical but pretty and it truly saves you time if you stamp as many white scraps of paper you have color them and save them on a basket, ready to be used on a project. This tip comes in handy especially when there's not much time and you need to send a card as soon as possible!

That's all for today. Thanks so much for stopping by.

Wednesday, September 20, 2017

Refuge In Him

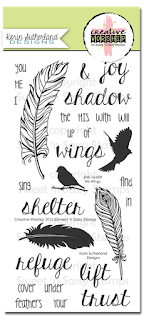
Hello Sweet Friends!  Julie here and today I am sharing a Mixed Media card created with the clear stamp sets, His Wings (Creative Worship set designed by Korin Sutherland) and Faith Quote Blocks (designed by NinaB Designs).

I love the designs in both of these sets and thought that they complement each other, don't you?

To create this card, stamp the feathers and bird image from His Wings using archival black ink, heat emboss with clear embossing powder, color the open feather images with distress oxide inks and fussy-cut the images.

I used distress oxide inks for the background panel wash before stamping the Faith Quote Blocks image with archival black ink and heat embossing with clear embossing powder.


Layer a woodgrain panel of designer paper (embossed with a woodgrain folder) onto black cardstock, add the twine at the top and mount onto the card front.  Add the fussy-cut feathers and twine bow with the accent.

Add the bird image with dimensional foam to finish off the card.

Thanks for taking the time to visit us today and I hope I have inspired you to create something this week- hugs and God Bless, sweet friends!


Saturday, September 16, 2017

Christmas, Christmas Time Is Here.....

{jane bosi}

Happy Saturday!  I honestly cannot wrap my head around the idea that I am already making Christmas Cards!! The Sweet N Sassy release, however, makes it hard to resist!  You can see the full release HERE.

Coloring has always been therapeutic for me.  The various trees in the Christmas Topiaries set are just perfect for some focused art therapy.  On both cards, I've water colored using distress inks and Fabiano hot press water color paper.

I saw this fun idea--to create a shaker card using acetate and sewing--in an online video. After making an acetate pocket and filling with pretties, I sewed it closed, added a topiary and sentiment from Christmas Wishes....so easy, y'all. Think how impressed my non-card making friends will be when they get a card like this and wonder of the intricacies involved....LOL!

My second card features another beautiful topiary, pretty paper and some messy sewing....my bobbin ran out and threatened a messy card, but I did what we crafter's do and pretended it was all part of the plan....

Thanks for stopping by!  Don't forget to check out the wonderful sales and deals going on right now! 

Be well---Jane

Friday, September 15, 2017

Merry Christmas

Hello Everyone!!  It's Sheri here with a Christmas card using the the NEW Christmas Botanicals stamp set. This is one of the stamp sets that is part of the September Holiday Release.  

For my card I created my own pattern paper and embellishment using one of the smaller holly stamps from the set.  I love being able to customize and have everything match perfectly.  This is also perfect for mass producing.  I plan to stamp out full pages and bring out to the front room and color while I watch TV with hubby.  I can then use the colored images to create layers for my Christmas cards.


 Image 1

Thank you so much for stopping by!

Thursday, September 14, 2017

Peaceful Dove

Hello everyone!
It's Ceal, here to share a card with you today featuring some of our newest stamps.  There is only 103 days until Christmas so I need to get started on my Christmas cards and our new release has the perfect stamps to get me started.

To make my card I started with a top folding white notecard and a watercolor paper panel cut down with a stitched die. Using Daniel Smith watercolors I made a wash on the panel for my background and then stamped the dove image from the set Peace on Earth and watercolored it with Daniel Smith watercolors as well. The greeting I used is from the Christmas Wishes set. 
We have more new Christmas sets in the shop, you can check them out HERE


Wednesday, September 13, 2017

Christmas Wreath

Hi Everybody,

Regina here and today I'm using a stamp set called Christmas Wreath.  This is the first Christmas card I've made this year!  I promised myself I would start in July and make a few each month and that did not happen.


The card stock I am using is from Gina K Designs called Cherry Red, Black Onyx, and Layering White.  I am really liking the brighter green and red together this year so I stamped the wreath with Colorbox Ink in Jalopeno.  I stamped the berries with Gina K Designs Cherry Red and it covered beautifully.

I got married this past April so I thought it would be nice to make cards using stamps such as 'from us' or 'from the family'.  I used a stamp set called Christmas Wishes.  I really like the fonts in this set. I stamped with Versafine Onyx Black and embossed with Zing Clear Detail Fine Embossing Powder to give some dimension and shine.  I love how crisp and black Versafine ink looks.

I cut the letter 'B' out with the Silhouette machine.  I have been wanting to get a wooden letter B to go on the front door ever since I got married in April. Monograms are very popular where I live in Mississippi so I liked the idea of using the Letter 'B' on the card making it more personal since the card is 'from our family' and we're newly married this year.   The bow was also cut out with the Silhouette, folded and glued together.  I brushed Wink of Stella in Clear over the bow and put some Glossy Accents in the center.

To finish it off I used some red and silver metallic twine from my stash. Glossy Accents were used on the berries and the letter 'B' to give lots of shine and dimension.  

HERE IS A LINK to the Sweet 'N Sassy online store for more Christmas stamps, dies, etc.

I hope I inspired you to make some Christmas cards, especially ones that are personal and unique for your family.  

Thanks so much for stopping by and have a great day!


Regina

Tuesday, September 12, 2017

just for you.

Hello! It's Monika here today with a flowery card. I've been under the weather for the last couple of days, so I needed a quick and easy card for my post... so I looked into my scrap pile and I found some flowers already colored and cut from a previous project. That's what I am talking about!
The images are from Scribble Flowers clear stamp set. They were stamped on water color paper, then colored and spritzed with distress inks.
 
 
I sponged the background with green distress ink. It's the perfect backdrop for the bold flowers. Added a touch of gold, black and white... and my card was done! A gold button with black thread completed the pretty look...


I am going to leave you with some Scribble Flowers stamp set eye candy:


Thanks for stopping by,
Monika