Thursday, February 28, 2019

I Color in my Bible


{jane bosi}  Hello, Sweet Friends!!  Today, I'm sharing two Bible journals I completed this month.  I haven't worked in my Bible much this year yet.  I'm an impulsive crafter and easily distracted with this project or that.  Sometimes, I'm inspired by the Word, sometimes the desire to gift someone and sometimes, I'm inspired by y'all--other crafters.

You may have already seen my Love Other's layout.  I was inspired by another crafter, Haley Tryon, to create this colorful page featuring stamps from Forever & Always and Send me.  I love using distress inks because the color saturation is excellent and vibrant.  

1 John 4:7-11  "Beloved, let us love one another, for love is from God, and whoever loves has been born of God and knows God.....God is love....In this the love of God was made manifest among us, that God sent his only Son into the world, so that we might live through him.  In this is love, not that we have loved God but that he loved us and sent his Son to be the propitiation for our sins.  Beloved, if God so loved us, we also ought to love one another."


My second layout, was done is my brand new ESV Psalms Scripture Journal.  I was so nervous to lay some ink down in that beautiful book!!  How weird is that? 

Psalm 1 "Blessed is the man..." I love the Psalms!!  Well, I love God's Word.  Oh, that I should spend the rest of my days planted by the Living Water!  It is the prayer of my heart and the meditation of my days.


To complete this layout, I again started with distress inks.  I used Scene Silhouettes: Trees--I was so nervous to stamp that tree, but it turned out great!!  I inked the whole image with a green colored distress ink and then used a dark brown distress marker to go over the trunk and branches.  I also used Skinny Caps Alphabet, Skinny Lowercase Alphabet and Typewriter Blocks Alphabet.

The month has come to a close--can you believe it, already!!  That means......it's the last day to qualify for the beautiful stamp of the month, Made New


It also means....it's just about release time!!  Stay tuned! 

Jane
If you're placing an order, use promo code JANE10 for 10% off your order of $10 or more. 👍


Tuesday, February 26, 2019

Hello

Hello Sweet Friends!  Sheri here today!  I thought that we could mix things up a bit and try something other that a standard A2 card (4.25" x5.5").  Have you ever made a Tall & Skinny card?  They measure 3.5" x 5.5" and will fit in a standard envelope.  

Directions to create a Tall & Skinny card:

 Top Folded Card
3.5" x 11" piece of card stock, score long side at 5.5"

Side Folded Card
5.5" x 7", score long side at 3.5" (sample shown below)

For my card I also did something a little different with the images.  I stamped and embossed the butterflies from the Made New stamp set in white on vellum and then colored them with a yellow copic from the back to give it a soft appearance.  Then I fussy cut them out and placed them on my card.  The sentiment is from the Keep In Touch, Too stamp set.


There's still time to qualify for February's Stamp of the Month  and get the Made New stamp set  FREE with any $75 order (after discounts and before tax & shipping). 


And...

 
Happy Stamping!


Monday, February 25, 2019

Two cards to share.....

Hello friends, Stephanie here today.  I have 2 cards to share with you today.
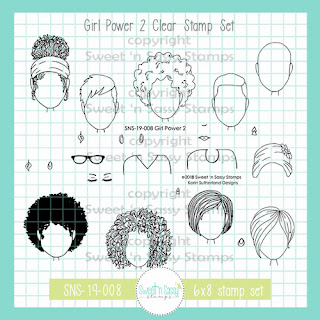
This first card uses Girl Power 2 which is back in stock along with a few older sets, Be Encouraged,
Choose Faith and Truth Quotes.  I wanted a fun, cheerful card to give to our neighbor who is fighting Ewing's Sarcoma and I think these stamp sets all worked well together.  I colored her with copics and paper pieced her shirt, the papers come from Pink & Main.
I made a bridal shower card which could also be used as a wedding card or engagement card using the heart from Forever & Always and the word love from His Love.  This paper is from DCWV.  I stamped the heart with pink ink and heat embossed it and did some fussy cutting and added it to an embossed circle.  Wow, those two cards used a lot of stamp sets!  Don't forget that if you spend $75 you will receive the stamp of the month for free!

Saturday, February 23, 2019

Friends in Faith


Hello everyone! Today I want to share this card I made with the Girl Power 2 stamp set. I love all the different girls and I just stamped an entire page with different images that I colored. After that I cut them out with my Silhouette. This gave me a lot of images to work with :).


I colored the images with alcohol markers and stamped the message with a black (Archival) ink and the Happy Alpha stamp set. I die cut a rectangle with a stitched border effect and distressed the border with Versamagic ink. I loved the background paper with the flowers and beautiful words so I really wanted to use that for this card. A kind of 'friends in faith' card.

http://www.sweetnsassystamps.com/creative-worship-happy-alpha-clear-stamp-set/

http://www.sweetnsassystamps.com/girl-power-2-clear-stamp-set/

- Have a nice day!
Lucinde

Friday, February 22, 2019

Girl Power X3 in Red and Teal

Hi Friends! Today I have some fun projects using the new Girl Power 2 set. I have also used other sets (I will point them out as I go) but this one is the focus on all of my projects. I wanted to show how a single stamp could be used in different styles and complexities (is that the right word? I'll go with it :)). To show this versatility, I decided to use the same color pallet on them and red and teal is the color combo I chose. These projects are all different but the each make me smile out loud! So here we go...


My first project is a mixed media art journal page. I saw a 6x6 disc bound journal and felt ready to commit to that as it was less intimidating than a bigger journal with two pages to cover. This is my more complex project as it has acrylics, and archival ink, and texture paste, and Copics, and Washi tape, and a masked (many times over) image. I even pulled out my gelliplate and got so messy and had so much fun. If you haven't tried a journal page - I encourage it. It is very rewarding.

Recipe (in order of use haha):
  • Background - Acrylics Dina Wakley Acrylics Ocean, Turquoise, and Sterling
  • Background stamps - Texture Tiles 1 using Archival Inks Cobalt and Paradise Teal
  • Splatters - White Gesso and Sterling acrylics
  • Corner texture - Stencil with texture cream (Momenta Art-C in Platinum)
  • Sentiment (big) Be Unique Clear stamp set from SNSS, (little) typed on computer
  • Image - Girl Power 2 Masked over and over. Main image colored with Copics R24, R27, R29(shirt), E53, E55, E57, E59 (Hair), E00, E21, E11(skin) Other images colored with warm grays - adhered with Multi Matte Medium
  • Washi Tape - not sure brand
  • Outline image with Stabilo All Pencil and water brush

My Second project is a less complex and uses only a few dies, designer paper (from my stash)some tulle, and sequins. There is a mask though :) It is a shaker of sorts...

Recipe:
  • Spellbinders circle dies (two sizes so I could add the frame on top) This card allows you to see through to the inside
  • Designer paper from my stash
  • Tulle - folded in half filled with sequins and closed up with score tape the taped down between the paper layers and the card base
  • Image - Girl Power 2 (I chose the girl that looks like me) Keep in Touch Too (sentiment) and Home for the Holidays (gift). I stamped the gift first then masked it then stamped the girl.
  • My background paper is cut with A Jillian Vance Design Basic Polka Dot Die


My Final Project is kind of Clean And Simple but still has a few steps. It still uses a mask (I cut them out so I wanted to use them as many times as possible I guess haha!) I cut out some frames, stacked them and colored up my image. to pop into the frame. I wanted this to look like a selfie pic of me and one of my best friends so I chose girls with our hairstyles. For fun I decided to try to video it. It isn't awesome but it is my first time doing this and the video stopped and I had to add in the end...oh well - feel free to check it out if you want to HERE)

Recipe:
  • Spellbinders Rectangle and Square dies (taped together to create a frame and cut multiple times to stack and remain the same).
  • Image - Girl Power 2 Masked over and over. Main image colored with Copics R24, R27, R29(shirt), E53, E55, E57, E59 (Hair), E00, E21, E11(skin)
  • Sentiment - You and Me set from SNSS
  • My background paper is cut with A Jillian Vance Design Basic Polka Dot Die

I hope you are inspired to pick up a stamp set and see what other ways you can create with it. See how you can combine sets for a single project and most of all, this should be fun so make it FUN!!

Thanks for stopping by!
Lyn


Thursday, February 21, 2019

butterflies x4


Good morning! I have FOUR cards to share using the Sweet ‘n Sassy February Stamp of the Month: Made New. These butterflies are so pretty and very versatile. Last week I shared two other cards with them...they're so fun to use! For my cards today I also used these SNSS stamp sets: Forever & Always, Typewriter Blocks Alpha, Nature Silhouettes, and Long Stem Silhouettes.
 
I stamped them in lots of colors for my background on the first card, then the black one was popped up with dimensionals.
 
 
I colored a rainbow of butterflies on my second card...

 
For the third card I die cut the top corner and sponged some inks on the layer behind it. Flowers were stamped with the same colors and the butterfly was colored to match.

 
This last card started out a disaster as I had one mistake after another. I was too stubborn to toss it after all the effort put into it so I kept going. LOL! In the end, I liked it after all. :)

 
Have a great day!
Diane


Tuesday, February 19, 2019

God Will Make a Way | Julee Tilman

Hi Sweet 'n Sassy friends! It's Julee Tilman here, popping in to share a couple of cards using the February Stamp of the Month, Made New. This set speaks to my heart and I can't even find words for how happy I feel when coloring these transformed butterflies. If you're not familiar with the stamp of the month program, it's a fabulous way for SNSS to give back to customers. A free gift to you with any purchase of $75 or more in the month of February. 


My first card pairs one of the butterflies from Made New with a sentiment from Be Encouraged 2. I have sung this song over and over through the hard times in my life, and find it so uplifting and encouraging. I stamped the butterfly in black, then again in versamark ink to be able to emboss it with sparkle embossing powder. I then colored with Copic markers, add a few white gel pen accents and fussy cut the body and wings.  Then I pulled out a white panel of cardstock and stamped the butterfly where I wanted it in black, then did a watercolor wash with some spray inks.  I embossed the sentiment in white on black, then trimmed into a banner and adhered to the panel. I then popped up the butterfly on foam tape over the stamped butterfly on the panel for some extra dimension. A thin black mat and a white card base and this sweet card was ready to put in the mail to one of my teamies!


The next card is one you may recognize if you've been to the store website this month. I felt so renewed and refreshed meditating on the 2 Corinthians 5:17 verse while I created this mixed media card using stamps from Made New and Texture Tiles 1. I made this card for a dear friend who experienced heartbreaking loss last year and has recently changed her focus in hobbies and has started a new business. I thought this verse would bring comfort and encouragement as she transforms into this new stage in her life.


I started by doing a wash of watercolor with spray inks. When the color was how I wanted it, I splattered a little bit of grey ink and some white India ink, then partially stamped the script text from the Texture Tiles 1 stamp set in grey as a backdrop for the butterfly. I then stamped the butterfly and the verse from Made New on the panel in black ink.  I tried embossing only with a stitched circle die around the verse, but it didn't have the oomph I wanted, so I traced around the embossing with a stabilo marks all pencil. I also added a little grounding for the butterfly, then blended the pencil out with a water brush.


I colored the butterfly image with Copics and hand trimmed just the wings and body, so I just glued it on, popping up just the outer wing for a bit of dimension. Next I embossed the change and transform words in white on black cardstock and trimmed them out. I placed them on the panel and traced around them with the stabilo pencil again and blended it out, then offset the sentiments when I adhered them to the card. My finishing touches were some shiny holeless sequins and distressed edges.

Thanks so much for stopping by today! If you haven't checked out the entire February release yet, I encourage you to do so. If you're placing an order, use promo code JULEE10 for 10% off your order of $10 or more. 👍


Monday, February 18, 2019

Birthday Butterflies

Happy Monday!
It's Ceal, here to share a couple cards with you today using our February Stamp of the Month, Made New. You have until the 28th to earn this set free with a $75 purchase and you get free first class shipping with a $75 order so its a win, win situation. 

Also you can use the code CEAL10 and save 10% off your order total

I love butterflies so when Korin came out with this set I was ecstatic because she used a mix of the sets she had retired. 
I have a couple friends who love butterflies as well so I made a couple birthday cards with it. The first one I embossed the butterflies in white and then blended the background using a pink, yellow and blue ink. The sentiment is from the So Happy set.


My second card using the Made New set and a stencil, the greeting is from the Scripty Thoughts set