Showing posts with label Monarch Dies. Show all posts

Sunday, October 9, 2016

Inspirational Word Art 2 Shaker

Hello! It's Monika here today with a shaker card. I used  one of the images from the newly released Inspirational Word Art 2 clear stamp set as my focal point.
 
 
I sponged the background with yellow and orange distress inks using a stencil to add a touch of color. It was the perfect backdrop for the bold word art stamp.
The shaker is filled with pretty sequins and micro beads.
 
 
The outside is decorated with flowers from Scribble Flowers clear stamp set. The images were stamped on water color paper, then colored with distress inks. While I did not use it, there is a coordinating die set available. 
I also used some pretty butterflies from Majestic Monarch clear stamp sets. They were stamped on vellum with VersaMark, heat embossed with white embossing powder, then die-cut with the coordinating Monarch die set.
To add a touch of sparkle, I die-cut a circle frame out of glitter paper... I also added gold rhinestones.
 
Thanks for stopping by,
Monika


Friday, July 29, 2016

His plans far exceed

Good morning!

Today I am sharing two cards using the Celebrate Today and Grunge Elements 2 stamp sets.


Both cards were masked with post-it notes and then I sponged the green and blue.  The flowers were then stamped with Versafine Black ink.  Some hearts from Grunge Elements 2 were stamped lightly in blue.  Then the masks were removed.  I added a few tiny drops of water which turned quite white!

On the first card I added a band of ribbon and a few buttons, and some diecut butterflies from the Monarch dies.


I had a tiny scrap of ribbon left from the strip I cut, so I turned it into a ribbon butterfly for the second card.  A strip of grass was also added from the Fence & Grass dies.


Thanks for popping in and… happy stamping!

Diane


Wednesday, March 30, 2016

Note This bookmark

Hello! It's Monika here today with a fun and easy bookmark.
 I used Creative Worship: Note This clear stamp set from the new Note This Bible Journal Kit. I love the words, the different styles... it's a fantastic word set with so many possibilities.
The background was water colored, before the words were stamped with Onyx Black VersaFine ink. The butterfly die is from Monarch Dies set. I also added some tiny flowers I had laying around on my desk, and a scallop border. The inside of the bookmark has magnets so it can clip onto the book page.
Thank you for stopping by,
Monika
http://www.sweetnsassystamps.com/creative-worship-note-this-bible-journaling-kit/


http://www.sweetnsassystamps.com/monarch-dies/

Monday, August 3, 2015

Camouflaging Die Cuts Tutorial


Hello Sweet 'n Sassy friends!   I'm glad you could join us for this week's Design Diva Demo.  I have a die cutting technique to share with you today.  It's fun to try new things with all of the supplies we have in our stash, and I don't know about you, but my collection of dies keeps growing!  LOL!  So…let's get started with Camouflaging Die Cuts!

Begin by gathering your supplies...you need just a few...

  • stamps or inks to create a background (I'll be sponging a background strip for my birthday card) 
  • a die (SNSS Birthday Word Die)
  • the die cutting machine of your choice
  • and card stock.


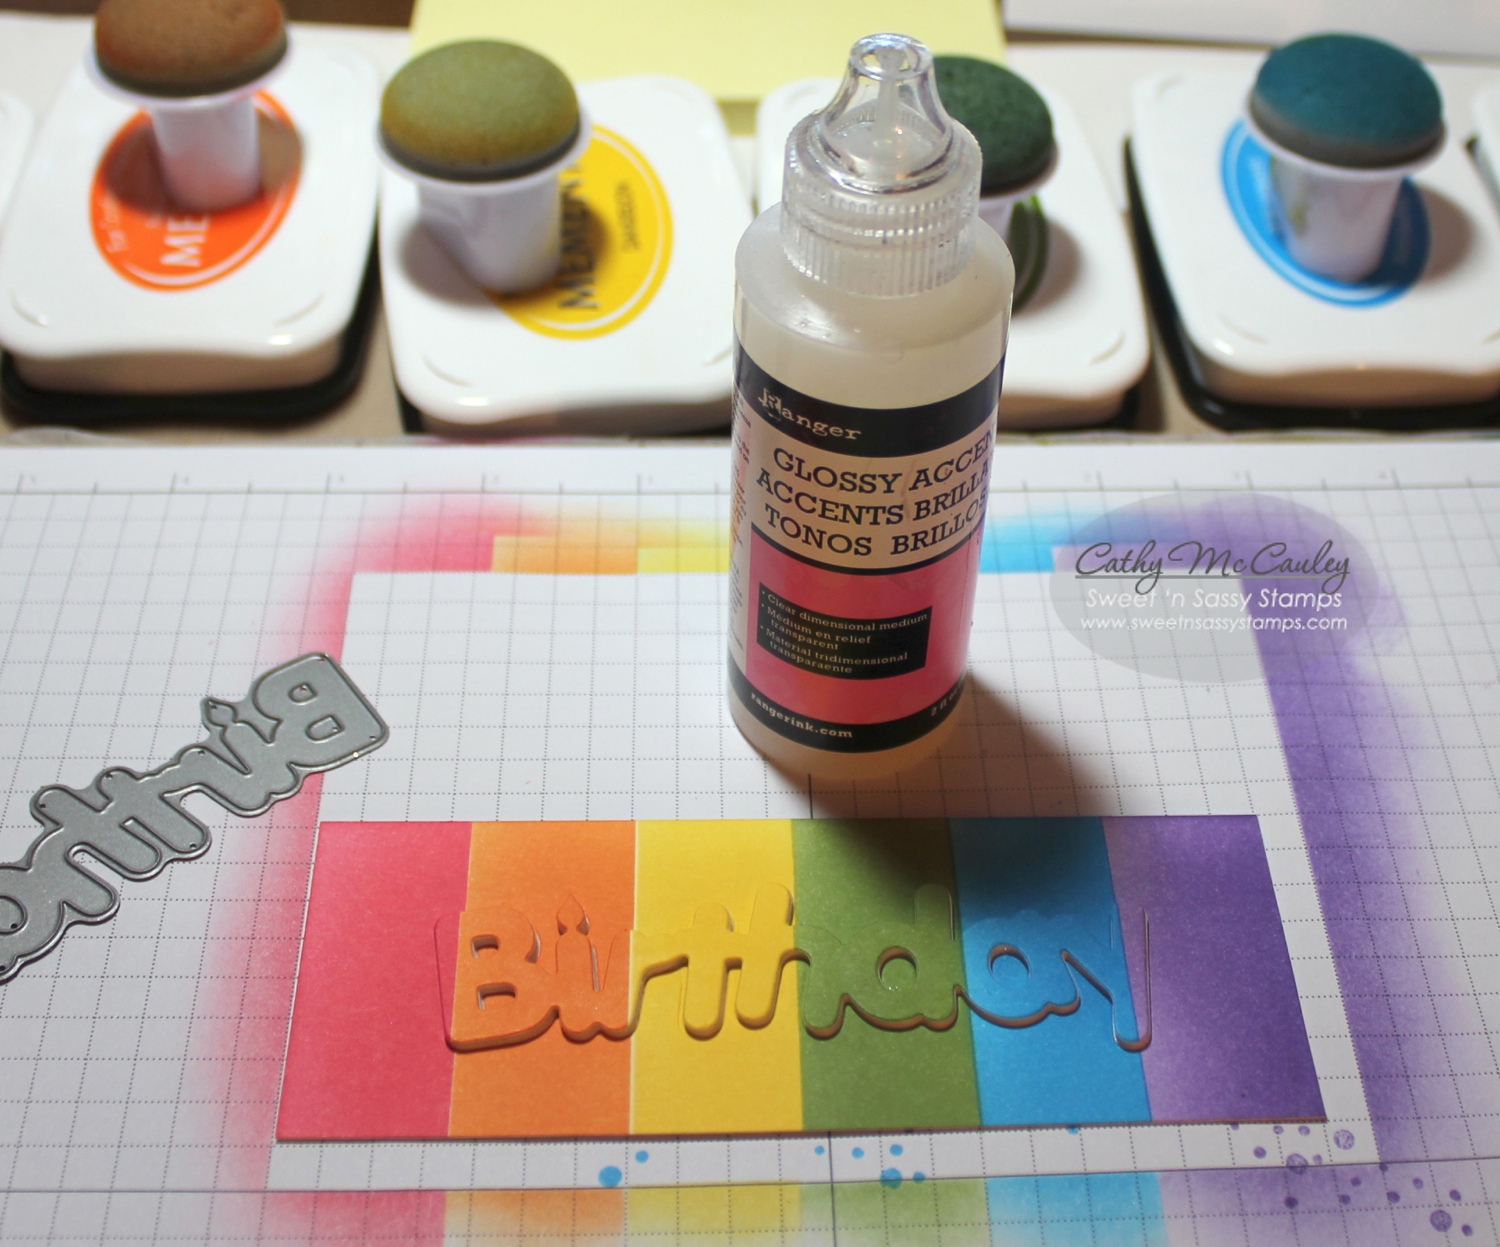
To create a rainbow of color, mask off the first section of your card stock panel.  I just use Post-Its.  Starting on the Post-It and working in circles, sponge on your color until it is smooth and blended.  Keep masking off each section as you work your way across the panel.  Now you have a bright, cheerful rainbow!


Trim your panel to the size you want for your card.  Using your die, cut the word or shape from your decorated panel.  Be sure to save all the little pieces. Then cut more of the same die cuts from scraps of card stock.  I cut 4, but you can make as many as you want depending on how thick you want your word or image to pop off the card.


Cut a second panel the same size as your decorated piece and cover it with adhesive.  I used my Glue Glider, but you can use a Xyron or any adhesive you like.


Adhere the die cut panel to the adhesive panel…


…and pop one of the scrap die cuts in the negative space.


Use the little pieces you saved to fill in the empty spaces.


Layer all of the die cuts, adhering each layer... 

…ending up with the one you cut from your background panel.  I use dots of Glossy Accents to glue the layers together because it gives me a little wiggle room to get the dies lined up correctly.


Finish your card using your Camouflaged Die Cut!  My little grand niece loves sparkles and purple…this card will be for her birthday.


Another sample of Camouflaging Die Cuts using a shape instead of a word die.

Here are the supplies from the Sweet 'n Sassy Stamps Store used to make these two cards:


Hope you'll give this technique a try!  Thanks so much for stopping by!
Have a marvelous Monday!

Monday, May 18, 2015

Tutorial Monday - 3-D Dies and Stamping

Hi folks! Kim here today to share a photo tutorial with you...showing you how to create an amazing 3-D image with dies! (I found this idea on Splitcoaststampers


I started by using the largest butterfly from the Monarch Dies set to cut out six butterflies. I used chipboard to cut out the images. Then I cut the wings off of the bodies. (Save one body!)
Using Matte Medium, I glued all six of the wings together. Making a big 'ol stack of chipboard wings.
I then used more Matte Medium and vintage text paper to cover the wings. Once the glue was completely dry, I used the coordinating butterfly image from the Majestic Monarchs stamp set to add the details to the wings. (Be sure to use Archival Ink when stamping!)
Some simple watercoloring added beautiful color to each wing. I also used Gathered Twigs Distress Ink and a blending tool to add ink around the edges of each wing.
Next...get started on the background. I used various pieces of designer paper to cover a white chipboard coaster. (I used Matte Medium as the glue). Once the glue was dried I used Typewriter Text to add just a hint of design on the background.
My last step was to create a landing place for my butterfly. I first used the Decorative Plaques die set to die cut the shape out of chipboard. I mixed Distress Paint with Wendy Vecchi Crackle Paste and then applied the colored paste to the chipboard. Once the paste was dry, I added more Gathered Twigs ink to the entire piece so you could see all those fabulous cracks! Now...assembly!
I stamped and inked one of the butterfly bodies and attached it to the plaque. Once that was dry, I created little hinges to hold up the wings, attached them to the back of the wings, and then attached the other side to the plaque. (And as I'm writing this I realized I should have taken a photo on the hings! Just a little "L" shape made out of paper...) Then the place was attached to the circle with foam tape. The sentiment at the bottom (love acrylic stamps because I can bend them!) is from another stamp set. (How do you like my Kiwi Crate canvas stand? Isn't it cute! I "borrowed" it from my kiddos...perfect for my art! *giggle*)

This is a small 4" round project that I'm probably going to make into a wall hanging (just thread a ribbon through the top) or maybe I'll add it to a larger canvas...humm...decisions, decisions. I had a great time with this technique...think of all of the fun 3-D images you can great with dies!

I hope you enjoyed today's tutorial!!

Thursday, May 14, 2015

Majestic Monarch

Hello! It's Monika here today, bringing you a birthday card. I've been missing my sweet butterflies (especially after seeing Cathy's beautiful card from yesterday), so I decided to use one on today's card. 

What a different look from Cathy's colorful card, don't you think? 


I started out with making the water color background. I swiped my ink pad on my craft sheet, spritzed it with water, and placed a piece of water color card stock over it, then lifted the card stock up immediately. To speed up the drying time, I used my Heat Tool. 
Next I die-cut a butterfly out of the background so the black base would show through. 
The sweet butterfly was stamped with VersaMark ink from Majestic Monarchs clear stamp set on Vellum, heat embossed with white embossing powder, then die-cut with the coordinating die from Monarch die set


The sketch came from Freshly Made Sketches #186.

I hope I inspired you to make something today. 

Thanks for stopping by,
Monika