Showing posts with label Gloria Stengel. Show all posts

Thursday, November 20, 2014

Congrats!

Hello! It is Gloria with you today. I am sad to say that this is my last post as part of the SNSS Design Divas. While I am stepping down from the team, I hope to continue behind the scenes designing stamps! Thank you to Korin and the other Divas for their love and support! And thank you, Readers for stopping by!

I used the super cute Baked For You stamp set to make a sweet baby card.


I love the playful style of this set. It is perfect for creating "sweet" cards!


I stamped and colored the bun, and then added Frosted Lace Stickles to create frosting!


And, a sweet message on the inside!

Thank you all for being SWEET to me over the past months.

Gloria

Saturday, November 8, 2014

You're How Old?

Hello! It is Gloria with you today. We are celebrating the 7th year birthday of  Sweet 'n Sassy Stamps, so make sure to take advantage of our our Sweet Perks Club bundles this month! Also, club members may take advantage of our Birthday Bundle Blitz through Sunday, November 9th!

I have created a masculine birthday card to share today. I think that most card makers struggle with this type of birthday card, so I like to share one now and again!


I used the Timeless Classic stamp set to stamp the truck. I colored the image with Copic markers. 


The sentiments are from a set I designed, called Birthday Word Art

I want to wish Sweet 'n Sassy Stamps a HAPPY BIRTHDAY! 

Gloria

Thursday, October 23, 2014

Autumn Greetings

Hello! It is Gloria with you today. Autumn is my favorite season. I love the colors, smells, and textures of autumn. I have a created a quick and easy card for you today, to celebrate the season!


Sometimes, all that you need to create a card is paper and a few sentiment stamps! Once I created the card, I used black ink to stamp a sentiment from the Autumn Mum Greetings stamp set onto the bottom right corner of the patterned paper.


I cut a small tag from a scrap of cardstock with the Mini Tags Die Set.  I stamped a tiny sentiment from the Autumn Bounty stamp set onto the tag.


I lined the inside of the card with more patterned paper and stamped another sentiment from the Autumn Mum Greetings stamp set onto the center of the patterned paper. I cut a second tag from a scrap of cardstock with the Mini Tags Die Set.  I stamped another tiny sentiment from the Autumn Bounty stamp set onto the tag.

Thanks for looking!

Gloria

Sunday, October 12, 2014

Fall Chalkboard

Hello! It is Gloria with you today. Happy Sunday!


I have used the Autumn Mum Greetings stamp set to create a little chalkboard greeting for this fall-themed card. I stamped the two sentiments with white ink onto black cardstock. I then embossed with white embossing powder. When the embossing was cool, I stamped over the top with watermark ink and the Falling Leaves stamp set. I embossed the leaves image with clear embossing powder.


I rubbed the sentiment panel with white ink. I used the Leaf Silhouettes die set to cut out two small leaves from cardstock scraps to add to my card. 

Thanks for looking!

Gloria

Saturday, September 27, 2014

Happy Fall

Hello! It is Gloria with you today. I have created a cute fall card for you, using the Beary Bountiful Autumn September Release stamp set.


Rhubarb is getting is scarecrow on! I stamped Rhubarb with brown ink and colored him with Copics. I also stamped the greeting and used a die cut template to cut it out.


I wanted to mix in some teal accents with the traditional fall colors.


I used the Leaf Silhouettes die set to cut some leaves for the inside of the card. I stamped a sentiment from the Beary Bountiful Autumn in brown ink.

Thanks for looking!

Gloria

Sunday, September 14, 2014

Autumn Greetings

Hello! It is Gloria with you today. Wasn't that a GREAT September Release on Friday? What a sweet collection of autumn-themed stamps and dies!

I made a simple tag and pocket project to share with you today, using some of the new goodies!


I found this kraft envelope, (3 1/2 x 6 inches) in my stash, and I made a gift card and tag holder out of it. I rubbed the edges with ink, and then I stamped the leaves from the Falling Leaves stamp set in various colors of orange, red, and gold ink across the center of the envelope.

I die cut the tree from the Forest Silhouettes die set out of brown cardstock and "planted" it to look like the leaves had fallen off the branches. I cut the fence from the Fence and Grass die set out of cream cardstock. I rubbed the fence with a bit of tan ink and added it to the envelope with foam squares.

I stamped the sentiments from the Autumn Mum Greetings stamp set onto gold paper with brown ink. I trimmed the sentiments to look like signs and added them to the envelope with foam squares.


To make the matching tag, I trimmed a Graphic 45 kraft tag a tiny bit on each side to make it fit into my envelope. I rubbed the edges with ink and stamped the sentiment from the Autumn Mum Greetings stamp set with brown ink in the center of the tag.

I used the leaf dies from Leaf Silhouettes die set to trim out a few paper scraps. I rubbed the leaves with ink and added them to the corner of the tag. I tied some ribbon and twine to the top of the tag. The back of the tag is blank to enable me to add a gift card or write a message. 

Thanks for looking!

Gloria

Tuesday, August 19, 2014

Relax!

Hello! Good day! It is Gloria with you today. I have a beach-themed card to share. I had some fun with the NEW Beauty By the Sea stamps and August Release die cuts


I created a standard 5 1/2 x 4 1/4 inch card (top fold) with a soft color palette and some wonderful starfish images!


I stamped the starfish images onto printed cardstock and colored them with alcohol markers. I used the Beauty By the Sea die set to cut the starfish. Don't they look amazing?! I used a photo slide frame to hold my little beachy cluster. 


For this cluster, I used a punched postage image and some twine to "anchor" my die cut starfish. I stamped the sentiment from the Beauty By the Sea set and cut it out in a banner shape.


Here is a peek at the inside of the card. I stamped the Scripture sentiment from the Beauty By the Sea set in brown ink. I also added another die cut starfish.

Thanks for looking!

Saturday, August 2, 2014

God Made You Special

Good Morning, Sweet 'n Sassy friends! It's Gloria with you today, with my first post as part of the SNSS design team! I am so excited to be here!


I have created a 5 x 5 inch friendship card to share with you. I used the NEW Birthday Word Art stamp set for my focal sentiment (and not to toot my own horn, but I designed the set and I am like a proud mama). I used the sweet One of a Kind set for the main image.


I colored my birdies with alcohol markers. I also colored in the word "special" on the sentiment. Everything is coordinated with pinks and blues, with that glorious pop of green!


I used a sentiment from the One of a Kind set for the inside of the card. I always decorate the inside!


Thanks for joining me today. Please drop by my blog, Scraps of Life and visit!

~ Gloria


Tuesday, October 30, 2012

Comforting Words of Jesus

Good morning! Gloria with you today! This is my fifth and final week of being the October Guest Designer for Sweet 'n Sassy Stamps! I used the Words of Jesus set for my final card.
 

I love scripture stamps, and this is a beautiful Word in a lovely font.
 

I stamped the sentiment, then cut it out with a die template. While the paper was still in the die, I sponged chalk into over it. I love the blue and green combination of the paper, so I added more with ribbons, flowers, and pins. I colored the pins with Copic markers.


Here is a view of the inside. I used a diamond die cut shape to mimic the diamonds on the paper. These are a set of nesting dies from Spellbinders.

I hope you enjoyed my guest posts this month! I have had such fun being part of the Sweet 'n Sassy team this month and I am very sad to say good-bye! I hope I get asked back again sometime! A special thanks to Korin for having me!

Gloria (Scraps of Life)

Supplies:
Cardstock: American Crafts Spinach; Stampin' Up! Whisper White
Designer paper: Authentique Loyal
Stamps: Sweet n Sassy Stamps Words of Jesus (SNS-12-041)
Ink: Memento Tuxedo Black; Clearsnap Colorbox Fluid Chalk Olive Pastel; Copic Markers
Die cuts: Spellbinders Large Deckle Rectangles, Classic Diamonds
Ribbon: Really Reasonable Ribbon
Button: Buttons Galore and More
Floss: DMC
Flowers: Prima
Pins: Fabric store
Adhesive: Scotch 3M tape runner; Beacon Fabri-tac; Scrapbook Adhesives by 3L foam squares
Tools: Bow Easy; Spellbinders Grand Calibur

Tuesday, October 23, 2012

Traditional Old-fashioned Christmas

Good morning! Gloria with you again! This is my fourth week of being the October Guest Designer for Sweet 'n Sassy Stamps!
 
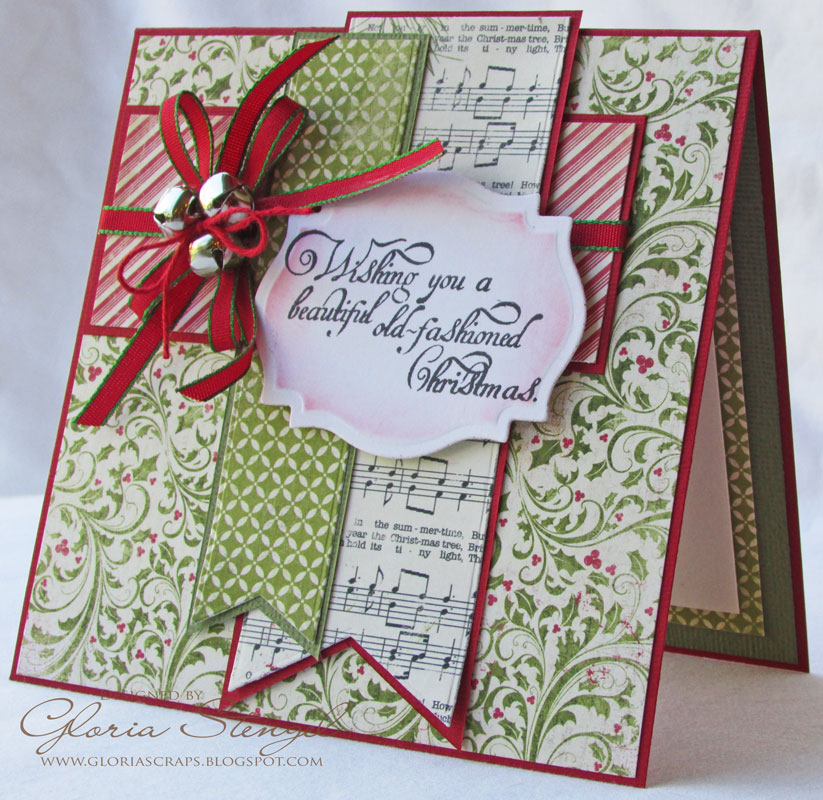
Here is the card I made using the October Release Old-Fashioned Christmas stamp set.
 

I created a "package" with the paper and the ribbon. The sentiment acts as the package tag.


Here is the inside. Lots of space to write a note or to add a family photo.

I hope you enjoyed my guest post! I will be back next week with my last post. Sadly, all good things must come to an end.
 
Come visit my blog Scraps of Life.

Supplies:
Cardstock: American Crafts red and green; Stampin' Up! Whisper White
Designer paper: Authentique Festive
Stamps: Sweet n Sassy Stamps Old Fashioned Christmad (SNS-12-068)
Ink: Memento Tuxedo Black; Clearsnap Colorbox Fluid Chalk Lipstick Red
Die cuts: Spellbinders Labels Twenty-five; My Favorite Things Fishtail Flag Stax
Ribbon: May Arts
Twine: Martha Stewart
Bells: Darice
Adhesive: Scotch 3M tape runner; Beacon Fabri-tac; Scrapbook Adhesives by 3L foam squares
Tools: Bow Easy; Spellbinders Grand Calibur

Tuesday, October 16, 2012

Vintage Baby Buggy

Good morning! It is Gloria with you again! This is the third week of being the October Guest Designer for Sweet 'n Sassy Stamps! I am having such fun!
 
I have once again used the Vintage Baby stamp set.

As you can probably tell, I love layers! I layered a bunch of circles for this card. They made me think of the baby buggy wheels!


Check out the sweet sentiments!


I hope you enjoyed my guest post! I will be back next week with another! Check out my blog at: Scraps of Life.

Supply List:
Cardstock: American Crafts gray; Stampin' Up! Whisper White
Designer paper: My Mind's Eye Miss Caroline Fiddlesticks
Stamps: Sweet n Sassy Stamps Vintage Baby (SNS-12-032)
Ink: Memento Tuxedo Black; Ranger Distress Spun Sugar
Die cuts: Spellbinders Standard Circles Large and Small, Classic Scalloped Circles Small
Border Punch: Fiskars Scallop
Ribbon: Really Reasonable Ribbon
Button: Buttons Galore and More
Adhesive: Scotch 3M tape runner; Beacon Fabri-tac; Scrapbook Adhesives by 3L foam squares
Tools: Bow Easy; Spellbinders Grand Calibur

Tuesday, October 9, 2012

Words of Jesus

Good morning! Here is my second post as the October Guest Designer for Sweet 'n Sassy Stamps! I will be posting a card each Tuesday in October using some of the fantastic SNS stamps.
 
Today, I used the Words of Jesus clear stamp set. This set contains some of my favorite Scripture.
 
 
I stamped the sentiment in brown ink, then die cut it with the Spellbinders Labels Ten die template. While the die cut was still in the template, I sponged it with yellow citrus chalk ink.

 
I hope you enjoyed my guest post! I will be back next week with another! Visit me at my blog: Scraps of Life.

Supply List:
Cardstock: American Crafts blue and yellow; Copic Xpress Blender White; Stampin' Up! Whisper White Designer paper: My Mind's Eye The Sweetest Thing Bluebell
Stamps: Sweet n Sassy Stamps Words of Jesus (SNS-12-041)
Ink: Memento Rich Cocoa; Clearsnap Colorbox Fluid Chalk Yellow Citrus
Die cuts: Spellbinders Labels Ten; My Favorite Things Fishtail Flag Stax
Ribbon: Creative Impressions
Twine: craft supply
Button: Basic Grey
Adhesive: Scotch 3M tape runner; Beacon Fabri-tac; Scrapbook Adhesives by 3L foam squares

Tuesday, October 2, 2012

Vintage Baby

Good morning! It is Gloria Stengel with you today, from Scraps of Life. I am so happy to be here! I have been looking forward to this guest spot all summer! I will be posting a card each Tuesday in October, plus taking part in the October Blog Hop! I am such a lucky ducky!

Here is my card for today. I used the Vintage Baby stamp set. This is a clear stamp set, and it stamps up perfectly! You would swear it is rubber!


I colored the image with Copic Markers and cut it out with a die cut template. I used a lot of layers and the beautiful Graphic 45 Little Darlings paper.


Here is the inside of the card. The Vintage Baby stamp set has the sweetest phrases. Just lovely!

I hope you enjoyed my guest post! I will be back next week with another!

Cardstock: American Crafts Coffee; Copic Xpress Blender White; Stampin' Up! Whisper White Designer paper: Graphic 45 Little Darlings 8x8 pad Stamps: Sweet n Sassy Stamps Vintage Baby (SNS-12-032) Ink" Memento Rich Cocoa; Clearsnap Colorbox Fluid Chalk Ice Blue; Copic Markers Die cuts: Spellbinders Big Scalloped Circles Large, Standard Circles Large and Small, Large and Small Labels Ribbon: Really Reasonable Ribbon Adhesive: Scotch 3M tape runner; Beacon Fabri-tac; Glue Dots adhesive dots; Scrapbook Adhesives by 3L foam squares Tools: Bow Easy; Spellbinders Grand Calibur