Showing posts with label Scenes. Show all posts

Monday, July 13, 2020

Deserts and Bees


Hello Friends, Esther here with two fun cards to share with you! This first one is a desert scene using the Landscape Silhouette stamp set. I inked up the top half of a watercolor paper with pink and purple distress oxides and added some paint splatter stars. Originally I had masked off the moon, but had a little "whoopsie" with my ink so I ended up cutting a large white circle  to cover it up.  It was my first time to use the Landscape Silhouette stamp set, and I'm loving how it turned out!


~~~This post contains affiliate links at no extra cost to you~~~
Supplies and Tools:
  • These Sweet n Sassy Stamp Sets
  • Canson Watercolor Paper
  • Circle Nestabilities (Spellbinders)
  • Fishtail Banners (Stamp Simply)
  • White Acrylic Paint
  • Brilliance Moonlight White Ink (Tsukineko)
  • Jet Black Archival Ink (Ranger)
  • These colors of Distress Oxide (Ranger)
    • Seedless Preserves
    • Dusty Concord
    • Wilted Violet
    • Black Soot


My second card features the BRAND NEW "Bee Sweet" stamp set.


After coloring my beehive I stamped and fussy cut some of the little bees. I then added glitter and  popped them up around my hive with dimensional tape!


Supplies and Tools:
  • Bee Sweet (Sweet n Sassy Stamps)
  • Texture Tiles 4 (Sweet n Sassy Stamps)
  • Canson Mix Media Paper
  • Arteza Real Brush Pens
  • Petals and Blooms Designer Paper (The Paper Studio)
  • Circle Nestabilities (Spellbinders)
  • Large Scallop Nestabilities (Spellbinders)
  • Fishtail Banners (Stamp Simply)
  • Crochet Dies (Sizzix - Tim Holtz)
  • Clear Glitter (Studio G)
  • Peeled Paint Distress Oxide (Ranger)
  • Antique Linen Distress Ink (Ranger)
  • Jet Black Archival Ink (Ranger)


Tuesday, April 21, 2020

Two Cards, One Color Palette

Hello All! 
I am back with a couple of cards to share today, both using the same color palette. 
I was itching to use the hummingbird in the Beautiful Birds Stamp Set. I  matched the bird up with the peonies in the Peony Cluster Stamp Set


Here is the how-to~ 
1.  Using MISTI, stamp peonies on edge of 51/2 x 4 1/4 panel of Neenah Solar White CS using Memento Tuxedo Black ink. 
2.  Color peonies and background with Copics.
3.  Determine position of hummer on the panel, and mount onto MISTI door.  Mask the area of the flower that is a part of the hummer image.
4.  Stamp the hummer with Memento Tuxedo Black ink and color with Copic markers.
5.   Draw a very light pencil line with a ruler, from the top of the panel to the bottom of the panel, avoiding the hummer. 
6.  Fussy cut around back end of hummer up to the pencil line. 
7.  Cut the rest of the panel along the pencil line, using a trimmer.
8.  Add Wink of Stella to the hummer.
9.  Fold a kraft cs cardbase and determine placement of sentiment. 
10.  Stamp sentiment with MISTI using Versafine Onyx Black Ink.  Sentiment is from the Mason Jar Bouquet Stamp Set.
11.  Adhere image panel to card base using dimensional adhesive. 

Next up, a card using the Country Garden Stamp Set~


This one has a little surprise in it! 
1.  The bike was stamped on a piece of Neenah Solar White Cardstock with Memento Tuxedo Black ink. 
I did not want to put grass behind my bike again as I had done that with my previous bike card.  I thought a flowering bush or garden of some sort would be pretty, but I doubted my ability to pull that off.  Then I got an idea.  I used the wheelbarrow image from the Country Garden Stamp Set and using Memento Desert Sand Ink, stamped just the flowers in the wheelbarrow- twice.  I masked out the wheel barrow to the best of my ability but other than that, I pretty much stamped right over the bike as I new I would be coloring over it anyway.  I think I may have masked out the basket of flowers. 
OK, back to the steps.
2.  Stamp the flowers in the wheelbarrow two times behind the bike.
3.  Loosely color in the flowers with Copics. 
4.  Color the bike with Copics.
5. Using Copics, color in a side walk and a bit of grass along the edge of the sidewalk. 
6.  Stamp the sentiment from the Beautiful Birds Stamp Set using the MISTI with Versafine Black Ink.
7.  Mount image panel on black cs. 
8.  Add patterned paper to horizontal card base. 
9.  Add white gel pen to centers of flowers in the bike basket.  Add sequins to finish off the card.

 I have not written up a blog post in this step by step fashion before.  I usually just do a narrative of how I made the card.  I would love to know which style of write up you prefer!  Please comment and let me know! 

OK, that's it for me!  I hope I I have inspired you to get out your stamps! 


Lee Ann 

Monday, March 9, 2020

Springtime Cards


Hello friends, Esther here sharing some spring themed cards I created with the NEW stamp sets for March! This first one features the "Sweet Little Lamb" set. I couldn't resist adding some hearts from the set to my tree, and those tiny little flowers to the vines along my fence.


~~~This post contains affiliate links at no extra cost to you~~~

Supplies and Tools:
  • Sweet Little Lamb (Sweet n Sassy Stamps)
  • Canson Mixed Media Paper
  • Watercolor Brush Pens (Benicci)  
  • Christmas Quilt Embossing Folder (Couture Creations)
  • Dotted Ovals Dies (Sizzix)
  • Grass, Tree, Vine Dies (Cottage Cutz)
  • Versamark Watermark Ink 
  • Black Embossing Powder (Ranger)
  • These colors of Distress Oxide (Ranger)
    • Salty Ocean
    • Twisted Citron
    • Wilted Violet


My second card uses "Blessing in Disguise" (my new favorite stamp set!), Psalm 23 Background, and Grace So Amazing.


For this card I stamped and embossed four coneflowers. After coloring them, I fussy cut them, and trimmed the leaves off.  I cut between the petals and glued one on top of the other to form two 3D flower heads. I then punched a bunch of tiny suns, scrunched them up, and hot glued them to my flowers (If you like to see a photo of the process you're welcome to visit this post on my personal blog.)


Supplies and Tools:
  •  Blessings In Disguise (Sweet n Sassy Stamps)
  •  Psalm 23 Background (Sweet n Sassy Stamps)
  • Grace So Amazing (Sweet n Sassy Stamps)
  • Canson Mixed Media Paper
  • Watercolor Real Brush Pens (Arteza)
  • Dotted Oval Die (Sizzix)
  • Crochet Thinlits (Sizzix - Tim Hotlz)
  • Garden Greens Thinlits (Sizzix - Tim Holtz)
  • Lace Embossing Folder (Sizzix - Tim Holtz)
  • Sun Punch
  • Versamark Watermark Ink
  • Black Embossing Powder (Ranger)
  • Faded Jeans Distress Oxide (Ranger)
  • Chipped Sapphire Distress Ink (Ranger)


Saturday, January 27, 2018

Beautiful Silhouettes

I am so excited about today's cards! Sweet N Sassy's New Silhouette stamps are so versatile! You can create almost any background and compliment it with a silhouette! You really can't wrong with them!

For my first card, I went with a simple acrylic block technique. This card feels very masculine and I am too often short on these so... YAY!
  • I used my acrylic block and Distress inks for the background.
  • Then I used Nature Silhouette 2 and black archival ink for the ground/grasses, added a sentiment from Thoughtful Words  and added my duck from Scene Silhouettes Wetlands (This is the January Stamp of the month and it is FANTASTIC - you still have time to get it free with $60 purchase). 


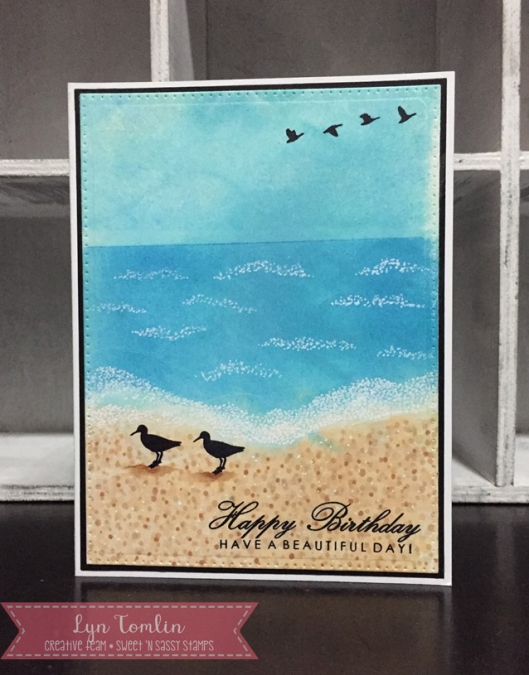
For my second card, I created a beach scene.
  • I tore some paper and  used it as a mask to ink up my beach line with Distress Inks
  • With the straight side of the paper acting as a mask, I added the ocean and sky - also with distress inks.
  • When that dried, I added details with shades of brown Copics and a white gel pen to get more realistic sands and waves
  • I added "beachy" birds from Scene Silhouettes Wetlands and a sentiment from Floral Greetings.


This is just two ways to use these awesome stamps! I hope they inspire you and I can't wait to see what ways you come up with!

Thanks for stopping by!

Lyn