Showing posts with label Thanksgiving. Show all posts

Saturday, October 5, 2019

Grateful Heart

Hi Sweet 'n Sassy friends! It's Julee Tilman here, popping in to share a couple of cards with the October Stamp of the Month: Grateful Heart.


Grateful Heart is a sweet remix of images from a retired set by Korin with a few new sentiments I designed sprinkled in. For my first card, I went for a traditional Thanksgiving card using the cornucopia image from the set. I remember in 2nd grade making a "stained glass" cornucopia project with aluminum foil, saran wrap, and markers. Ever since then I get delighted every time I see a cornucopia, so I had to start with this image!


I colored it with Copic markers, then highlighted with glossy accents and glitter for a little shine.  This panel is matted with brown cardstock and the corners rounded.  I did a similar treatment with the Thanksgiving Blessings sentiment and then finished with some patterned paper from my stash.


For this next card, I strayed just a bit from traditional colors, adding in a bit of aqua. I love all the aqua and sage fall decor I've been seeing, so colored this fall bouquet with  an aqua flower and bow.  The background for the card is a sage patterned paper that I stenciled with a ledger stencil then used distress inks to shade the edges.  I added a bit of patterned paper for interest and some lace trim.  Each of my focal circles is matted with a vellum scallop circle. I love the soft look to it.


Since Grateful Heart is our stamp of the month, it's available for purchase right now. Or you can get it for free with a $75 order (after discounts and before shipping) in the month of October. Don't miss the rest of the October release, coming on Monday, October 7!

Friday, October 20, 2017

Harvest Blessings

Hello Everyone!!  It's Sheri here with a couple Fall themed cards to share with you.  With Thanksgiving just around the corner I thought that I would create a card featuring the Harvest Blessings stamp set.  I created two samples for you today with the same basic design to show that you can get two totally different looks with just making a couple changes to the basic design. 

My first card features an Ivory and Gold color combo for a more elegant design.  The cornucopia and sentiment are embossed in gold.  I then used an embossing folder on the back panel to add some texture.  For a final touch I added gold sheer ribbon.


My second card uses the same basic design except.  Instead of embossing the images I stamped them in charcoal brown ink.  I also substituted the gold glitter card stock for coordinating charcoal brown.  I used an oval die to cut out the image panel and used brown sheer ribbon.  The sentiment was stamped on a tag die and tied to the ribbon with twine.


So which one is your favorite?   Hope you will take a look at some of your favorite creations and see how you can change them up!


http://www.sweetnsassystamps.com/products/Harvest-Blessings-Clear-Stamp-Set.html


Thank you so much for stopping by!


Saturday, October 19, 2013

Immortal, Invisible

Happy Saturday Morning!

Does a long weekend make your work week feel longer or shorter?   Do you try to do more in 4 days to make up for it?   I don't know about you but many times I pack more into those long awaited holiday weekends than I should.   Is it hard to be still and quiet?   The scripture says, "Be still, and know that I am God."  To become still we must surrender.   Our minds, our thoughts, our being.

While I was creating my card for you today the words of the mighty hymn, Immortal, Invisible... flowed from my lips.  I am at peace; my spirit settled as I set my mind on things that are above and not on this earth.    Listen and see if it isn't true for you too.

To all life Thou givest, to both great and small;
In all life Thou livest, the true life of all;
We blossom and flourish as leaves on a tree,
And wither and perish, but nought changest Thee.

I realize I must learn to rest, to surrender my thoughts to the Word.   When I do, I am always blessed beyond measure - because I'm spending time with the One who loves me and desires to be my all.

My card is created using both image and sentiment by Dina Kowal, for Sweet 'n Sassy Stamps called, Season of Change.   I used the coordinating die set, Leaf Dies (set of 4) as well.
May the eyes of our heart see, and our faith increase as we surrender and transform our minds.   May God's peace and rest steady our pace in the days to come.

Hapu u'de'u ki-anokhi Elohim
arum baggoyim, arum ba'aretz

Be still, and know that I am God - I will be exalted among the nations, I will be exalted in the earth
Blessings,
Susie ~

Tuesday, November 27, 2012

Giving thanks for YOU!


Thanksgiving Day has come and gone. . .but I am not finished giving thanks. (Nor do I plan to be, any time soon!)  It's been such fun joining you all at Sweet 'n Sassy Stamps this month.  I have one last project to share with you here on the SNSS blog. . . and if you'll stop by my blog, I'll share one more bonus project too! 

I used the fabulous Grunge Borders set along with Leaf Silhouettes again today because there are  limitless combinations with these two sets! I stamped the woodgrain border on my card base, and then inked the edges to add a little more dimension and texture.   I stamped my leaves in two colors of ink, trimmed them and adhered them to a matted cardstock block.  As a finishing touch, I added the sweet small sentiment and a few twine stitches. (I told you, I cannot STOP myself when it comes to that dark brown twine!) 

Warm and bright. I love the way the colors just popped on this card.  

Thanks so much for having me this month, at SNSS.  It's been a blessing!
Have a beautiful holiday season, and I'll be seeing you around, for sure!
Laura,
xoxo

Tuesday, November 20, 2012

Sweet 'n Sassy blessings

Hello, hello! It's my day here on the Sweet 'n Sassy blog!
It's the week of Thanksgiving, and I thought I'd share something warm and cozy, and filled with autumn.  I've used a few of my favorite things on this card. Would you like to hear about them?

First off. . .RED. This deep red cardstock and ink is so warm and  cozy for autumn and winter projects.   I stamped the chevron border across ivory cardstock and almost gasped, because the texture on the Grunge Borders  is SO fabulous.  It's hard to find a REALLY good looking textured-looking stamp, and this set, by Dina Kowal takes the CAKE baby. Gorgeous. One of my new favorite things!! 
I love the way the border works so nicely with the crisp leaves of Leaf Silhouettes too! 

My next favorite thing. . . .twine. Especially this dark brown twine from May Arts. You may have noticed, I use it on almost EVVERYTHINGGG! (I'm a little obsessed.) Thankfully it comes on a giant roll so I can use it to my heart's content.

I pray your Thanksgiving holiday is filled with family (whether by birth or by blessing) and lots of delicious food and fun.  There's not much better than cool crisp air, delicious smells in the air, and lots of laughter!
Hugs!
xoxo
Laura,

Tuesday, November 6, 2012

Leaf Silhouettes with Laura Williams

Hello! I am so happy to be here at Sweet 'n Sassy this month!
I have a trio of projects to share with you today, which will help you get all ready for Thanksgiving. 

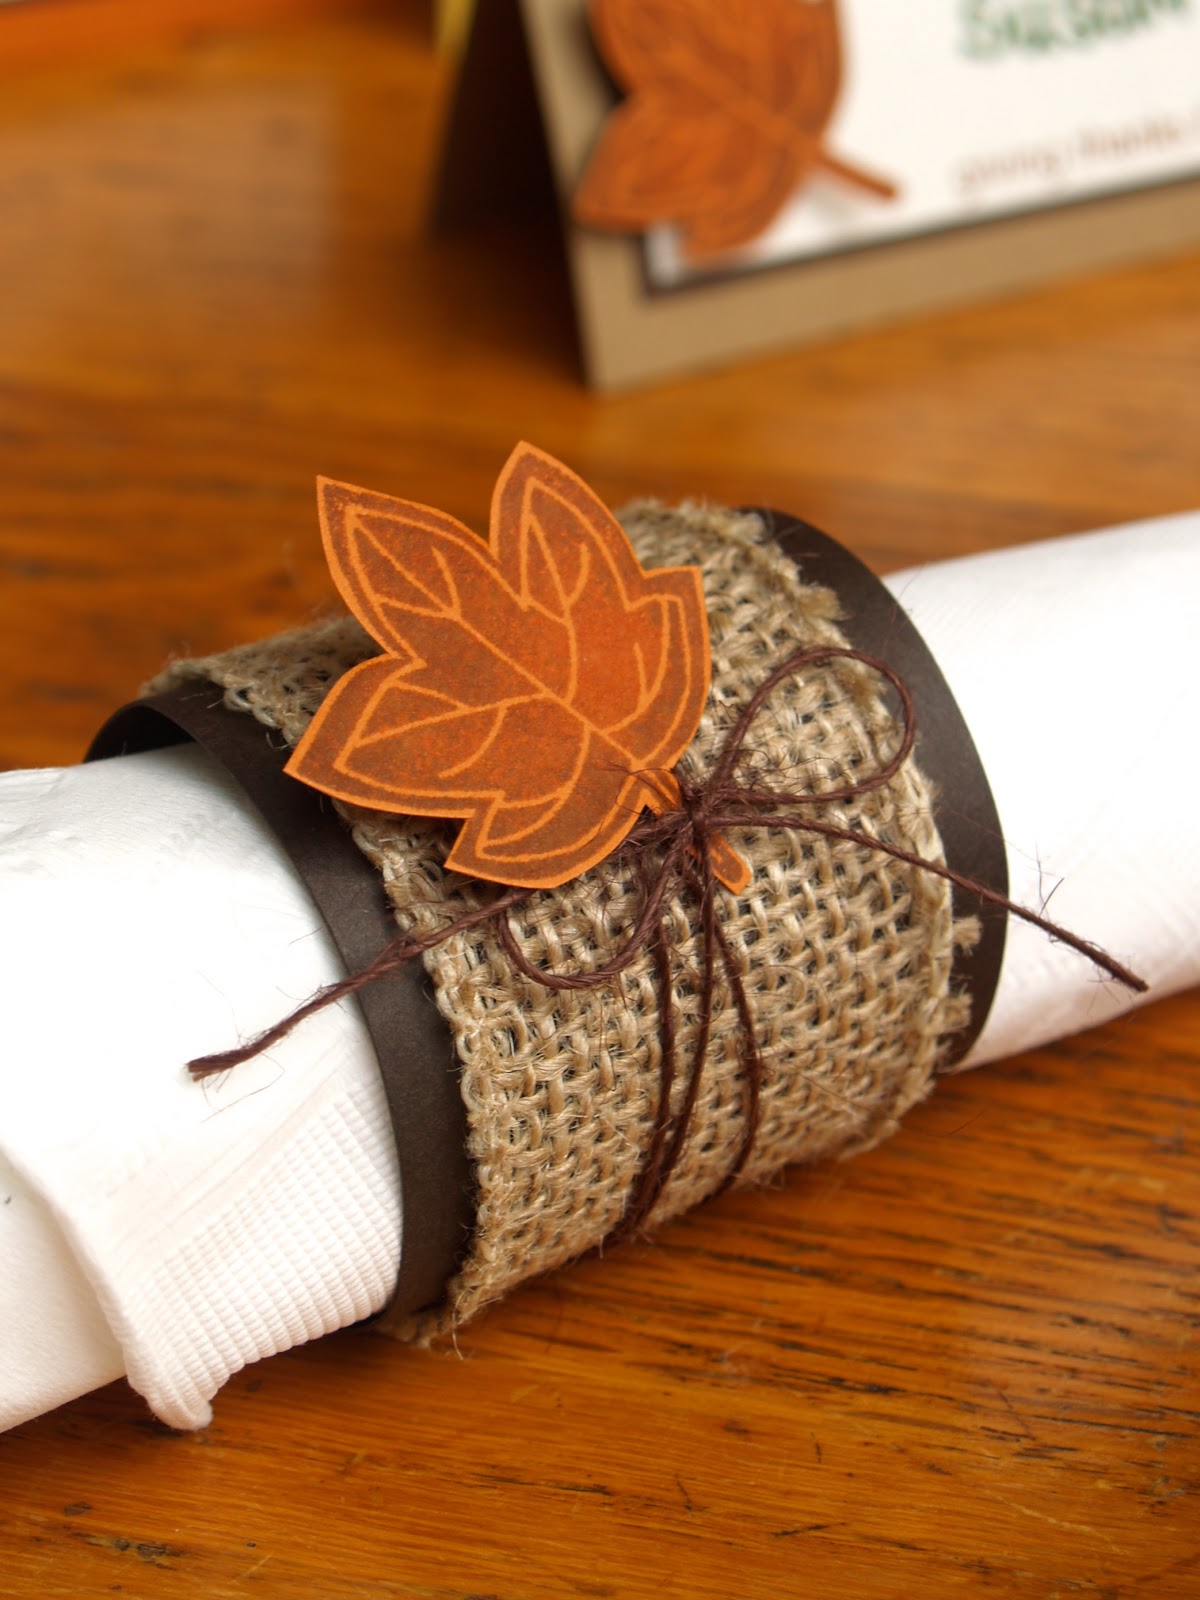
I used the Leaf Silhouettes stamp set to create napkin rings, placecards, and a thank you card.  


To create a simple napkin ring, trim a strip of cardstock (I usually do mine about 1.5x6 inches.) Roll it gently, and add adhesive.  I then wrapped mine with a layer or burlap ribbon, twine, and then tucked my stamped leaves into each one. (I added a dot of foam tape behind each leaf to secure it.)

I stamped the leaves on colored cardstock, and used two colors of ink on each one.  The trick is to start with the lightest color. Dab it on the ink, and then roll the edges of your stamp in the darker colored ink.  It creates a fun look and creates unique leaves that are never exactly the same.

Using matching cardstock and ink, I whipped up placecards. (Any size you prefer will work, but i generally cut a 4x4 inch square, and fold it in half.) Twine, and the oh-so-cute stamps make this quick and FUN work! I followed the same basic format for a sweet and simple (and sassy) thank you card. 

I can't wait to come back next week! I have a holiday card to share with you using a non-holiday stamp set.  Goodness knows, by the time Thanksgiving rolls around, we better be working on our holiday cards, so hopefully this will get you moving, if you aren't already!

Thanks for being here with me, at the Sweet 'n Sassy blog today! 
xoxo
Laura, 

Friday, November 18, 2011

Save the Turkeys!

When I realized Thanksgiving is less than a week away, I knew what I wanted to do for my SNSS Blog post!  Every year my DH and I get invited to Thanksgiving dinner, and every year I make a table favor for everyone, so it was time for me to come up with this year's idea!  Korin had just added a new "Save the Turkeys" digi to the SNSS Store that would be just perfect.  I started playing around with the Spellbinders Label 10 die because the ends reminded me of turkey feathers...okay...maybe that's a stretch, but bear with me!  This is what I came up with...AND...6 Hershey Nuggets or little cello bags of mixed nuts fit perfectly in this little favor box!


Here's how to make this cute little turkey box!

Step 1: Die cut the largest Label 10 die from card stock.  Now would be a good time to add texture if you want.  Center the die between the left end and the 6" mark on a Scor-Pal and score at 2 and 4 inches.  (Or use whatever scoring tool you have.)  Then turn the die vertically and score at the ends of the scallops on each side.  Cut the tabs up to the score line as shown.


Step 2:  Apply adhesive to the tabs on the right side of the die cut.


Step 3:  Fold on all the score lines.  Tuck the tabs in and adhere.  At this point you can decorate your box...or...make a liner.  


Step 4:  Cut a complimentary piece of card stock 4 1/2" X 4 1/2".  Score at 1 1/4" on all four sides.  Cut corner tabs to score line and add adhesive to the tabs on the right side of the box.


Step 5:  This is what you end up with.  This liner will tuck perfectly into the little die cut box.  I added some adhesive to the bottom to hold it in place.   
Step 6:  I decorated my box by cutting a piece of DP with the next size smaller die and wrapped it around the box. The great thing about digi images is that I was able to size the turkey to fit the box perfectly!  The "Save the Turkey" image was colored with copic markers, cut out, and popped up on the front of the box.  A 6" piece of ribbon was adhered to the sides of the box and buttons were added for decoration.  


And there you have it!   Be sure to check out all the other new digs and wonderful stamp sets at SNSS!  For this week, every $25 gift certificate you buy, you get a $5 gift certificate for yourself!  Thanks for stopping by!  I'm off to make several more of these turkey favors...Hope everyone has a Happy Thanksgiving!