Showing posts with label Script Background. Show all posts

Monday, September 12, 2022

Gilding Polish

 Did you know Sweet n ' Sassy Stamps is in the process of adding product from their brick 'n mortar store (The Stamper's Boutique) to their online site? Check out all the fun NEW stuff added to the Art Mediums category! There will be limited quantities of these products until Korin gets a feel for what sells well, so if you see something you like, grab it up fast!

I'm showcasing Gilding Polish on today's card. After embossing the azalea's I went over the raised design with two shades of blue polish. Don't you love that beautiful shimmer?

 ~This post contains affiliate links at no extra cost to you~~~

Supplies and Tools:


Monday, April 11, 2022

Song Birds


Esther here  today with a cheery bird card featuring two  BRAND NEW stamp sets from the April Release.

 ~~~This post contains affiliate links at no extra cost to you~~~

To create my card I stamped the Script Background stamp in wilted violet distress ink (Ranger) on purple card stock. I lightly stenciled the Delightfully Delicate Stencil in the same color in two corners and added two sentiments from Church Family. I attached a strip of lace die cut with the Doily Border Dies under the purple panel and glued it over a piece of white card stock stamped with bricks from Texture Tiles 2 .

The bird image is from the NEW Song Birds stamp set and was stamped in  Versafine Clair Nocturne Ink and colored with Arteza real brush pens. I used some foam mounting tape to pop it up off my card.

Saturday, April 2, 2022

With Love & Prayers

Happy Saturday! The April Release is here and you are going to LOVE it! My first card with the new release features the Stamp of the Month, Church Family. I love the mix of fonts and scripture references included in this set!


I recently sat down and created some backgrounds with the knit stencil. Honestly, I had no plans in mind when I created these backgrounds. I just picked some colors I liked and played knowing the ideas would hit me at some point. 


The blue background was the jumping off point for my card. To create the background, I used cool caribbean cardstock, the knit stencil along with cool caribbean, tempting turquoise and taken with teal dye inks. After I created this background, I searched though my stash of already colored images. I was excited when I came across this butterfly I colored a year ago. Yes, you read that right, a whole year ago when Garden Whimsy was first release. I remember coloring this image, trying to make it work for a card and almost pitching it in the trash when nothing panned out. Now, I am really glad I saved it!

Now that I had the main image selected I knew I had to do more to the background. I added texture and visual interest by stamping the script background in brown, the dots from texture tiles 6 in white and adding black paint splatters to complete the look. 

I stamped the sentiments in black ink, cut to size and added black lines along the edges. I die cut the background panel, matted with black and attached to a white card base. I added some white highlights with a gel pen to the butterfly. I popped the butterfly up with foam tape, glued the sentiments down and added some light blue gems to the front to finish it off. 


I hope you enjoyed today's card and thanks so much for stopping by!

Karen

Wednesday, March 23, 2022

Spread Your Wings Mixed Media

 Hi sweet friends! It's Julee popping in today with a little mixed-media inspiration using the new Spread Your Wings and Spotted stamp sets. I've been in a bit of a creative slump lately, just having a hard time getting into the creative mood and staying there long enough to make a card. I know it's just the normal ebb and flow of the creative process, but I sure wish there was an instant fix!

Here's what I did to try to break out of the cycle. I found a pad of paper at Ross that was $1.99. It was 8.5 x 11" 300 gsm mixed media paper and I was intrigued by the thickness. So even though I have a ton of other cardstock, I bought this pad expressly giving myself permission to just play with it. See how well it worked, play with inks and paints, and see where the process took me. 


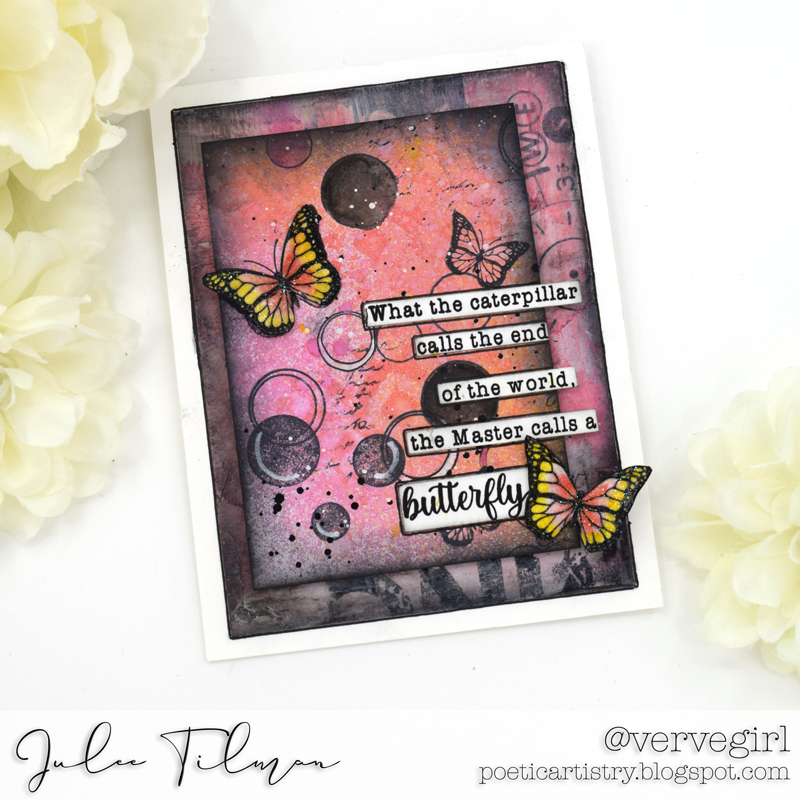
So I tore out one of the pages and got my fingers inky blending distress inks, oxides, and sprays to my heart's content. Next I pulled out the Spotted stamp set and stamped the different stamps randomly over the paper in archival ink.  I then added a bit of texture with the Script Background stamp here and there.  I watercolored some of the open circles with distress crayons and a waterbrush, then added gel pen accents to others.  When I was satisfied with the page, I cut it into six 3 x 4" panels and inked around the edges with black soot ink. I took two of the panels and stamped them randomly with the butterflies from Spread Your Wings.

Next I stamped the larger monarch butterfly several times and watercolored with distress inks.  When it was dry, I fussy cut the butterflies, then coated with Versarmark and embossed with sparkle embossing powder. This makes them not only sparkly, but have a little less fragile when you add them to your card.

For my first card I went with a simple HOPE sentiment from the God is Sovereign set, embossed in white on black cardstock.  I added a panel dry embossed with an embossing folder behind, then accented with some shiny sequins and distressed edges to finish it off.

For the second panel, I stamped out the quote, then cut with my paper trimmer to add to the side of the panel.  I then added a couple of the butterflies.  The background is from a second mixed media page I did with some similar colors, usiing tissue paper, paints, and gel crayons. I tied it all together with some black around the edges and two cards are done.  I still have four more panels for next time I need a little jump start getting created!

Thanks so much for stopping by today! I hope you're inspired to just play a little in your studio and see where it leads.

-Julee


Thursday, March 3, 2022

spread your wings

 Hello, friends!  Today I have two cards for the Sweet ‘n Sassy Stamps March release. I could feel spring trying to come today and I don't know about you, but I am ready for butterflies and flowers! This new butterfly set is called Spread Your Wings. I also used a new Leaf Branch Stencil and the previously released Script Background.

Product links: Spread Your Wings Stamp & Die Bundle, Leaf Branch Stencil, and Script Background. Spread Your Wings is also available separately... Stamp set and Die Set.

I love the blue & purple color combo in my first card. I brushed the stencil with the same shade of blue and stamped the script in a light gray. The measurements of the panels are: white- 2 x 3 3/4 and two 1 x 3 3/4, purple mats- 2 1/8 x 3 7/8, and two 1 1/8 x 3 7/8.


My second card is CAS. I decided to make a rainbow of butterflies and popped them all up with foam dimensionals. It still looked like it needed a bit of something so I threw on a few scattered rhinestones.


Have a great day!
Diane


Monday, January 10, 2022

Sweater Weather


Esther here today sharing this fun winter card. I don't usually do slim line cards, but I wanted a little more space so I could include more the winter wear from this super cute set. 

To create my card I stenciled the background using  Weathered Wood Distress Ink from Ranger and the NEW Quilt Stencil. I then stamped the Script Background over top in the same color of ink. 

The images  from Sweater Weather were stamped in Versafine Clair Nocturne Ink  on mix media paper and colored with Arteza Real Brush Pens. 

After die cutting a snowflake from the Large Snowflake Die Set I added a sentiment stamped in worn lipstick and picked raspberry distress ink.  The last step was adding a few tiny  white pearls to my little pink snowflakes.

     ~~~This post contains affiliate links at no extra cost to you~~~

Monday, December 13, 2021

Masked Background


Hello friend, Esther here today with a clean-and-simple card featuring a quick way to create a masked background. 

I cut a piece of scrap paper the size of a card front and then tore a jagged opening in the middle. I placed this scrap paper over my card front before stamping the script background stamp, and wa-la, a pretty partial stamped background!


Would you like to win FREE STAMPS FOR A YEAR? Come link up to the final challenge for 2021 on Sweet n Sassy Stamp's VIP Facebook page using at least one SnSS product on your creation. (Remember there are digital stamps if you don't own any regular ones!).  

CLICK HERE to be taken to the challenge album. 

~~~This post contains affiliate links at no extra cost to you~~~

Supplies and Tools:


Friday, November 26, 2021

Pocket Card


Happy Day After Thanksgiving! I hope you had a wonderful Thanksgiving full of family and fun! I am still trying to recover from all that food haha!  Today I have a simple pocket card for you. I dug through my stash of backgrounds and then took them up a notch by simply adding the new Script Background stamp in a coordinating color. I also created a note card to go into the pocket and gave it the same "subtle" treatment and also added an image from the Wonder of Wonders set. I colored the faces, hands, and heart and let the rest blend into the background. 


I think this will be a unique card for someone who needs some love and encouragement but what do you think?


Thanks for stopping by!

Lyn

Monday, November 22, 2021

Snowflake Dies THREE Ways


Esther here today with a pretty Christmas card that features snowflake dies used THREE different ways. 

Way #1 To create a stencil --- I cut two snowflakes from printer paper and used them as a stencil on the background.

Way #2 To create an impression on stamping foam ---I heated my stamping foam, pressed it into the largest of the snowflakes to create an impression, inked the stamping foam with distress ink, and stamped it on a piece of white card stock.

Way #3 To create a regular die cut --  Last of all I die cut the medium sized snowflake and glued it over top the reverse print. 

 This week all STEEL DIES and DIGITAL STAMPS 

are 20% off at Sweet n Sassy Stamps.

        ~~~This post contains affiliate links at no extra cost to you~~~ 

  Supplies and Tools:

Sunday, November 21, 2021

Simply Amazing

Today's card is the kind of card I love to create! The one that will lift someone up with a beautiful sentiment and kind words inside.


I began by creating the background. I used the Vintage Doily stencil with basic gray ink on a lighter gray cardstock. Then, I stamped the Script Background with the same ink over the top of it and cut with a stitched edge rectangle die. I stamped the sentiment from My Thoughts of You on the panel with Versafine Clair Nocturne ink. I matted the panel with black and attached to a basic gray card base. 

I stamped the butterfly from Begin Again on white cardstock, blended honeysuckle and cranberry ink on the wings and fussy cut out. I popped the butterfly up with foam tape and added some black jewels to finish it off.


**The stencil and butterfly set are part of the current sale that ends tonight.**


Begin Again


Script Background 

 My Thoughts of You


Vintage Doily Stencil 


I hope you enjoyed today's card and thanks so much for stopping by!

Karen


Wednesday, November 10, 2021

Wish Big

Hi Sweet 'n Sassy friends! It's Julee popping in to share a little inspiration with some stampy goodness. We're celebrating 14 years of Sweet 'n Sassy this month with weekly mini releases + sales!  This week's sale is 20% off stamps in our Backgrounds and Creative Worship Stamps categories. While supplies last, through November 14.

Today I'm going to share a few cards that feature stamps from these two categories. First up is one combining the NEW Script Background (just released on Monday) with my Joyful Day set (new this month), and a previously released Creative Worship set, Old Fashioned Alpha.


I placed the Script Background in my MISTI, then inked up with a rainbow of Catherine Pooler mini inks and stamped. I then went over the stamp lightly with a waterbrush and stamped again to give a little watercolor effect to the script. When this was dry I lightly blended the same color of ink over each color of stamping on the background. The cupcakes are from the Joyful Day set and colored with Copics and then fussy cut.  I then used the Old Fashioned Alpha set to create the wish big sentiment. I finished off with some sequins and bling.

My next card uses the beautiful Creative Worship: Wonder of Wonders set from our October release.  I colored up these rejoicing women with Copic markers, then trimmed around with scissors.  The sentiment from Timeless Hymns is embossed in white onto purple cardstock. I then stenciled the Vintage Doily Stencil onto white cardstock with villainous potion distress ink. 

My third card features the Spectacular Snowflakes set from our Backgrounds category.  I stamped them randomly in versafine clair fallen leaves onto kraft cardstock, then added a little ink blending around the edges.  The focal snowflake is created with the Large Snowflakes Die Set. I die cut the snowflake three times, then layered together for dimension.  I then inked the edges with brown ink.  Next I coated the entire snowflake with versamark ink and embossed with sparkle embossing powder.  This is added to my card with dimensional foam tape for some extra life.  The sweet little tag is from the Mini Tags Die Set, and I stamped the Noel sentiment from Christmas Wordfetti on it, then tied with some string.

Thanks so much for stopping by! I hope you're inspired to create something today.