Showing posts with label Gift Idea. Show all posts

Monday, August 22, 2022

Back to School Tags


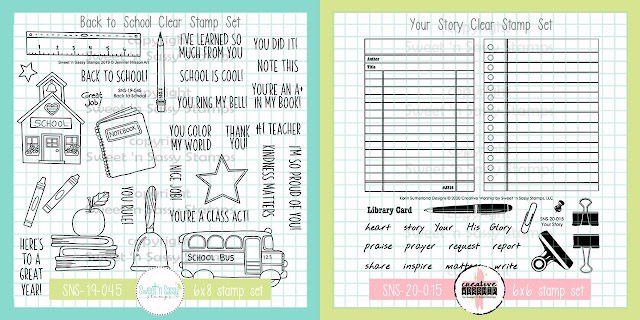
Happy Monday! Esther here today sharing some fun tags I created to attach to gifts I'm giving out to my Sunday School kids to celebrate going back to school this fall. 
I started by stamping the library card from Your Story in Versafine Clair Nocturne Ink on white card stock and cutting them out. Next, I stamped a bunch of images from the Back to School stamp set on mixed media paper and colored them with Arteza Real Brush Pens. After fussy cutting (because I don't own the Back to School coordinating dies --- yet!), I arranged them on my library cards and stamped various school related sentiments at the top. Each tag has a personal message from me on the back.

~This post contains affiliate links at no extra cost to you~~~


Tuesday, April 2, 2019

Oh Happy Day

Hi Sweet 'n Sassy friends! It's Julee, popping in today to share a card with the NEW release. Have you seen the new stamps for April yet? Once again, it's a  spectacular release, with so many must-haves and I know you're going to love all the inspiration we have in store for you this month!


It's no secret that I have a strong affinity for coffee. When I saw these sweet little posies and the builder words in the Happy Day April stamp of the month set, I immediately thought of creating a card to hold a coffee gift card to perk up someone's day. Here's a look at the sets I used today. Happy Day is available this month exclusively as a FREE gift with a $75 or more purchase. And Fill Me Up is one of my all-time favorite SNSS sets.


I started by stamping a couple of the flowers and coloring with Copic markers. I fussy cut these and added some swirls of glitter glue for a little shimmer. Next I stamped the cup from Fill Me Up and colored with warm greys, stamping the little solid triangle accents in light grey inside the cup for a subtle pattern. I cut the cup out and set aside to make the gift card pouch.


Gift Card Pouch Instructions
These little pouches are so easy to make. Just add 1/2" to the width and 1/4" to the length of what you want the finished size of your pouch and then score 1/4" from the edge on three sides. I used a circle punch to punch a half circle for a thumb slot, but it's not necessary. My finished size is 2.25" x 2.75" to fit a standard sized gift card. So I started with a 2.75" x 3" piece, scored three sides, and then glued those three flaps to the card front. Easy peasy!


I added a little doodled frame with a black pen around the edges of the pouch and then stamped the oh, happy, and day words onto the card front. I finished by adding the coffee cup, layered with the flowers to the pouch and then added one more flower over by the sentiment.

Thanks so much for stopping by today! If you haven't already, hop on over to the Sweet 'n Sassy Shop to check out the NEW release! For a limited time (through April 9) you can save a little cash when you buy the sets together in the April Early Bird Bundle.


Tuesday, July 18, 2017

Mixed Media Frame

Hello! It's Monika here today with a mixed media project. I have always loved mixed media, but usually I don't have enough time to work on complex projects... while this project started out as a quick 'mixed media' card, I decided I shouldn't rush it... so I made it step-by-step, day-by-day, letting everything air dry...


It started out with a regular 5-1/2" x 4-1/4" piece of heavy cardstock. First I adhered some torn book pages to the cardstock, then I painted it over with white Gesso. Next I adhered some art stones, lace and dry wall tape to the background, using Gesso... it's a great adhesive...

 
Next came the messy part... coloring the background:


I used red mist from Maya Road and yellow mist from Michael's... I had to add yellow mica powder to the yellow to make it brighter...
While it didn't look great at first, after adding the embellishments, it all came together.


The greeting is from Be Encouraged clear stamp set, my go to stamp set these days... I love the inspirational words!
The embellishments were so much fun to put together... you can get really creative and use odd items, recycled materials... really, anything that you can put your hands on... I mostly used my Hot Glue Gun to adhere the embellishments... along with Soft Gloss Gel which is another great adhesive especially when you are looking for flexibility or applying glitter...
As I love butterflies, I added some pretty ones. The images are from Majestic Monarchs clear stamp set... while I used the now retired coordinating dies, the images are easy enough to hand cut. They are backed with black cardstock to add a nice contrast to the yellow...

Thanks for stopping by,
Monika


Thursday, September 22, 2011

Altered Art

Hi!  It's Cathy once again, and it's my turn to share an idea here on the Sweet 'n Sassy Stamps Blog!  Something fun and challenging to do is to take something old, something used, or an inexpensive item and transform it into a piece of stamped art.  I thought I would share an idea that's been around for a long time.

This project began with the card.  The lovely titmouse image was released in August and is one of many bird images at Sweet 'n Sassy Stamps...if you like birds, you will need to check them all out!

My card is a CASE of this beautiful Thinking of You card by Linda (AKA morningsun47), the featured Stamper on SCS this past Sunday.  The titmouse image is colored with copic markers.  The layout was kept pretty simple although I did add a few layers and some Baker's twine.

The little Post-It note holder was made from an inexpensive acrylic photo frame purchased at Michaels.  The stamped image slides into the frame where the photo goes.  The Post-It pad is sticky taped to the front of the frame.  A little ribbon loop adhered under the note pad holds a matching, beaded RSVP mini pen.  The pen was made by running a piece of BasicGrey DP through the Xyron and rolled around the barrel of the pen.  A piece of Scor-Tape covered the DP, and this was rolled in tiny mico beads.  Easy-Peasy...but it makes a nice gift set, don't you think?  Hope you've been inspired to try a little altered art for yourself!  Thanks for stopping by and come back again tomorrow for some more inspiration!

Cathy