Showing posts with label Mother's Day. Show all posts

Wednesday, April 27, 2022

Happy Mother's Day


Hi sweet friends! It's Julee Tilman, popping in with a little Mother's Day inspiration with the new Roses for You stamp set. I just love these beautiful roses and sweet sentiments.

I stamped the solo rose image from Roses for You, then colored with Copic markers and cut with my Scan 'n Cut machine (but there are coordinating dies as well). The sentiment circle is cut from a paper I swiped the ink pad direct to paper with Wintergreen and All That Jazz inks. I stamped the mother's day sentiment and then matted with a white circle.


The background is stenciled with the Delightfully Delicate Stencil with Wintergreen ink, then I stamped the love you so very much stamp repeatedly in All that Jazz for a meaningful background.  A bit of sponging around the edges finishes things off.

Thanks so much for stopping by today! I hope you have a fantastic day.


Thursday, May 6, 2021

featuring Jenn Nilsson

 Hello friends! If you haven't heard, it’s Customer Appreciation month at Sweet ‘n Sassy Stamps and this week SNSS is spotlighting illustrator Jenn Nilsson with a buy 2 get 1 free sale. If you love her images as much as we do, head on over to the store...the sale on Jenn's stamps ends today! Also this month you get to choose your own $11.95 value Stamp Of The Month with each $60 order!


I used two sets she illustrated on my cards today. The first is called Flower Garden and I created some Mother's Day cards with it. I also used a sentiment from the new Rose In Bloom Digital set. This is a 3x6 Mini Slimline card.


My second card was made with her Mer-mazing stamp set. This set has a sweet little mermaid and several other cute sea themed images to accompany her. I used the "keep swimming" sentiment...I think we all can relate to that one! lol. The background was created with Distress inks which were applied to acetate, spritzed with water, and "smooshed" onto the paper.


Have a great day and don't forget to check out the SALE!
Diane


Tuesday, May 4, 2021

From Fish to Flowers

 Hello Friends!  

We are having some fun this month celebrating the artists here at Sweet n Sassy Stamps.  This week our focus is on Jenn Nilsson fabulous stamp collection!  Jenn's sweet, whimsical style are right up my alley.  Her set, Country Garden, is one of my favorites.  


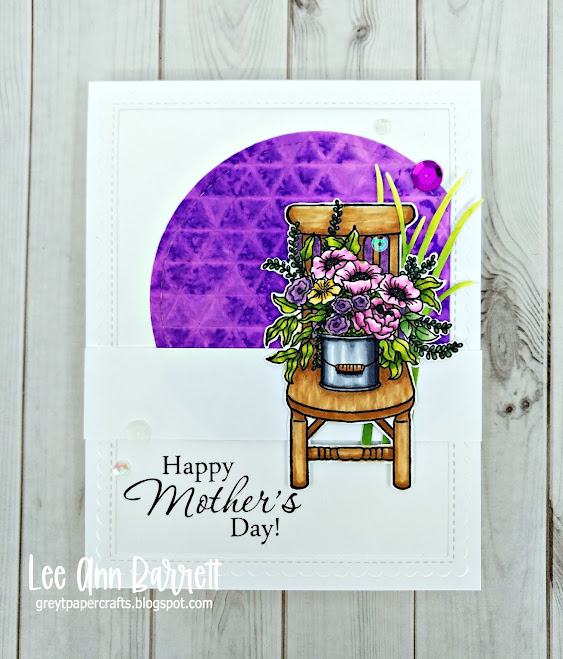
This gorgeous image was stamped with Memento Tuxedo Black ink and colored with Copics.  I then fussy cut the image out.  I got some new embossing folders- they seem to be making a comeback and I was in need of new!  I watercolored a piece of cs and let it dry.  Next, I spritzed the inside of my embossing folder with water and then ran the watercolored paper throught the Big Shot.  What a lovely surprise I got with the fun texture and color variation on the panel.  I die cut a circle from the purple paper and used it to back the image.  

The sentiment, from the Precious Poppies Stamp set -was stamped in the corner of the card front.  A white scalloped frame was added to the card front, then the purple circle and image were added, along with a bit of grass made with the Tall Grass Die were adhered to the card.  

Next up, a super cas card in which the darling fish does just fine standing on its own! 


Mr. Puffer is from the Fin-tastic Friends Stamp Set.  He was colored with Copics and fussy cut out.  
The background was done with an embossing folder and distress ink.  I used several techniques to get the background the color I wanted.  I started with some base color by sponging on various blue shades of distress inks.  Next I inked up the inside of the embossing folder, spritzed the folder and then placed the sponged cs in and ran it through the Big Shot.  I got wonderful, wavy dimension, but I still wanted more color so I watercolored with distress inks, following the curvy, embossed lines.  I love how this turned out.  The sentiment worked out so well in how it followed the curves of the 'waves'.  A few sequins were added and done! 
And because we are celebrating Jenn's art this week, all of Jenn's stamps are on special this week, 
buy 2 get 1 free (limited to stamps on hand).  


This is an awesome sale to take advantage of!  

Thanks for stopping by!  

Lee Ann  


Wednesday, April 7, 2021

A Mother's Love by Charmaine Canham


 I am so very excited to be on the Sweet 'n Sassy Stamps blog for the very first time as a fellow design team member. I hope to share some of my love of creating with you on a more frequent basis. If you have any questions, leave me a comment and let me know how I can help!

 With Mother's Day fast approaching, this Sweet 'n Sassy Stamp, A Mother's Love, is just perfect for this card I envisioned. This stamp is versatile and can be used for birthdays, baby showers, or an "I love you, Mom" card.

I love silhouette-type images, and the mom and baby stamp just spoke to me. I created the card using a nested die set that I have had forever and white and black scraps of cardstock in my stash. If you don't have this specific nested die, use any other shape like an oval or stitched rectangles.

The main image was stamped with Altenew Obsidian Black ink and clear embossed with Ranger Clear embossing powder. Remember to use your embossing buddy before embossing anything.   Use the smallest die and cut the image. 


Cut a piece of white heavy cardstock with a larger die from the set. Since I know that I want the sentiment and some of the card to match, I "colored" this cardstock that will go right under the mom and baby. Use Versamark Watermark stamp pad or any clear "tacky" ink that will stay wet longer and stamp/apply to the cardstock. Heat emboss this piece with WOW Metallic Copper Super Fine embossing powder. Wait for it to cool down before placing double-sided foam tape above and under the cardstock. Adhere the mom and baby to the top.

The sentiment was heat embossed with the same WOW embossing powder and placed on a banner die from SSS, or was it MFT? Place this on double-sided foam tape as well. 

The black background was made by using a pierced cover plate with detailed stitching for a sophisticated look. Place all of this on a top folding A2-sized card and you are done. This card can easily be modified with a pink or blue hue instead of the classic white and black look. 

I hope you liked today's card and find more pretty stamps over at Sweet 'n Sassy Stamps.

See you soon!

Charmaine @ CharCards

Follow me over on Facebook and Instagram for almost daily inspiration.

                                      ***This post contains affiliated links at no cost to you ***

Wednesday, May 3, 2017

Mother's Day Card with Mason Jar Bouquet

It's Gracie Chavez and today I'm sharing my first card using one of Sweet 'n Sassy's new stamp set Mason Jar Bouquet! This set is so pretty, so versatile and is perfect for coloring.


I stamped the flowers in hot pink dye ink and colored them in the same color, to create a tone on tone effect. I have been using watercolor markers to color a lot lately and I've also been drawn to bright, summer colors. I watercolored this flowers in hot pink using very little water and added a fresh green on the leaves. I decided they would look great with a few green leaf die cuts. I used foam squares to give them dimension.

The sentiments in this set are so beautiful, a very nice font and size. I was able to stamp this Mother's Day greeting  in black, on one side of the die cut panel matching the rest of the card design.


The images are so striking and pretty I really didn't need to do much for my card base. I just die cut a large intricate panel, cut it in half and layered the pieces creating a lace border like design. Details such as the black ribbon and pearls tie the card together.

I hope you enjoyed today's post! Until next time.


Sunday, April 30, 2017

CAS Mother's Day card

Good morning!
 
Today I am sharing a card using the beautiful Mason Jar Bouquet stamp set from this month's release.
 

Sometimes a clean & simple card is just as pretty as one with many layers and embellishments and I really liked how the colors and design of this one turned out.  I inked just the center of the Floral Pattern Background stamp with a small Memento dew drop pad and left the edges un-inked. The flower was cut out and popped up with foam dimensionals.  Some Stickles in the flower center and a few sequins finished it off.
 
Have a great day!
Diane