Showing posts with label Tall Grass die. Show all posts

Monday, July 25, 2022

Paw-some Pals


Happy Monday! Esther here today with a fun puppy themed card. To create the base of my card I used a side step card tutorial from Splitcoast Stampers. Next I cut a bunch of grass using green card stock and the tall grass die coupled with the smaller grass die. I inked the top edge with dark green distress ink. All the dogs, the bare tree, and the sun were stamped on mixed media paper and colored with water brush pens. 

~~~This post contains affiliate links at no extra cost to you~~~

Supplies and Tools:

Tuesday, May 4, 2021

From Fish to Flowers

 Hello Friends!  

We are having some fun this month celebrating the artists here at Sweet n Sassy Stamps.  This week our focus is on Jenn Nilsson fabulous stamp collection!  Jenn's sweet, whimsical style are right up my alley.  Her set, Country Garden, is one of my favorites.  


This gorgeous image was stamped with Memento Tuxedo Black ink and colored with Copics.  I then fussy cut the image out.  I got some new embossing folders- they seem to be making a comeback and I was in need of new!  I watercolored a piece of cs and let it dry.  Next, I spritzed the inside of my embossing folder with water and then ran the watercolored paper throught the Big Shot.  What a lovely surprise I got with the fun texture and color variation on the panel.  I die cut a circle from the purple paper and used it to back the image.  

The sentiment, from the Precious Poppies Stamp set -was stamped in the corner of the card front.  A white scalloped frame was added to the card front, then the purple circle and image were added, along with a bit of grass made with the Tall Grass Die were adhered to the card.  

Next up, a super cas card in which the darling fish does just fine standing on its own! 


Mr. Puffer is from the Fin-tastic Friends Stamp Set.  He was colored with Copics and fussy cut out.  
The background was done with an embossing folder and distress ink.  I used several techniques to get the background the color I wanted.  I started with some base color by sponging on various blue shades of distress inks.  Next I inked up the inside of the embossing folder, spritzed the folder and then placed the sponged cs in and ran it through the Big Shot.  I got wonderful, wavy dimension, but I still wanted more color so I watercolored with distress inks, following the curvy, embossed lines.  I love how this turned out.  The sentiment worked out so well in how it followed the curves of the 'waves'.  A few sequins were added and done! 
And because we are celebrating Jenn's art this week, all of Jenn's stamps are on special this week, 
buy 2 get 1 free (limited to stamps on hand).  


This is an awesome sale to take advantage of!  

Thanks for stopping by!  

Lee Ann  


Tuesday, August 23, 2016

Best Fishes

Hello Sweet Friends! Julie here showcasing the brand new Birthday Pals Stamp/Die Bundle along with the previously released BareTree Die Set and Tall Grass Die from Sweet ‘n Sassy Stamps.   

I love the new Birthday Pals ClearStamp Set- perfect for cards for kids of all ages!


To create this card, I stamped the balloon image as well as the first fish from the Birthday Pals Clear Stamp Set directly on white cardstock using archival black ink and the second fish onto acetate (then laid a piece of white cardstock onto the stamped acetate for the reverse image).

I die cut all of the images out with the coordinating Birthday Pals Dies (part of the Birthday Pals Stamp/Die bundle) and colored each of the fish with water-based markers adding the white dots on the fish and the reflection on the balloon with the Sharpie Extra Fine White Paint Pen.

I cut a circle out of designer paper (I saved the die cut panel for another project), mounted the circle to a piece of white cardstock, stamped the sentiment (curving it a bit) with archival black ink and added the Tall Grass Die cut from green cardstock and the Bare Tree Die cut from pink cardstock (to mimic coral).

I mounted this background panel onto a tangerine card base, added the stamped/die cut fish and balloon with dimensional foam and a few sequins to finish off the card.

I am looking forward to playing with more of the Birthday Pals images- they are so much fun!!


Have a blessed week and thanks for visiting- hugs, sweet friends!

Friday, June 24, 2016

Just Keep Swimming

Well, I am having some fun making shaker cards! I know I am slow to jump on the bandwagon, but I am on! This is my second attempt, and again, I have some naughty sequins and beads that want to stick to some adhesive I forgot to "erase." But I will never tell where! Only the recipient will know!

This one was made with Happy Ocean Friends and the Tall Grass Die. I colored them with Copic markers and then glued them to the background paper. Remember to get rid of ANY remaining dried glue (note to self!). I like how the ric rac looks like waves. The multi-colored Prima flowers fit in with the color scheme exactly. I forgot all about a sentiment, and was really hoping that I could stamp it cleanly after the entire card was put together.

Last night my sister (who is visiting from Arizona) and I went to see Finding Dory (AWESOME!), so I knew just what sentiment I would choose.

This is going to my daughter, who is almost done with Cosmetology School!


Saturday, October 18, 2014

Happy Birthday, deer.


Good afternoon!

Jessica here with a masculine card that I made using a couple of SNSS dies: Forest Silhouettes and tall grass.  The sentiment is from the Forest Silhouettes stamp set.  I die cut the grass out of vellum and then embossed it on the card front for added texture.


Hope this CAS card gives you an idea for a card for those guys in our lives who love hunting and nature!

Have a great weekend!
Jessica

Friday, September 5, 2014

One SWEET PERK and an Open House

Hello Sweet 'n Sassy friends!  Happy Friday!  I hope you have all been having a wonderful week!  This has been a very busy week at the Sweet 'n Sassy Studio!  The response to the Sweet Perks Club has been phenomenal and for that we are grateful.  
Thank you for your overwhelming support of this new venture!


BUT there is only one week left to take advantage of the September SWEET deals this club has to offer.  After Thursday, September 11th all of the bundles become available as single items at the regular price…just in time for the new release!    Here is a card that was created using dies from two of the new bundles…Forest Silhouettes and Leaf Silhouettes:


We are also very excited about our OPEN HOUSE this weekend.   
Tonight, from 6:00 - 9:00pm EST and again tomorrow, September 6th from 10:00 - 4:00pm EST, the Sweet 'n Sassy Studio will be opening it doors to YOU!  We will have light refreshments and a Make and Take table, so if you are in the area, please stop by to say hello!

Sweet 'n Sassy Studio
69 Ridge Drive
Mohrsville, PA 19541
(717)202-5496

One more thing before I go…Our new release will be revealed on the Sweet 'n Sassy Stamps Forum at Splitcoaststampers on Thursday evening, September 11th from 8:00 - 10:00pm EST.  Then, on Friday September 12th, we hope you will join us on the Sweet 'n Sassy Stamps Blog for our Release Blog Hop and Challenge!  Here's just a little sneak peek of what you can expect to see:


 Thanks so much for stopping by…have a blessed day and a wonderful weekend!  

Thursday, August 28, 2014

birthday fishes

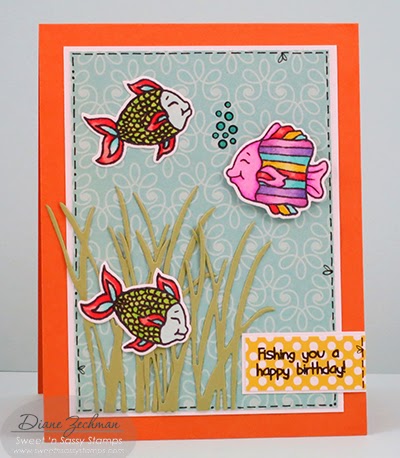
Have you checked out the new Sweet 'n Sassy die sets yet?  They make creating with their companion stamp sets fun and easy!  Here's a card using the Happy Ocean Friends stamp set and dies.  I also used the Tall Grass die.


The fish and bubbles also have some sparkle from a clear Wink of Stella brush.


You can see how nicely the dies cut these little fishies out.
 
These images aren't just for summer...you can "fish" someone a happy birthday all year 'round.  And now that the kids are starting to hit the books again, how about making a card to wish them a great "school" year?  I bet the teachers would appreciate one too.  ;)
 
Have a fabulous day!
♥ Diane
 

Monday, August 18, 2014

Fishing you a happy birthday!

Hello! It's Monika here today, bringing you a fun and playful card using one of the brand new die sets from our August release: Happy Ocean Friends Die set... along with the coordinating Happy Ocean Friends clear stamp set.


I started with splashing blue watercolor on the background. Then I attached a piece of torn gold glitter strip, and grass that I die-cut with the Tall Grass Die... I also added a sign with the greeting that's glued to a tooth pick:


Next, I stamped, colored, and die-cut some of the sweet images from the stamp set, and adhered them to the background piece... I also added a small piece of cheese cloths: 


Then, I die-cut a circle out of a light blue square and framed my scene:


Finally, I added some gold half pearls and done!


This sweet card is perfect for all three of our August Release Party Challenges on SplitCoast Stampers. Challenge #1: use at least 3 bright colors (orange, blue, green); Challenge #2: use water in some way (ocean scene and water color in the background); and Challenge #3: use 3 different textures (cheese cloths, tooth pick, glitter paper). There is still time to play along with us and WIN! 

I hope I have inspired you to make something today...

Thanks for stopping by,
Monika


Monday, August 4, 2014

Window on Fall

Hello Everyone!

I am back from Colorado, from visiting fellow team member, Ceal, and I am thinking cool weather!  After all, it was snowing on August 1st at the top of the mountain we were on!   Yes, real snow! 
Summer vacation is just about over as well.  [sigh].  With these things in mind, I created a fall scene, using a few Sweet 'n Sassy Stamps supplies. 


 I could use the Love Birds Stamp Set on just about every card.  I love the versatility of the branch.  For this card, I colored my branch and leaves with Copics.  Instead of using the matching die to cut out the image, I did some fussy cutting, as I wanted to cut off some of the leaves from the branches to allow them to rest on the window sill.  
I wanted the look of a cool fall day, but with the warmth of home.  Faux barn wood  was made using the direct to paper technique with various shades of red and white ink.  The 'boards' were cut to about 5/8" wide from this inked cs and then mounted to some brown cs. 
I added a window die cut to the barn boards and put a sweet kittie from the LOL Cats set sitting in the window.  The fussy cut branches and leaves were then adhered; a couple of the branches are popped up on dimensionals.  I love the new Tall Grass Die for embellishing and it works perfectly here as ornamental grass outside the window. 
The sentiment from the Happy Home Stamp Set further adds the warmth I was wanting on this card. 

Thanks so much for stopping by;  I hope I have inspired you to think 'fall'!  

Hugs!

Lee Ann  :)


Sunday, June 15, 2014

A Happy, Thankful Father's Day!

Good Morning Friends and Happy Father's Day!!  Jacquie here to share a "GUY" creation with you!  I always find it a challenge to create something for a man, don't you?  So, I am always glad to find those elements that are NOT gender specific!  AND?  Those elements are exactly what I used today!

No matter who your card is for, be it your Father or someone who has been just like a Father to you?  Being thankful is something I am sure you will want to express.  So, why not make a thank you card?  We are all thankful for the men in our life and today is a GREAT day to tell them!  Check out my take on a thankful, Father's Day card!


Hope you like my thank you creation!  Be sure to thank those men in your life today, no matter who they are!  Happy Father's Day!  Have a WONDERFUL day and thanks for stopping by!

CREATION ELEMENTS:


Wednesday, June 11, 2014

Sympathy...

Hello! It's Monika here today, bringing you couple of sympathy cards. 
Normally, I would use monotone colors and nothing too bright... but this time, I wanted to give bright colors a try and see how I liked the cards... 


The butterfly from Majestic Monarchs clear stamp set, was stamped with VersaMark and heat embossed with clear embossing powder on pink card stock. Then I sponged some dark pink ink on top. (On the second card, I used white embossing powder instead of clear.) The butterfly was then die cut with the coordinating Monarch die set.


To make the background for the first card, I heat embossed the Typewriter Text Background image with clear embossing powder. Then I rubbed green ink on my craft sheet, spritzed some water on it, and placed the card stock over it. (Dry it with a heat tool, or put it aside to dry...)


I finished the background by adding blue and pink strips to the left side, adhering part of the grass die-cut (Tall Grass die), rounding the corners, stamping the greeting on vellum (Sympathy Innies clear stamp set), then attaching the vellum strip to the card... and lastly attaching pink thread with a Sticky Dot. The butterfly was then adhered with dimensional tape.


The background for the second card was partially covered with embossing paste, before splashing pink glimmer mist over it...

Thank you for stopping by,
Monika