Showing posts with label Giovana. Show all posts

Sunday, September 7, 2014

You bring great joy to my life!

Hello friends! Giovana here today bringing you a pretty card using one of the bundles from the new Sweet Perks Club (available until September 11th). For this project I used "Flowers in Bloom" bundle (stamps + die).

I colored the image with Spectrum Noir Markers, then die-cut it with the coordinated die. I sprayed a piece of white cardstock with Taxi and Green Mr.s Huey's mists, then added the die-cut flower with foam adhesive. Stamped the sentiment on a banner, then added it to panel with foam adhesive as well. I added a border frame and the the card was done!!


Hope you like it!

Here is today's Sneak Peek from our upcoming release on Friday:


Have a fantastic day!

Monday, July 28, 2014

Winter is...

Hello friends! Giovana here sharing a winter card with you. I got inspired by the last challenge "Winter". I used the "Winter Silhouettes" set, stamped the image and sentiment on a piece of light brown cardstock in Versamark Watermark ink, then added white embossing powder and heated set.
After that I added a strip of red cardstock on top, tie on copper twine and added gold sequins. Super easy!!


Hope you like it. Don't forget our new challenge"Winter", you can upload your projects HERE.

Have a great day!
Giovana

Saturday, May 17, 2014

Thank you for everything

Hello friends!! Hope you are having a fantastic day. Today, I have a Clean and Simple card for you, it took me only 13 minutes!! Pretty good, right? I used Thankful Blossoms Set and Thankful Blossom Dies, and Typewriter Text Background set.

Here are the details:

  • Cut a card base from Pink Cardstock. A2 size.
  • Cut a piece of Watercolor paper 3.5" x 4.75", mist it with Taxi and Estate Green colors. Set aside to dry.
  • Stamp blossom in red ink and leaves in green ink. Die-cut pieces with coordinated dies.
  • After watercolor paper is dried, stamp Typewriter Text background in Vintage Photo Distress ink.
  • Stamp sentiment in Jet Black Archival Ink,
  • Adhere the blossom and leaves to panel with foam adhesive. Die-cut a large scallop border and adhere it behind panel.
  • Add red sequins.
  • Add panel to card base with foam adhesive.

Hope you like it!
Have a wonderful day.

Tuesday, April 29, 2014

Wishing you a lovely day.

Hello friends, Giovana here today with a "Clean and Simple" card using Sunshine & Flowers Set. For this project I die-cut 3 little labels from White cardstock and stamped the flower in different spots. Colored the flowers with Spectrum Noir Markers: CR4, CR5, CR6 and GB6, then stamped the sentiment in Coffee Archival Ink, added the little labels to white panel with dimensionals, added a strip of Patterned Paper.
After the card as finished, I covered the petals with Stickles and the centers of flowers with Crystal Lacquers.


Hope you like it!
Have a great day.

Wednesday, April 16, 2014

Wishing you

Hello friends! Giovana here today with a very clean and simple card for you. For this project I used Sunshine & Flower Clear Set, just released. I used the little flower from this set and stamped it all over the bottom edge, then cut around the edges and added a piece of Strawberry Blush cardstock to create a fun border. I die-cut a stitched label from Bookmark & More Dies set and stamped the sentiment in Coffee Archival Ink.
The flowers were colored with Spectrum Noir Markers, also added Crystal Lacquer and clear glitter to all the flower centers, added red ribbon and the card was done :)


Hope you like it!
Have a fantastic day!

Tuesday, February 25, 2014

Welcome Little One


Hello friends! Giovana here today. I want to share with you a cute and sweet card, I love making baby projects and this card is not the exception :)
I used Delightful Doilies (on sale this week!! only $20.80) to create the background, I stamped the doilies on White cardstock in Versamark Ink, then added White embossing powder and heat set, then used soft inks to sponge it.
I matted with a piece of pink cardstock and added zig-zag stitches, added ribbon, button and twine. Added the panel to a white card base, then I stamped the sentiment from Vintage Baby set on a stitched label in Memento Luxe Teal Zeal ink. 
 

Hope you like it!
Have a great day!
 
**********************************************

Remember you still have time to participate in our weekly challenge, you can find the details HERE

Wednesday, February 5, 2014

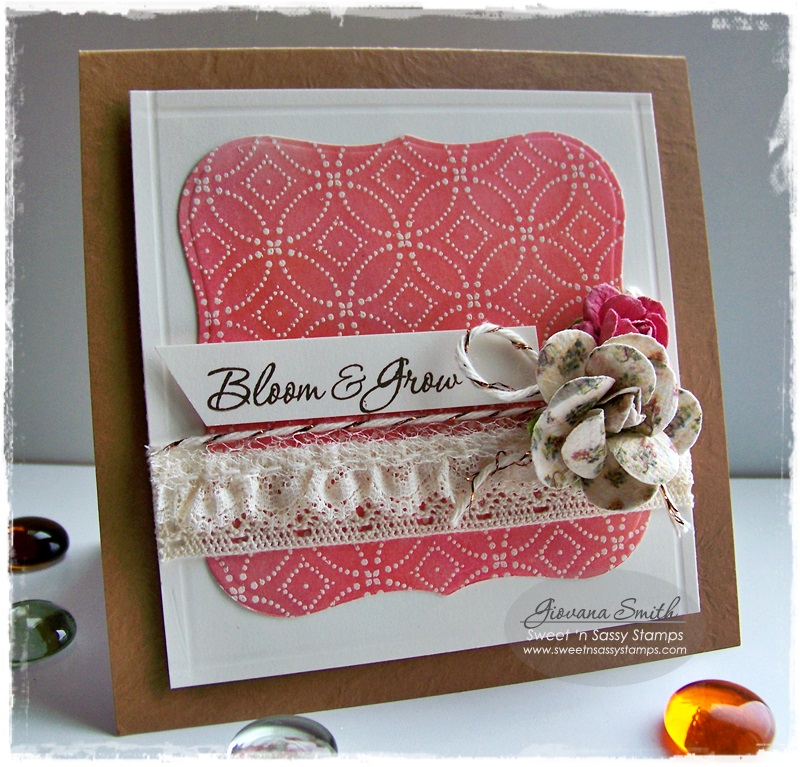
Bloom and Grow

Hello Sweet 'n Sassy friends!! Today, I want to share a card using brand new sets (not available just yet), but no fear, they will be in the store on Friday!! I know you all want to see the new release, so this card is just a little taste of you will be seeing later!

The background stamp is one of my favorites! I used 4 different Distress Inks ( Spun Sugar, Victorian Velvet, Tattered Rose and Barn Door) then I die-cut the image, added 2 different kinds of lace and paper flowers, twine. Then I stamped the sentiment in Coffee Archival ink.
This is a 4.75" x 4.75" card.


Hope you like it!!

And don't forget to play along in our Friday Feature Challenge.  You have two more days to play a long for a chance to win!  

Thursday, January 23, 2014

Happy Valentine's Day!

Hello friends! Giovana here today with a very cute Valentine card using "Valentine Critters" set! Anytime I look at this set,  I smile :)

This card is super simple, yet cute! I stamped the elephant image on a piece of White Cardstock and colored it with Spectrum Noir Markers: DGR1,3,6; GG1,2,3,5; BGR1,2,3; FS5. Then I stamped the sentiment in Jet Black Archival ink and added a piece of chevron patterned paper, added zig-zag stitches. Die-cut a tiny heart and added it with dimensionals. Finally I added Crystal lacquer to the heart balloons and sprinkle clear glitter. After that was dried, I added the panel to a red card base.


Hope you like it!
Have a fantastic day!

Saturday, January 4, 2014

So good to hear from you

Hello friends! Hope you all are having a fantastic day, today I have a very "Clean and Simple" card for you, but really means a lot to me! Why, you may ask? Well, you may know I am from Peru and my whole family lives over there, I do Skype a lot with them, but yesterday I had the chance to see family members I haven't seen in more than 30 years!!!

Anyway, this cute and old fashioned phone is from the Keep in Touch Stamp set and coordinated dies., stamped in Coffee Archival Ink, the sentiment was stamped in memento Love Letter ink, added few mini red rhinestones and voila!!


Hope you like it!
Have a fantastic day!

Saturday, December 21, 2013

Happy Snow Day!


Check out the cute Winter Stamp sets HERE.


Hello friends! Giovana here today, bringing you a Winter-y card. Today, winter starts officially, although in this part of the country, we have had -15F already, which I consider pretty cold and winter weather. My daughter is anxiously waiting for snow and her wishes may come true today!! We are expecting some snow and hopefully this will make her very happy. So, to celebrate the occasion, hehehe, I made a snow-y card and I hope you like it.

For this project I used Snowy Hello Set, stamped the image on white cardstock in Memento Tuxedo Black and colored it with Markers, then I die-cut, embossed and stenciled it. I die-cut a bigger piece in Light blue cardstock and did some dry embossing. The sentiment was stamped in Jet Black Archival. I die-cut Small Snowflake dies in Gold cardstock and added to the card. I added some crushed glass to the image to create snow. I added red ribbon and a bow.


Hope you like it!
Have a fantastic day!

Tuesday, December 3, 2013

Art

Hello friends! Today I have a Clean and Simple card for you using one of the new sets from our December Release! This set is called Grunge Elements and has fun images and great sentiments. Just to give you a hint, everything you see here on my card comes from the set!!


I just used different ink colors and VOILA!! my card was done!
Don't forget, this set will be available this weekend.

Hope you like it!
Giovana

Monday, November 18, 2013

Happy Snowy Day!

Hello friends! Giovana here today bringing you a Mixed Media Canvas project.

For this project I used Small and Large Snowflake dies, the sentiment is from Snowy Hello Set.

I started with a 6"x8" canvas, die-cut the snowflakes using chipboard (you can use thick cardstock or glue together a couple of pieces of cardstock ). Applied a coat of Mod Podge to my canvas and adhered the snowflakes, then I crumbled a piece of aluminum foil and adhered it on top of snowflakes, then with the help of a little stylus go around the edges of the snowflakes to shape the details of the images. Then I covered the piece with blue, brown, gold and red acrylic paints, then I took a piece of paper towel and removed most of the paint, you could keep the paint until it dries, or remove some spots as I did. After that got dried completely, I added gold paint, super fun!!

I removed most of the paint from the snowflakes to keep a contrast with the background, then added a little pearl on every snowflake center.

For the sentiment, first I die-cut the stitched label from chipboard, then I covered it with gesso and stamped the sentiment in Jet Black Archival, I added a couple of white die-cut snowflakes and ivory hemp.


Hope you like it and get inspired to use your die-cuts in a different way.
Giovana

Tuesday, October 29, 2013

Merry Christmas

Hello friends, Giovana here today bringing you a CAS Mixed Media card. recently got a new stencil and I thought this would be a perfect match with "Born this Day" set.
This card is super simple. The background was created by mixing embossing paste and Ferro Amber Gold paint, positioned the stencil on you piece of cardstock and added the mixture, set aside to dry, after that I sponged it with Mustard Seed distress ink.
I die-cut a manger from White cardstock, then stamped the image in memento Tuxedo Black and colored it with Copic Markers. I added Star Dust Stickles to the hay part.


Products used:
Hope you like it!
Have a fantastic day!

Thursday, October 17, 2013

Sunflowers

Hello friends! Today, I want to show you a card I made using the sunflower and sentiment from "Prim Blessings Set" and  one of  the "Decorative Plaques Dies" and coordinated "Decorative Frames".
I started with a piece of Ivory cardstock for my card base. I matted a piece of Kraft cardstock and Patterned paper from Bo Bunny "Forever Fall" Collection, distressed and ink all edges and added stitches. Die-cut a frame from Ivory Cardstock and stamped the coordinated border in Memento Tangelo Ink. Stamped the sunflower on Watercolor paper in Jet Black Archival Ink, colored it with Inktense Pencils, then added Crystal Lacquer to the center and sprinkle clear glitter. Added it to the frame with dimensionals. Stamped the sentiment on a piece of Ivory cardstock in Coffee Archival ink and cut it out, added twine and tied it to the frame.
Finally added pearls to opposite corners.

I used the sketch from "The Sweet Stop", you still have time to play along  too :)


Hope you like it!
Have a great day!
Giovana

Thursday, September 26, 2013

Square cards

Hello everyone! I have 2 cards to show you today. Let start with this 5" square Christmas card. Here I used Poinsettia Set and matching die. I had a lot of fun creating the background for this card, actually I made a whole page and just cut a piece for this card, so I have a lot more left to use :) First, I sprayed the watercolor page, then added Gelatos in Banana, Acqua Dolce and Blood Orange, mixed them all, then I used Mister Hueys's Sunset and Estate Green. After that I combined Embossing Paste and Amber Gold Paint and added it to the page using a chicken wire template, then let it dry (it takes few hours). Then I die-cut and piece of Watercolor paper using the Poinsettia die, stamped the Poinsettia image and color the image with Inktense Pencils.
I die-cut a border and label in White, stamped the sentiment in Olive Archival and cut half of the label.
Put all pieces together, add crystal lacquer to poinsettia and sprinkle glitter, then add crystal lacquer to the leaves, finally I added a couple of pearls.


Second card, it is super cute and simple. I used the remaining of the red cardstock, and I made a cute 3.5" square card. Die-cut and stamp wreath in Versamark Ink, add gold embossing powder and heat set. Stamp sentiment in Golden Glitz Delicata. Add a couple of pearls and your mini card is done!!


Hope you like them!
Have a fantastic day

Wednesday, July 10, 2013

You're precious to me

Hello friends!! Giovana here bringing you a sneak peek of one of the brand new stamps from our July release!! This set "Delightful Doilies" was designed by our very talented Dina and I just love all the images and sentiments from it.

For my card I used Metallic paints and color the yellow cardstock, then stamped the doilies in Versamark ink and added White embossing powder and heat set, cut out all the little doilies, added to a white square piece. Stamped the sentiment in Coffee Archival ink.
The chevron BG is a SU embossing folder, to finish the card I added pearls :)


Don't forget our release party tomorrow over at our SCS forum!!
Hope you like it!!
Have a fantastic day!

Monday, June 24, 2013

Happy Birthday!

Hello! Hope you all are having a great Monday! I have a very CAS birthday card for you today using the new number dies and a sentiment from Flower Block 2.
I started die-cutting the number from Metallic Blue Cardstock (x3), then I glued them together to make them thicker.
For my card base I sprayed the front with Taxi and Espresso Green Mists from Studio Calico, added a strip of chevron washi tape, stamped the sentiment in Olive Archival Ink. Finally added the numbers and green and blue sequins.

A very fun and easy card to make!
Hope you like it!
Giovana

Thursday, June 6, 2013

Happy Birthday!

Hello! Giovana here with today's post. Few days ago my daughter had a Tea Birthday Party, of course I made the card and what better stamp set to use than Special Blend Set.
I stamped the image on Watercolor Paper in Jet Black Archival and colored it with Inktense Pencils, then added tiny pearls and Stickles, of course I added stitches :)


Hope you like it!!
Have  a great day!!

Thursday, April 18, 2013

Happy Mother's Day

Hello!! Giovana here today bringing you a Mother's Day card. A friend of mine asked me if I could make a card for her mom and I said sure!! Asking for little details I got she likes orange and butterflies, so I used them both.

Directions:
  • Make card base from Ivory Cardstock. A2 size.
  • Mat a piece of Orange CS (5" x 3.75")  and Patterned Paper. Add stitches.
  • Add ribbon around.
  • Die-cut a Decorative Plaque from Ivory Cardstock. Stamp sentiment in Jet Black Archival and toppers in  Memento Tangelo. Add piece to card panel with Dimensionals.
  • Die-cut butterflies from Vellum, stamp butterflies in Memento Tangelo. Glue vellum butterflies (I used my heat glue gun) and add them to card. Add small pearls to butterflies.
  • Add medium pearls to corners.
  • Add panel to card base with large Pop dot.

Sweet 'n Sassy Products:
  1. Precious Poppies (Sentiment)
  2. Decorative Frame Toppers
  3. Decorative Plaque Dies
  4. New Beginnings
  5. New Beginnings Butterfly Die

Hope you like it!!
Have a great day!

Wednesday, March 27, 2013

Happy Birthday!

Hello! Giovana here bringing you a Birthday card and a little peek of what's coming next month!!

I created this birthday card using Special Blend Set, I stamped the image twice, color the main image and the flower and wing form second one, cut them out and adhered them to main image, added few drops of White Opal Liquid Pearls and Star Dust Stickles.
The image was colored with Spectrum Noir markers, the ribbon is from my stash.


I also decorated the inside, here is a little peek of what's coming next month!!


Hope you like it!!
Have a great day!