Showing posts with label Poinsettia. Show all posts

Sunday, November 29, 2015

Christmas Poinsettia

  My creation today is using the beautiful Poinsettia stamp set. After my bloom was colored I cut around the edges so that I could pop it on my stitched panel. If you don't like to cut around the delicate petals, you are in luck with the matching Poinsettia Die. The sentiment is stamped on vellum and a notched end added for fun. 


The main panel is layered over a snowflakes designer paper and adhered to the base. A few scattered pearls  around the card and center of the bloom with some sparkles added. Voila! Thanks for joining me and have a wonderful week! 

Check out the sale on the Poinsettia stamp set and matching die in the SNSS Store today. 

Friday, November 20, 2015

Delightful Poinsettia

Hello sweet friends! Cathy here with some fun things to share with you, the first being
our Birthday Celebration Special for this week…
25% off all dies
From now until Thursday, November 26th!
Use code BDAYDIES25 during checkout and enjoy this fabulous sale!

 There are a little less than two weeks left of our birthday party celebration!  I hope you've been enjoying all the Throwback Features, prizes, and specials we've been having throughout the month of November.  Today's Throwback Feature is Delightfully Delicate Background, but before I get to that, it's my turn to share a little about myself and my stamping journey.

I'm also known as Cathymac on my blog and on Splitcoaststampers.  I live with my husband, Mike, and our current Golden Retriever, Kody, in southern Lancaster County in Pennsylvania.  My favorite vacation spot is the beach.  When not stamping, I enjoy reading, taking walks with Kody, helping others, and I'm very involved with several ministries at my church, one of which is teaching the little ones.  I enjoy making cards for friends, family, and for the Encouragement Ministry at my church.

I was introduced to stamping over twenty-five years ago while still teaching elementary school.  Like many, I got my start as a Stampin' Up! Demonstrator. I've been a fan of Sweet 'n Sassy Stamps ever since I met Korin about six years ago.  I love the variety of styles and the emphasis on scripture in the Sweet 'n Sassy line of stamps.  After being a guest designer for a month, I was asked to join the design team and I've been here ever since.  Now that I'm retired (after teaching for 35 years), I enjoy going along to the Paper Craft shows, helping with "Make and Takes," and teaching a few classes.  Korin was the first person to encourage me by giving me the opportunity to be on her design team and by investing in me as a stamper.  I have learned a great deal about the stamping industry through her.  I admire her creativity and count it a blessing to be her friend along with the other members of this talented and caring design team.  

I don't think I can pick out just one favorite Sweet 'n Sassy stamp set, but Landscape Silhouettes would certainly be at the top of the list.  Here are a few cards made with this stamp set:


My advise for a new stamper would be to join a stamping group or browse some of the many card galleries such as Splitcoaststampers or on Pinterest to get ideas.  Playing along with some of the challenges out there is a good way to learn new tips and techniques.  If possible, take some classes at a local stamp store or on line and don't be afraid to try new things.

Now on to the Throwback Feature for today...


After white embossing the Delightfully Delicate Background, Evergreen Bough, Pine Needles, and Worn Lipstick Distress inks were sponged over the embossing.  The Poinsettia was stamped twice, sponged, and cut to be popped up and layered onto the card.  The Delightfully Delicate Background was lightly stamped on the top layer of the Poinsettia with Worn Lipstick ink. The sentiment from Christmas Innies was stamped in the bottom corner.  Prills and a silk bow were added to finish the card.  The Delightfully Delicate Background is perfect for adding just the right bit of texture to your stamping project.


 Thanks so much for stopping by…have a wonderful weekend and enjoy our 25% off sale on dies!

{{{Hugs}}}
Cathy

Monday, March 24, 2014

Joyful Greetings...

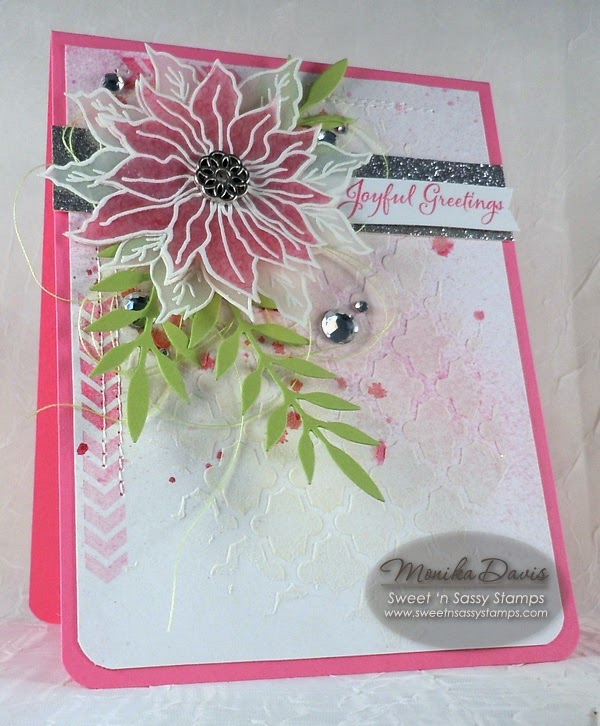
Hello! It's Monika here today, bringing you a Christmas card... I know, I know... you are all ready for Spring! I am ready too, but Mother Nature thinks otherwise, and we still have snow on the ground and another snow storm on its way! So might as well be Christmas... and on that note, have you seen the ON SALE promotion? There's a pretty SWEET deal going on on some of the products. Perfect time to do some shopping! Just call it Christmas in March!

Back to my card... I wanted to make more Christmas cards this year, and my plan was to make one every week... well, I am way behind, but today I can add one more to my slowly growing stash! 


There's so much going on my card, so I wanted to break it down for you and show you what I did:


First I used Embossing (Modeling) Paste and a stencil, and added some pretty pattern (and texture) to my white card stock, then I misted it with pink glimmer mist. (Note: while the paste dries very fast, you might want to set the card aside, or dry it with a heat tool.)


Next I stamped the arrow lines from the new Pick Me Up clear stamp set, stitched some lines, and adhered a strip of silver glitter paper.


Then... I added green thread to my card. I love that subtle look it gives to your project. I used a sticky dot, and adhered the thread. I like to do it in a figure 8 pattern. (Note: I made sure the loops were big enough so they would show from underneath the poinsettia image.)


My poinsettia flower (Poinsettia clear stamp set) is stamped on vellum with VersaMark ink and heat embossed with white embossing powder. (Note: I usually stamp and heat emboss a bunch and cut them out while watching TV). To add color to the flower, I used a Copic marker on the back side of the smaller flower. The greeting is from Christmas Tags clear stamp set (on sale and will be gone... so pick it up now!).
To further embellish my card, I die-cut some leaves and added some blings... the bottom corners were punch with a corner punch.
The sketch came from Cardabilities Sketch #95.

Hope I inspired you to make something pretty today! Whether it's a Christmas card or a Spring card, create something for FUN!
Thanks for stopping by,
Monika

Sunday, December 22, 2013

Merry Christmas!

http://www.sweetnsassystamps.com/categories/Clear-Stamps/Christian/

****************************************************************************


Good morning!

Jessica here this morning stopping by to share several Christmas/Winter themed cards with you.  With all the things going on this week leading up to Christmas, I was unable to finish the card I had started and was planning on sharing with you today so I decided to look through my files to find some of my past favorites to show you today.

My first one uses the adorable Cozy Friends - I forgot how much I love those wintery animals in the circles!


My second card uses another one of my favorite Teddy Bears - sweet Rhubarb from Rhubarb's Christmas stamp set. I made this card a few years ago for my father-in-law whose birthday is on Christmas day.


My next card uses the lovely Vintage Ornaments with their coordinating dies.  This one shouts 'Nordic Christmas' to me and my Norwegian heritage!  Love the blue ornaments and woodgrain patterned paper together!


And, last but not least - this one with the GORGEOUS Poinsettia stamp set with coordinating die.  LOVE the traditional Christmas colors on this one and that paper pieced/colored flower was so fun to make.  I may be allergic to poinsettias in real life, the stamped version gives me only joy! 

I hope you have a very blessed Christmas season with your family and are able to spend some quality time with your loved one's celebrating our Savior's birth!
Jessica


Monday, November 25, 2013

Season's Greeting

Hello! It's Monika here today, bringing you a Holiday card.

I am in full Christmas mode now and trying to come up with interesting designs using the wonderful new stamp and die sets that were released this month.
Today I used Tender Thoughts and Spectacular Snowflakes clear stamp sets, and the coordinating Birch Forrest Die and Spectacular Snowflakes Die sets.

The snowflake was stamped and heat embossed on Vellum, then die-cut with the matching die. It was the perfect embellishment to my card along with the wood veneer tree and pearls. The background was splattered with white watercolor after I stamped the trees.


The greeting came from Poinsettia clear stamp set.

Thanks for stopping by,
Monika

Thursday, October 31, 2013

Christmas Starburst


Hi there, it's Ceal here to share with you today.
I know it's Halloween but not being much of a Halloween person I decided to share a Christmas card. It seems that Halloween has become the start of the Christmas season anyways. I am already seeing the Christmas commercials and all the Christmas decorations in the stores can put someone in the Christmas spirit.
For my card I stamped the Poinsettia and cut it out with the Matching Die and then colored it up with my copics. The sentiment is from another set Christmas Sentiments

I used a technique called Starburst where you just take strips of design paper and cut them at an angle and arrange them on your front to give a star burst appearance.


Happy Halloween


Thursday, September 26, 2013

Square cards

Hello everyone! I have 2 cards to show you today. Let start with this 5" square Christmas card. Here I used Poinsettia Set and matching die. I had a lot of fun creating the background for this card, actually I made a whole page and just cut a piece for this card, so I have a lot more left to use :) First, I sprayed the watercolor page, then added Gelatos in Banana, Acqua Dolce and Blood Orange, mixed them all, then I used Mister Hueys's Sunset and Estate Green. After that I combined Embossing Paste and Amber Gold Paint and added it to the page using a chicken wire template, then let it dry (it takes few hours). Then I die-cut and piece of Watercolor paper using the Poinsettia die, stamped the Poinsettia image and color the image with Inktense Pencils.
I die-cut a border and label in White, stamped the sentiment in Olive Archival and cut half of the label.
Put all pieces together, add crystal lacquer to poinsettia and sprinkle glitter, then add crystal lacquer to the leaves, finally I added a couple of pearls.


Second card, it is super cute and simple. I used the remaining of the red cardstock, and I made a cute 3.5" square card. Die-cut and stamp wreath in Versamark Ink, add gold embossing powder and heat set. Stamp sentiment in Golden Glitz Delicata. Add a couple of pearls and your mini card is done!!


Hope you like them!
Have a fantastic day

Wednesday, July 31, 2013

Hello Wednesday!! and 2 cards for you

Hello friends!! Hope you are having a fantastic Wednesday. Today, I have 2 cards for you!!

We start this this new set "Delightful Doilies" by Dina Kowal, super duper cool, don't you agree? For this card I used my new Memento Luxe Inks, They are pretty cool

Instructions:
  • Stamp doilies on White Cardstock in Memento Luxe Wedding Drees Ink. Add Clear embossing powder and heat set.
  • Sponge around image with Memento Luxe Teal Zeal Ink. Mat this piece with a slightly bigger piece of Red cardstock.
  • Die-cut a Doily border in Ivory cardstock. Adhere it to panel.
  • Add Red Ribbon.
  • Die-cut a banner and stamp sentiment in Teal Zeal (I didn't add clear embossing powder, let it dry for a minute, it dries pretty fast). Add banner to card.
  • Adhere panel to front of card. A2 size.
  • Add red pearls.

=====================================

Second card: Since I am still in Christmas mood, I want to share a card I made using the new Poinsettia die that coordinates with Poinsettia set.

Instructions:
  • Make card base from Ivory Cardstock. 5" square.
  • Cut a piece of Patterned Paper, distress all edges, add a piece of red and ivory cardstock and add zig zag stitches. Adhere panel to card base.
  • Die-cut a poinsettia from White Cardstock, stamp image and color it with Markers.
  • Add burlap behind image and adhere it to card.
  • Stamp sentiment on a piece of Patterned Paper, die-cut and add it to card with dimensionals.
  • Add pearls to corner.
  • Add Gold Gala Glitz to center of Poinsettia.

Hope you like my projects!!
Have a great day!

PS: Sweet 'n Sassy now has a Facebook Closed Group, where we share our love for Sweet 'n Sassy, you can request to join the group. BTW, we have a challenge going on, 1 of these cards fits the challenge, prizes included!!

Sunday, December 30, 2012

Vintage Poinsettia

Hi there and thanks for stopping by I hope you had a very Merry Christmas. Even tho Christmas is over,  I wanted to share another Christmas card because I love making Christmas cards. This Vintage Post card set is a favorite. You can use it with so many sets. The other set I used it with is Poinsettia. I love the vintage look to this one

Sunday, December 9, 2012

Merry Christmas Poinsettia ~

Good morning everyone! Mary here with a Christmas card. This poinsettia takes it all, in my opinion! I love the ease in which we can colour this and cutting it out by hand was quick. The flower is coloured using copic markers and paired with MME paper. The fish tail banners are hand cut.

As we prepare for the Christmas Season, let us always remember the divine love birthed on our behalf. I love the variety of Christmas stamps SNSS has in the store. Check them out for your gift giving and gift creating. Have fun!

Mary Faus

Supplies used: 
Stamp: poinsettia
Inks: Copics, memento ink, versafine black
Paper: MME, SU
Accessories: pearls, rhinestones, dimensionals

Saturday, December 8, 2012

Snowflake Flourish Gift Tag Box...

Hello! It's Monika here today, bringing you a sweet little box full of gift tags. After the Great Gifts Blog Hop, I was inspired to make a Gift Tag Box. The template came from Technique Junkies Newsletter: Great Gifts CD.


The box was really easy to make. I only used one 8-1/2" x 11" card stock to make the box itself. I did use my own measurements, but followed the fabulous tutorial from the CD.
I used Snowflake Flourish, Vintage Postcard, and Poinsettia clear stamp sets.


 I kept most of the tags fairly simple. They are 3" x 2".
To embellish the box and the tags, I used Spellbinders snowflake dies and Martha Stewart snowflake punch... along with Baker's Twine, Rhinestones, and Cheese cloth...

The sketch for the box came from The Sweet Stop, SSS188. Come and play along with us!

Thanks for stopping by,
Monika

Saturday, November 24, 2012

Poinsettia Greetings...

Hello! It's Monika here with a lovely holiday card. I am in love with Poinsettia clear stamp set.


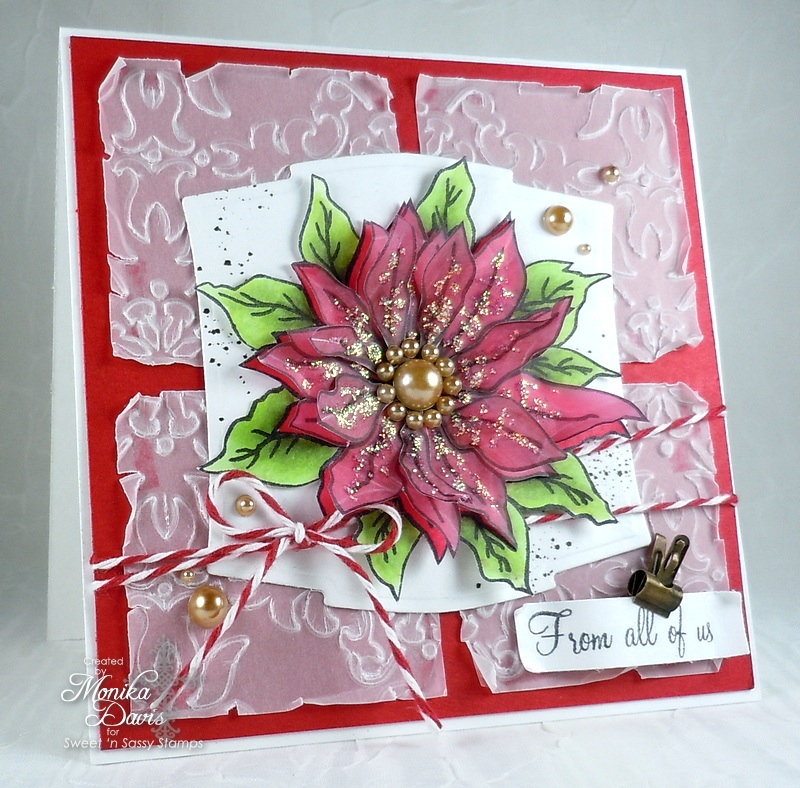
I just love stamping the flower image on different mediums and see how it turns out. I also love using layers to give dimension to my flower.
This time, I used White card stock and Vellum paper to build my flower layers. The images are colored with Copic Markers. The vellum pieces were colored on the back.


 ...and this is how it looks after I added gold pearls and Stickles to the flower. I also roughed up the petals by scrunching them a bit.

The background was made using dry embossed vellum and red card stock.
The sketch came from The Sweet Stop, SSS186. Hope you swing by and play along with us!

Don't forget our Birthday Sale Special: right now all in stock Christmas clear stamp sets are on SALE!

Thanks for stopping by,
Monika

Saturday, October 20, 2012

Pretty Poinsettias

Happy Saturday to you all!  I hope you've had a wonderful week.  My card sample for today uses the newly released clear stamp set Poinsettias.  When I was very young, I would sit for hours with my crayons and coloring books...I still love coloring to this day.  I decided to get out those crayons again and play!


The background was made by melting red, pink, and white crayons on a hot iron and swiping the iron across a piece of glossy card stock.  The postcard sentiment from the Vintage Postcard set was stamped in Archival Ink and the whole panel embossed with a Tim Holtz embossing folder.  After stamping the poinsettias several times, a white crayon was used to add highlights to each of the petals.  Distress inks were then sponged over the leaves and petals.  The wax of the crayon resisted the inks leaving white highlights.  Some of the poinsettias were cut out and popped up giving the card dimension.  The layout used for my card was the sketch challenge this week over at Splitcoaststampers.  Hope you like my card and feel encouraged to take out those crayons and have some fun!

Thanks so much for stopping by...have a blessed day!

Hugs,
Cathymac

Friday, October 12, 2012

Poinsettia Season's Greetings

Hello! It's Monika here today, bringing you a Christmas card. I hope you hopped with us yesterday during our Release and Virtual Stamp Day. I had so much fun seeing all the holiday cards, that I just had to make another one.

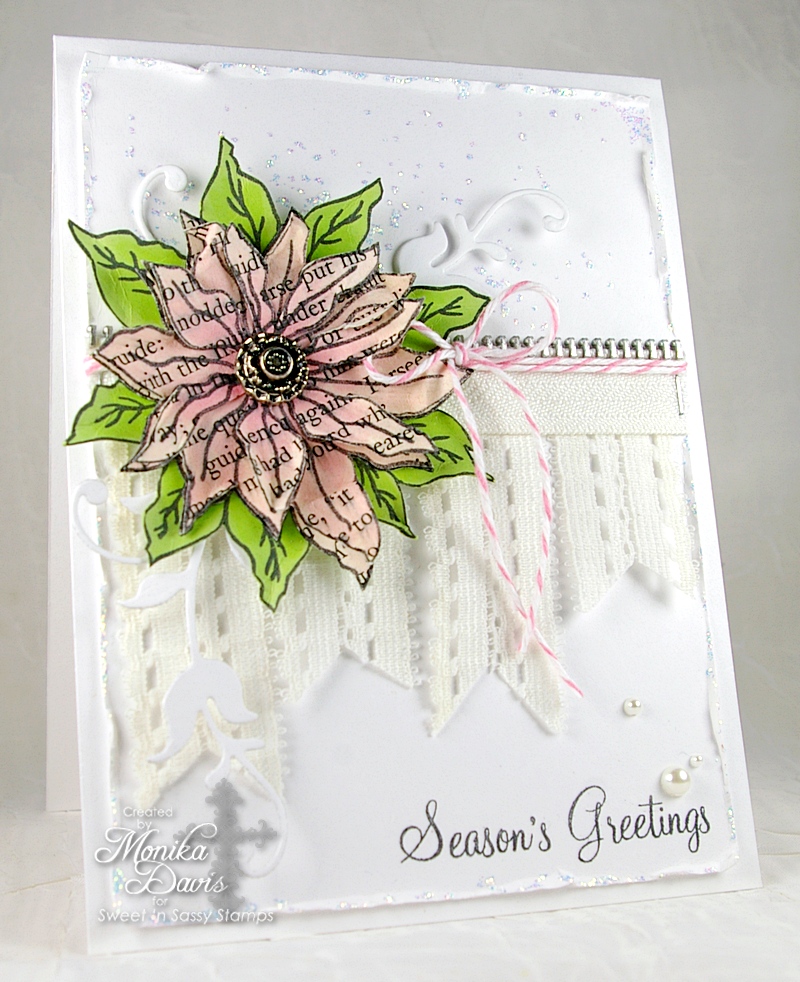
I decided to use Poinsettia clear stamp set. (The flower is also available in digital format!). I haven't been up to coloring lately, so I wanted to do something that didn't require a lot of precise coloring. I love to add stamped dimensional images/embellishments to my cards, so that is what I did...


I stamped the flower image on green card stock (1 time) and book pages (3 times) with Tuxedo Black Memento ink. Then I cut them out, and added a light layer of pink with Copic Markers. The letters did smear a tiny bit, but it just added to the worn look of the flower.


The cutting wasn't too hard, plus I love doing it. So while I was watching my favorite show, I cut the layers out. I added some Stickles to the card. One of the challenges from our Virtual Stamp Day is to make your card sparkle (SNSSOCT12RP4) so I think this will work.

(The inspiration for my card came from HERE and HERE.)

The challenges (see HERE) are open until Monday, so make sure you stop by and play along with us!

You might have seen this card on SplitcoastStampers couple of days ago:


...again, I didn't want to color, so I stamped the flower image on colored card stock and cut the layers out.
There are so many different materials you could use... vellum, fabric... hope you will give it a try today! 

Happy Stamping!
Monika