Showing posts with label Winter. Show all posts

Monday, November 14, 2022

Blizzard of Hugs

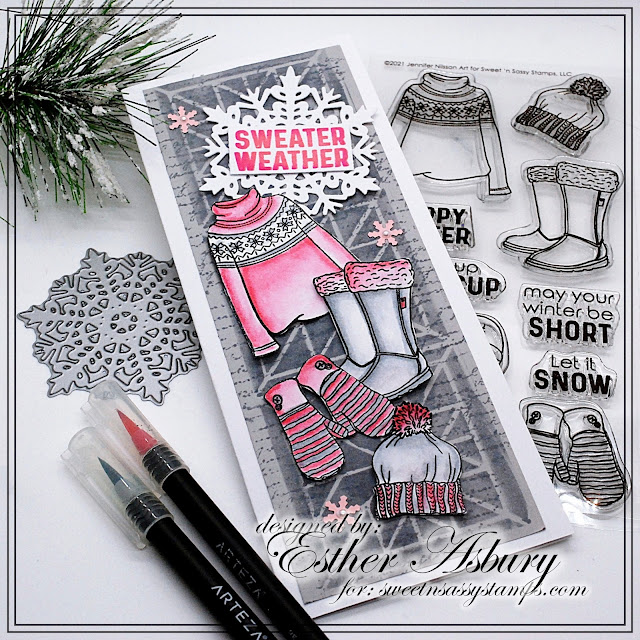
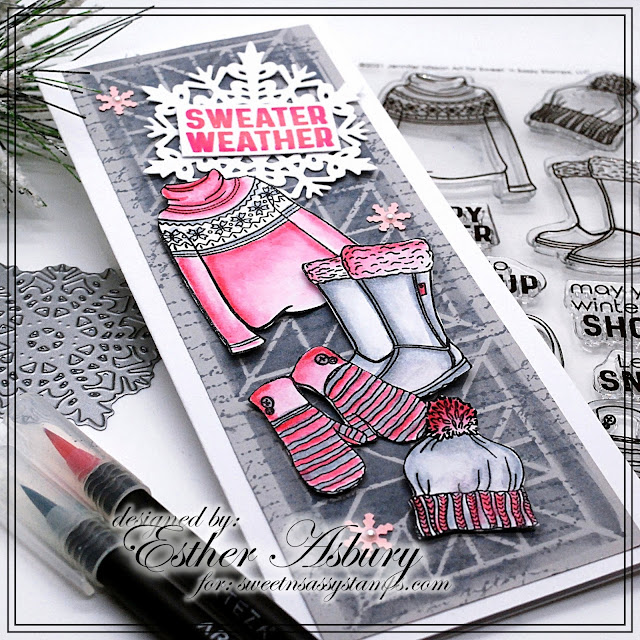
 Hello crafting friends, Esther here today sharing fun winter card that features the sweet Winter Hugs stamp set that now has coordinating dies

I had so much fun creating that night sky by blending three shades of distress ink on mixed media paper. I started by swiping three strips of the lightest ink (cracked pistachio) in the center of my paper and adding the next darkest color (peacock feathers) around the strips and over the rest of the card front. To finish off I added the darkest ink (prize ribbon) just around the edges, coming up a little deeper on the bottom to make it look like ice. 

This card was simple enough to make that a couple of my Sunday School girls (10 and 6) created their own versions during a recent card making afternoon I had with their mom. 

~~~This post contains affiliate links at no extra cost to you~~~

Supplies and Tools:

Monday, January 10, 2022

Sweater Weather


Esther here today sharing this fun winter card. I don't usually do slim line cards, but I wanted a little more space so I could include more the winter wear from this super cute set. 

To create my card I stenciled the background using  Weathered Wood Distress Ink from Ranger and the NEW Quilt Stencil. I then stamped the Script Background over top in the same color of ink. 

The images  from Sweater Weather were stamped in Versafine Clair Nocturne Ink  on mix media paper and colored with Arteza Real Brush Pens. 

After die cutting a snowflake from the Large Snowflake Die Set I added a sentiment stamped in worn lipstick and picked raspberry distress ink.  The last step was adding a few tiny  white pearls to my little pink snowflakes.

     ~~~This post contains affiliate links at no extra cost to you~~~

Monday, July 26, 2021

Holiday Blessings


Hello friend. Today is the final day for Sweet n Sassy Stamp's "Christmas in July" SALE! All winter and Christmas themed stamps are 25% off through midnight tonight! 


For my card today I used the super cute Happy Camper stamp and die set to create a fun little winter scene.  I highly recommend purchasing the coordinating dies as they are a real time-saver in cutting out all those little pieces!

Check out the Christmas themed stamps here

Check out the Winter themed stamps here

 ~~~This post contains affiliate links at no extra cost to you~~~

Supplies and tools:


Monday, November 30, 2020

You Melt My Heart


Hello Sweet 'n Sassy Stampers! 
It's Ceal here to share a couple cards with you today.  I hope you all had a blessed Thanksgiving holiday even though I am sure it was a lot different than normal. 
It's officially the Christmas season and I am working on putting trees up and making Christmas cards. the two I am sharing with you today have a snow theme because we are forecasted to get snow today. 


I used the following sets on these cards. 

You can save on these sets through today so hurry over to Sweet 'n Sassy Stamps.  
 

For complete details on how I created them head over to my blog, Simply Beautiful.

Wednesday, October 14, 2020

October Release Blog Hop + GIVEAWAY

Welcome to our October Release Blog Hop!

Who's ready for some fabulous inspiration with our October release? Our cardmaking team is super excited to be hopping today, and there's a chance to win a $25 gift code to the Sweet 'n Sassy Stamps shop! Read on for a bit of inspiration and a little walk through of this month's fabulous new holiday goodies, then hop along to the blogs linked below to get inspired! 

Before I get to the hop, though, we have a very special set available for pre-order starting today!  This set was designed in honor of Nick Saenz, a 17 year old battling bone cancer for the third time. As you can imagine, costs associated with treatment are high, and we wanted to help! Korin designed this set with Nick in mind, and $10 from the sale of EVERY Fear Not set sold (retail), will be donated directly to the Saenz family.


This encouraging set of scriptures on its own will be such a blessing as you encourage others with handmade kindness. Then to be able to help a family in need with the purchase is twice the blessing!
Look for samples with this beautiful set along the hop today!

GIVEAWAY: Leave a little shout out in the comment section on each stop along the way for a chance to win a $25 gift voucher to the Sweet 'n Sassy Stamps shop. Comment deadline for the prize drawing is 10 pm ET on Tuesday, October 20. Winner will be announced here on the SNSS blog, Wednesday, October 21. Happy hopping!


Here's the official hop list. If a link misbehaves along the way,
hop on back here to pick  up where you left off.


I used the adorable Winter Gnomes set on this fun wintery slimline card. The background is stamped with snowflakes from the Folk Art Snowflakes in white pigment ink for a soft, subtle look. The sentiment is from the October Stamp of the Month, My Thoughts of You .


Deeds created these fabulous encouragement tags with the new Encouraging Peonies set. Absolutely beautiful!


Nina continues to wow us with her amazing watercolor skills on this fall beauty featuring My Thoughts of You and Autumn Splendor.


Korin pairs Old Fashioned Alpha with Welcome Home on this stunning night scene card.


Guest Designer Lieschen Harshbarger created this happy little neighborhood scene with our new Welcome Home set. What a fabulous way to brighten someone's day!


Okay, the next stop on the hop is my blog, Poetic Artistry, with another creation from me! 

Here's a little look-see at the sets included in the October release...

First up is the October stamp of the month, My Thoughts of You. This set is available for purchase for $15.95, OR you can get it as a FREE gift with a $75 purchase (after any discounts and before shipping and tax) during the month of July! Please note you MUST add this set to your cart to receive the discount. Once your order qualifies, the discount will apply to the set in your shopping cart.


Last month brought us Christmas Gnomes, and this month Jennifer Nilsson brings us an adorable Winter Gnomes set! These darling fun loving gnomes are sure to steal the show!


If you love creating scenes, this fabulous Welcome Home set from Korin is going to be so much fun! Such a sweet way to create a winter wonderland, but also completely usable in all seasons! That's a win in our book!


We're so excited about this first set designed by one of our Creative Team Members, Stephanie Gammon! The Old Fashioned Alpha set is so pretty and versatile. And there's more to come from Stephanie in future releases!


Flowers are timeless, especially beautiful ones like the flowers in Encouraging Peonies.


That's our October Release in a nutshell! So many fabulous sets to choose from! What's your favorite? Let us know in the comments.

May you be blessed today and always!

Saturday, January 18, 2020

Paper Scraps Challenge

Hello Sweet n' Sassy friends! Today we are hosting a stamp-a-thon in our Facebook Sweet n' Sassy VIP Group. Woohoo!! Get ready for a fun day and week of stamping!!!!

The creative team will be sharing live projects, plus a bunch of fun challenges throughout the day.
Play along with us in the VIP Group group for a chance to win a fabulous prize—a $50 gift code to our website! You have a whole week to create and submit for a chance to win.

My challenge is a.........


I am going to explain how to create a fun and easy background using paper scraps.You can use scraps of cardstock or pattern paper. No scraps, just cut down some of your stash. Your stripes can be horizontal, vertical or diagonal depending on your card design. So have fun, experiment and don't forget to share your creations in the VIP group on Facebook!


I used four different colors of cardstock to create the striped background.
I cut my scraps to the following sizes for my card.

2 blue 4 1/2" x 1 1/2"
1 pink 4 1/2" x 7/8"
1 orange 4 1/2" x 1/2"
1 green 4 1/2" x 1"

I put adhesive on the back of my cardstock stripes. Then starting at the top of my A2 card base, I lined up my first panel along the top edge allowing the ends to hang off the two sides. I continued to place the other pieces on the card front making sure to leave no space between the colors. After all the panels were attached I turned my card over and trimmed the ends hanging off the edge.

*I like having the ends longer so I don't have to stress about my measurements being perfect.*

*If you have white space at the bottom of your card just trim it off.*

I then stamped the white panel using the Folk Art Snowflakes and a Kaleidacolor stamp pad for a beautiful multicolored look. This beautiful snowflake set and its intricate pattern works well with a Kaleidacolor stamp pad. If you do not own one of these you can use your stamp pads to add various colors of inks to an image. Just make sure to always start with the lightest color first and work your way to the darkest.

Once my white panel was complete, I matted it on black and adhered it the front of the card. I  used Typewriter Blocks Alpha and All About You to create the sentiment stamping it in VersaFine Clair Nocturne ink.

I hope you will give the Paper Scraps Challenge a try along with the other fun challenges in the VIP group. Don't froget you have a week to create and enter for a chance to win a $50 gift code to
Sweet n' Sassy Stamps.


Thanks for stopping by and have a wonderful day!

Karen


Friday, December 20, 2019

Winter Hugs

Hi sweet friends! It's Julee popping in to share a few new creations with the ADORABLE Winter Hugs set. Seriously, could these polar bears and penguins be any cuter? I think they'd make for some sweet little Valentines, too. (And now I have to go try out that idea! 😄


I started with these sweet little penguins. They are the happiest little dudes, don't you think? I colored them with Kuretake Clean Color Real Brush markers, which seem to be my medium of choice of late. I've had them for years, but am just now actually taking the time to get to know how they work, which is entirely unlike Copics! Anyhow, I used a glitter brush pen to blend them out, so they are SPARKLY! Once I was finished, I fussy cut the images, then hand trimmed a little slope from white cardstock for the snow bank.


Next I worked on the background, sponging tumbled glass, faded jeans and chipped sapphire inks, then dripping on some water and blotting off.  I then stamped the snowflakes randomly in the background and intended to emboss with white embossing powder, but accidentally pulled out the clear instead.  I do like how it turned out, though. The clear picked up on soem of the lighter blues and left a nice iridescent sheen.  I finished with the sentiment embossed in white (got it right this time!) and then layered it all together and added a few grey shading areas with copics to the snow.


My next card was super simple.  I found a pad of paper at Michael's a few weeks back that had polar bears and penguins, so I just cut a piece of that donw to card size for the background.  Next I used a journaling card from prima, rounding the corners and matting with silver cardstock.  I then colored the sitting polar bear and fussy cut to pop up and finished with a bit of silver cord. Easy breezy beautiful!


Well, that's all from me today! I h ope you have a super day! Thanks for stopping by!

Tuesday, December 17, 2019

Winter Friends

Hello All!

The countdown to Christmas is on!  Are you still making Christmas cards?

Today I am sharing a couple of cards that can be Christmas or general winter cards.  The first one uses the brand new Winter Hugs Stamp Set.


He is just the cutest!  I colored him with Copics, using the pointillism technique to give him a bit of a warm, fuzzy, baby penguin look.
The background was actually a reject from a prior project.  I stamped snowflakes from the Folk Art Stamp Set in Versamark ink and heat embossed them in white.  Then I used the Smooshing technique to add pink and red color to the background.
Snowy hills, a sentiment and a few sequins finish it off.
This next card uses some oldies but goodies stamp sets.


I started with the line of trees from the Thrill of Hope Stamp Set.  I used my MISTI to get perfect placement and did second generation stamping in red ink.  I stamped the larger two trees in the same red ink, again using my MISTI so I could get good coverage of ink.
Next, I stamped snowflakes from the Thrill of Hope Stamp Set as well as the Snow Much Fun Stamp Set in grey.  Lastly, I stamped the deer image in the Thrill of Hope Stamp Set in Versafine Black, using the MISTI to get solid ink coverage.
I was inspired by some of Korin's recent cards to use patterned paper and do some layering; this was difficult as it is not something I do often anymore!  I do like how it turned out though.  I added a sentiment strip across the bottom, heat embossing several sentiments from the Christmas Wordfetti Stamp Set in silver ep.  Some embellies and a linen thread bow finish it off!

That's it for me!  I would like to wish you all a very Merry Christmas and I will see you back on the blog next year!

Lee Ann 

Friday, November 29, 2019

Never Lose Hope

Hi friends! It's Julee popping in with a couple cards using one of today's Friday Features sets, Choose Faith. This set is just $13.50 today only, after combining the Friday Features and Black Friday discounts!


I started with the background, smooshing broken china and shaded lilac onto some packaging and then spritzing with water and pouncing onto watercolor cardstock. Next I embossed the hope and the never lose stamps with chipped sapphire ink and clear embossing powder.  I then masked off the never lose portion with a post it note and then stamped the flowers from Nature Silhouettes in a combination of shaded lilac and chipped sapphire inks, then embossed in clear. A super quick, fun card.

Next I did a watercolor wash on watercolor cardstock with broken china and cracked pistachio distress oxides. Then I splattered on some of the same colored inks.  When this was dry, I embossed the JOY stamp from Choose Faith in white, then added the trees and snowflakes from the Thrill of Hope set to complete a winter scene. I cut this with a die and matted with navy cardstock.  The back panel is embossed with a snowflake embossing folder.

Thanks so much for stopping by today! I hope you've enjoyed these quick cards.  Be sure to check out all the Friday Features today!


And while you're there, don't forget that everything in the shop is 25% off during our Black Friday/Small Business Saturday sale!

Saturday, November 2, 2019

Snow Much Coffee Goodness

Hi Sweet 'n Sassy friends! It's Julee popping in to share a couple little creations I've been working on lately.  It's no secret that I love coffee, so I can never resist making a few cards for the Coffee Lovers Blog Hops. The Fall/Winter hop started yesterday and I shared another coffee card on our Super Sponsor post. Here are a couple others I created dressing up the big to go cup from the Fill Me Up set.


For this first card, I paired the brand new Snow Much Fun set with the cup for a fun wintry feel. This little snow friend is so jolly, I couldn't resist having him skating on top of the cup. I created a fun background by randomly stamping the snowflakes from the set in distress oxides and then blending with distress inks. A few snowflakes and some ribbon and jingle bells finish things off.


My second card for today, brings a fall spin to the cup, using the Fur-ever Friends set to add leaves and color with Spectrum Noir alcohol markers.  I created a sweet little gift card pocket and added a vellum sentiment from the Donut Worry set for the perfect little gifty for a coffee loving friend.


Thanks so much for stopping by today! Be sure to pop over to the website to see the entire NEW release, plus take advantage of the 12% sitewide savings for our 12th birthday month!

Tuesday, November 7, 2017

Warm Cocoa Wishes

Hi Everybody, Regina here.... 

It has been in the high 70's the last few weeks and now it's in the low 60's and 50's.  That's COLD for Mississippi weather lol.  I know, if you live up North you're chuckling right now. :)

I love to drink flavored coffees and hot chocolate when it starts getting cooler outside so I thought it was time to pull out this stamp set by Sweet 'N Sassy Stamps called Winnie's Warm Wishes


I used a Tim Holtz stencil for the background called Holiday Knit.  I love this stencil for holiday and winter cards.  For the very first time, I used my new Clarity Stencil Brushes.  I like the soft look but you do have to apply many layers.  I tend to press harder with a jumbo sponge dauber and always seem to make it darker than I would've liked so these definitely will solve that problem.  I used Gina K Designs Ocean Mist and Jellybean Green Inks and card stocks. 

I colored the cups with Copic Markers and added Nuvo drops in Gloss White on the marshmallows for some dimension and shine.  For some subtle shine on the hearts, I used the Sakura Glitter Pen in Clear Star.  You'll notice there is one cup in this set.... I mirrored it to make the other one. I used a piece of acetate and stamped the cup in Memento Tuxedo Black Ink and pressed it gently on the card stock.  It's not going to stamp as crisp as the original one but I went over it with a black Faber Castel PITT Artist Pen with super fine tip and cut them out. 

Next I embossed the words I wanted for the card on Gina K Designs Black Onyx card stock with Brutus Monroe Alabaster Ultra Fine Embossing Powder and cut into strips. 

To finish it off, I used clear sequins which I think add such a lovely touch without interrupting the other items on the card. 

I like this stamp set also to make cards to send out after the New Year as well. 

For more inspiration, please visit my blog at http://cardsbyregina.blogspot.com

Thanks for stopping by and have a great day!


Regina

Friday, November 3, 2017

Winter Fun!

Happy Birthday Sweet N Sassy Stamps! I am so happy to celebrate these fabulous stamps - both clear and digital!! There is lots of fun going on this month including a HAPPY Freebie! Check it out HERE.

For today's cards, I am working on some Christmas/Winter cards and some SNSS clear stamps and digital... I had a great time with alcohol inks on Yupo paper. I used the tutorial from Splitcoast Stamper called Alcohol Ink Baubles.


For my first card, I used the clear sets - For the Birds; Sentiment - Christmas Pine. I Splattered metallic white water color paint for a snowy look and then with the metallic water color, I created a snow bank for my winter bird to sit on. Pretty simple but sweet!


For my second card I used some digis from Sweet N Sassy -  Cup of Cocoa and Snowman Soup (retired).


Thanks for stopping by!! Have a great one!
Lyn