Showing posts with label Warm Winter Friends. Show all posts

Monday, September 19, 2022

Christmas Cookies


Hello Sweet 'n Sassy Friends! 
It's ceal, here. Today I am sharing a Christmas card using an older set, Christmas Cookies that now has dies to match. 
To make this card I started with a white top folding card base and a panel of kraft Cardstock. I randomly stamped the gingerbread man cookie all over the kraft panel, then partially colored them using colored pencils. 
I stamped another gingerbread man on a separate piece of craft cardstock, colored it using OLO markers and colored pencils and popped it on the front. 
To finish the card I added some scalloped frames and a Merry Christmas Sentiment.  


I shared this one using the same set on my blog and thought I would share it here as well. 


Thursday, January 20, 2022

sparkle & shine

 Good morning! Today I have two cards using stamps from the January release. Here I used Sparkle & Shine, Sweater Weather, Warm Winter Friends, and my own set, Snowy Hello, which has returned and is now available with dies! Dies are also available separately if you previously purchased the set.

I created my own background for the first card and die cut some circles to make it a little whimsical. The sweater was paper pieced, and I stamped the words on the front.


I couldn't just toss the partial circle that I cut from the background, so I added it to my second card, along with a few more circles. I love that the Snowy Hello set now has Dies!


To make the background, I first smooshed some Distress inks onto my work surface. Then the ink was spritzed with water and I laid the cardstock on top. Repeat several times and dry as needed. When finished and dry, I stamped the flakes over top.


Have a great day!
Diane


Friday, November 19, 2021

Starry Night on a Hillside


Happy Friday my friends! I hope you're having a great day and that your weekend goes even better.

Today I want to share with you a fun card I made using the Starry Night stencil, the Hillside Edges die set, and the Warm Winter Friends stamps.

I trimmed my cardstock to make an A2 base card. On it, I stamped one of the images from the Warm Winter Friends stamp set to create a background. Then I die cut a semi stitched circle and used my distress inks to color the background. Next, I used the Starry Night stencil with white pigment ink to add those cute stars.
 
 
On a separate piece of cardstock, I die cut the Hillside Edge and used my Copics to color the trees, houses, and hills. Once I finished coloring, I splattered some white metallic watercolor to make it look like snow. To finish the card I heat embossed a sentiment from the Warm Winter Friends stamp set.

Remember! Sweet 'n Sassy Stamps is still celebrating their birthday! This week to celebrate, all of the animal stamp sets and stencils are 20% off! No code needed. You can take advantage of this sale to get the Warm Winter Friends stamp set & the Starry Night stencil I used on today's card.


I really hope you have enjoyed today's crafty project! For more inspiration you can follow me on Instagram @harshgurl . Have fun getting some crafty supplies! See you next time!


*Products mentioned contain affiliated links at no extra cost to you.*

Tuesday, October 26, 2021

Merry Christmas

  PRODUCT LINKS BELOW CONTAIN AFFILIATE LINKS AT NO COST TO YOU
 
Hello Sweet Friends! Sheri here with a little Christmas card featuring the NEW sweet & adorable Warm Winter Friends stamp set from the October 2021 Release!

From time to time I like to mix it up by making a card size other than the standard A2 (4 1/4" x 5 1/2") and thought it would be fun to make a 4 1/4" Square card.

First I stamped a few of the images using alcohol friendly ink and then I colored them using Copic markers. Next they will need to be cut out with the coordinating dies or you can fussy cut them out.

To add a little texture I pulled out an old embossing folder, Cuttlebug Swiss Dots,  and I also added a bunch of layers along with a little ink blending for the sky before creating the little scene and assembling my card. You can go as elaborate or simple as you desire.

Card Measurements:
Square Card Base: 4 1/4" x 4 1/4" (4 1/4" x 8 1/2", scored at 4 1/4")
Red Square Mat: 4" x 4"
White Square Layer (Embossed): 3 7/8" 3 7/8"
White Scallop Square: 3 1/2" x 3 1/2"
Red Square Mat:3 1/8" x 3 1/8"
White Stitched Panel: 3" x 3"
Snow Bank Strip: 3" x 1 1/4"
Red Sentiment Strip: 2 1/8" x 3/8"

Looking for more Inspiration?!
Here's the card I created for the November IG Hop

For card details, Click HERE.


There's still time to pick up the 
October 2021 Stamp of the Month!!
 

Happy Stamping!!

Saturday, October 16, 2021

A Trio of Christmas Cards

Happy Saturday Everyone! I created some backgrounds a couple of weeks ago using the brand new Warm Winter Friends. I just love the sweet animals and other images in this set! I decided to utilize the flower in the set to create my trio of backgrounds.


For my first card, I created the background by inking up a white A2 panel with ballet slipper ink and then stamping the flower over it with cranberry ink. I die cut the panel and layered it on a lacy edge rectangle die cut. I stamped the rabbit with Versafine Clair Nocturne ink and colored with Altenew Artist Markers. I decided it needed something more, so I added in a white snowflake. 


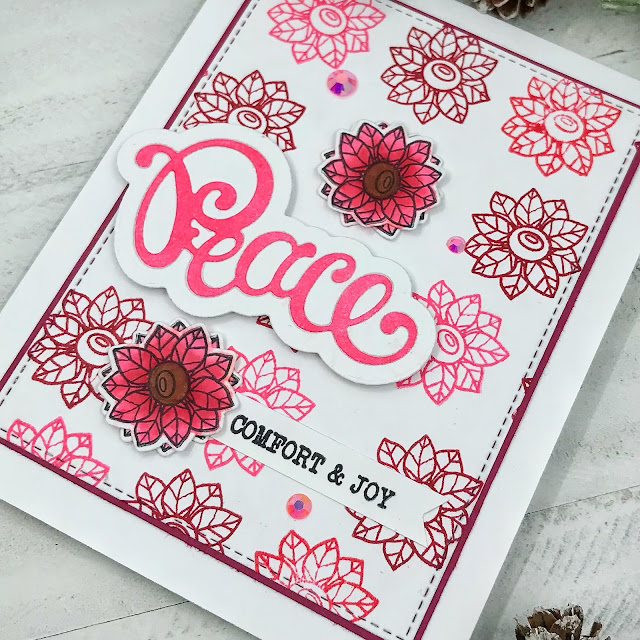
For my second card, I created the background by stamping the flower on a white cardstock panel with festive berries distress oxide ink, honeysuckle and cranberry dye ink. I die cut the panel and cut a mat from purely pomegranate cardstock. I stamped the flowers multiple times on white, colored with honeysuckle and cranberry inks and die cut out. I decided to glue two flowers together to create a bit of depth and texture. 


I started my third background by inking up the white panel with honeysuckle, stamped the flower with cranberry and then stamped the text background over the top in black. At this point, my third background became a hot mess because I decided to use a stencil with white ink over it. In my mind it worked, but in reality it did not.

I did not like it at all, so I took a baby wipe and wiped it off. Now it was very faded and I was at a loss for what to do. I made another oops too, but you can't see it in the photo so we are not going to talk about it. I searched for a layout and decided to utilize an older Freshly Made Sketches sketch challenge. 

I added some white splatters to the panel, cut the panel down to a square and used purely pomegranate cardstock again for the mat and long strip. I used a leftover flower from my other card and added some white gel pen dots to the center to mix it up a bit. Ta-da, I managed to salvage the background! Whew!


Here are the background panels before I turned them into cards. The top panel is the one I added the text script too.


I used the same sentiments for each of the cards and here are pictures of how I did the peace one. I cut a base for each one in white, then nested the die pieces together and cut again in white. Next, I inked up white cardstock in three different colors and die cut just the word peace. Finally, I glued them together as seen in the photos. I decided not to waste the extra inked up cardstock and used some heart dies for future cards.


These cards fit our October Sweet 'n Sassy stamps VIP Group challenge, Think Pink. We would love to have you join us in the group and play along.


Warm Winter Friends

Peace & Joy Word Dies

Christmas Wordfetti

Christmas Text Background

Large Snowflakes Die Set


I hope you enjoyed today's cards and thanks so much for stopping by!

Karen (click my name to follow me on Instagram)

Friday, October 15, 2021

Wintery Wilderness Wonderland


Hello crafty friends! I hope your week went well! I for one am looking forward to this weekend to do some fun crafty projects.

Have you checked out this month's new release over at Sweet 'n Sassy stamps? It's all so adorable! You need to check it out!

For today's card I'm using the new stamp and die set released this month called Warm Winter Friends. Foxes are one of my favorite animals, so I couldn't wait to make a card with the cute fox that comes in that set!

I created a mini slimline base card measuring 7x6 with scoring on the 7 inch side at 3½. For the front panel I used some watercolor paper measuring 3¼ x 5¾.

I then used watercolors to paint freehand a tree for the background. Then on leftover watercolor paper I stamped the cute fox and ornaments from the Warm Winter Friends set. I colored those with watercolors as well.


To finish the card, I splattered some white pearl watercolor to make it look like snow and glued in place the sentiment and the colored images from the Warm Winter Friends set onto the front panel of the card. I also used some distress glitter to make it look like snow.

I hope you have enjoyed today's post! I really had fun coloring these images with watercolors!

While I have you here, have you checked out our Inspirational Hop over on Instagram? Our team has created some fun projects using this month's new release! Check out my post on Instagram @harshgurl to read more about it and also how you can win a $25 gift code to Sweet 'n Sassy Stamps. I hope you hop along and leave some love on the team's IG posts!


 I hope you get to do some fun crafty projects over the weekend! Until next time!

Sunday, October 3, 2021

Merry Christmas

So, this year for my Christmas card creating I have been a little stuck on the color green. It's no surprise that I'm using green again to create this fun card featuring the new Stamp of the Month Geometric Background. It's free with a $60 order, just make sure to add it to your cart.


I stamped the background with white pigment ink on white cardstock and embossed with white embossing powder. I inked up the embossed piece with bundled sage distress oxide ink, wiped off the excess from the embossed parts and heat set once more to make it shiny again. I die cut the panel and spritzed it with a sparkle shimmer craft spray. I added a border of dark green cardstock and attached to a white card base. 

Next, I stamped the apron from Sweet Treats on pattern paper and the towel portion on white cardstock and fussy cut them out. Then, I die cut the apron from white and glued all the pieces to form the apron. I stamped the ornament from Warm Winter Friends on white, colored with glitter gel pens and hand trimmed out. The sentiment is from the same set. 

I assembled the card as seen adding some white gems and popping the sentiment and ornament up with foam tape. 


I hope you enjoyed today's card and thanks so much for stopping by!

Karen