Showing posts with label papercrafts. Show all posts

Saturday, November 27, 2021

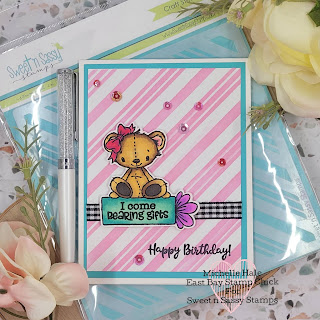
A Sweet Birthday Card

 Happy Saturday Stampers! Michelle here from East Bay Stamp Chick with another card share. 

November is Sweet 'n Sassy's birthday month, so I have a sweet birthday card for you.


This card came together pretty quick. I cut a card panel of 3.75x5 inches. I used a pink and blended it over the Peppermint Stripe Stencil. I used a strip of gingham ribbon going across the panel then adhered it to another aqua colored panel of cardstock that measures 4x5.25. I then mounted it onto my A2 card base. I stamped Happy Birthday from the Joyful Day Stamp set towards the bottom in black ink. That adorable bear is from the Bear Hugs Stamp set. I colored her using alcohol ink markers. I added a few pink sequins for bling.

Let's take a look at what I used.


Don't forget Sweet 'n Sassy has a Black Friday Sale all weekend!


i hope you find some time to get crafty this weekend! Thank you for visiting!

Saturday, May 8, 2021

New Sale at Sweet 'n Sassy Stamps

 Happy Saturday Stampers! It's Michelle here from East Bay Stamp Chick.


We have a new sale at Sweet 'n Sassy Stamps 25% off all stamp set designed by Nina B.

To celebrate the sale I made a new card featuring the Nina B stamp sets Thrill of Hope and Mason Jar Bouquet.

Thrill of Hope is traditionally a Christmas set but I though by adding the sentiment from the Mason Jar Bouquet set it made it more usable anytime. To make this card, I used a panel from one of my gel press prints. I love the gel press because every time you get something different. I though this piece was perfect for a night sky. I heat embossed the images with white embossing powder. I actually made a mistake and that is why the sentiment is on a navy piece of cardstock. I had originally heat embossed it right on the card in white. but I messed it up! So I had to add it on the navy cardstock to cover my mistake. I added a few sequins for shimmer and it's done. A very easy card!

Here's a look at the sets I used.


I hope you find some time this weekend to get crafty! Thank you for visiting and spending time with me today! 


Saturday, April 10, 2021

Easy Wedding Card

 Happy Saturday Stampers! It's Michelle from East Bay Stamp Chick.

Today, I'm sharing an easy wedding card using the new Just Married stamp set.


Here's the stamp set.


This stamp set has so many fun images!

This card is very easy to make. I heat embossed the sentiment and image in gold embossing powder. I fussy cut the cake and used my paper trimmer to cut the sentiment. I cut several panels out of gold and silver pattern paper for the background. To make this card you will need to cut out the following panels.  The card is an A2 size card, 4.25x5.5 inches. Out of silver paper I used my paper trimmer to cut panels that are 4 1/8 by 5 3/8, 3 1/8 by 4 1/8, and 2 1/8 by 5 3/8. Then in the patterned gold paper I cut out 3 7/8 by 5 1/8, 2 7/8 by 3 7/8, and 1 7/8 by 5 1/4. I then adhered all the silver and gold layers together. I mounted the middle layer, the one with stripes, on foam squares and the cake also. I added a few sequins for additional bling. This card was so quick and easy!

Check out the new April release for lots of  fun new stamps!


Saturday, March 13, 2021

Big Bold Butterfly

 Hi Stampers!

This is Michelle from East Bay Stamp Chick with a card share.

Today's card features a big, bold butterfly from the new stamp set Garden Whimsy.


This butterfly is so fun to color. I love all the bold colors. I used alcohol ink markers to color it. The sentiment is also from the same set. For the background I used the new Delightfully Delicate stencil. Here's a closer look at them.


I added some sequins and heat embossed the sentiment and the card is done. So easy!

I hope you have some fun crafting this weekend!

Saturday, February 13, 2021

Encouraging Peonies

 Happy Saturday Stampers!

Michelle here today from East Bay Stamp Chick with some quick and easy cards. I love floral cards and one of my favorite things to do is to stamp the same image multiple times and then color each card panel in different colors or styles. I love to see how the same image looks so different in different colors.


So I stamped and heat embossed in white embossing powder the same image 3 times on watercolor paper. I used the Encouraging Peonies Stamp set.


I absolutely love this stamp set. It is one of my favorites! And it's in the Overstock Sale right now, so it's 20% off!!

To create the faux watercolor look, I used a watercolor powder. There are lots of brands out there. The one I used is called Brushos. Any brand will work. Once you have stamped the image with an embossing ink and heat set an embossing powder you are ready to sprinkle the watercolor powders on your paper. Make sure you use a heavy weight paper like watercolor paper for this. After you sprinkle the powder, then mist your paper with water. I use a small spray bottle from the cosmetic department in Target. Mist as much or as little water onto the paper as you want and watch the powders mix and come alive. Every time you do this it will be different. Here are close ups of each card.


I dried each panel with a heat tool. Then I ran the edge of the paper over my embossing ink pad and applied gold embossing powder on all the edges and heat set the embossing powder. Then I stamped my sentiment on each panel. I mounted each panel on fun foam and then adhered them to my A2 size card bases. Lastly, I added a few sequins.


Which color combination is your favorite? Let us know! Have a great weekend and I hope you have some time to get crafty!