Tuesday, October 31, 2017

Leaves Are Everywhere!!

Happy Fall Y'all and Happy Halloween!!
I don't know about you but I have leaves EVERYWHERE. As soon as they are cleaned up a wind blows down an equal or greater amount to replace them! Ughh.
I finally got all my reports done and got a chance to play in ink this weekend. I played with some Splitcoast Stampers techniques and am in L-O-V-E with the results!
The first tutorial is called Joseph’s Coat.  I used the Falling Leaves Clear Stamp Set and the Autumn Collage Set. I created the background with distress inks (Spice Marmalade, Candy Apple Red, and Mustard Seed) then embossed the leaves over the colors and covered it all with vintage photo ink.  I embossed the sentiment with White embossing powder.
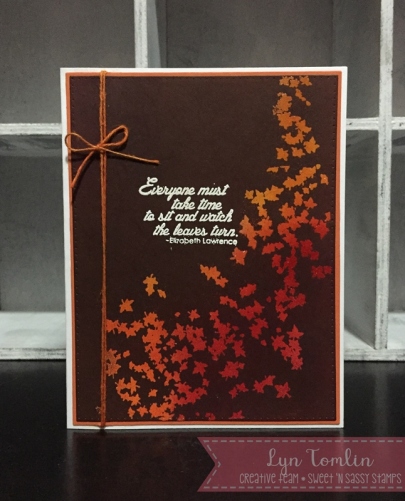
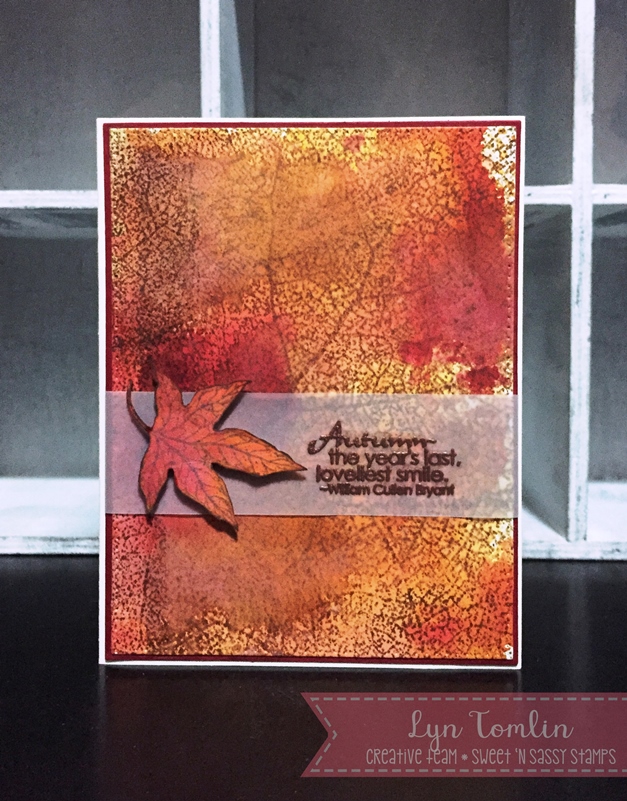
The second technique is a Wrinkle-Free Distress technique and the Leaf Skeleton BG. I created the colors of fall for this fun challenge. I embossed the sentiment from Autumn Leaves Clear Stamp Set with copper embossing powder on vellum.
I hope these inspire you to try something new!
Have a great one!
Lyn

Saturday, October 28, 2017

A CAS Christmas

Hello friends!  Cathy here with several cards to share with you using some newer stamp sets from the Sweet 'n Sassy Stamps Store.  CAS (Clean and Simple) is a style I struggle with, but this first card using the Peace on Earth stamp set is simply elegant and very easy to reproduce....especially with Christmas closing in on us!

The dove image from Peace on Earth and the sentiment from the Christmas Innies set were gold embossed on white card stock.  Square dies were used to cut the frame and pop up the dove image.  Each panel was matted with gold card stock and a small bow made with gold metallic thread was added to finish the card.

If you were around for last year's SNSS Birthday Celebration, you will remember that Korin had designed four single stamps that were given away with your purchase.  Many of you asked if these sets could be made available for purchase.  As SNSS is nearing its 10th anniversary,  we've decided to do just that!  One of the little singles, Hope Anchors, was combined with the Be Encouraged 2 stamp set to make the following card.

The Hope Anchors sentiment was split to fit the sketch which was a challenge on Splitcoaststampers. The papers are from Graphic 45.  The stars found in my stash of embellishments were gold so I covered them with VersaMark ink and silver embossed them to match the anchor.

The stamp sets used for these cards are available now at the Sweet 'n Sassy Stamps Store.
Be sure to check out these and the other little mini stamp sets just added to the store.

Thanks so much for stopping by...enjoy your weekend!
Hugs,
Cathy

Friday, October 27, 2017

Season's Greetings Shaker Card

Hi Everybody,

Regina here and today I'm using a stamp set from Sweet 'N Sassy Stamps called Season's Greetings.  Currently, this stamp set is 20% off so grab it now while on sale and start your Christmas cards. While you're at it, check out all the other stamp sets on sale. A few are left with free coordinating die sets as well. 


Have you used the Gina K Designs Fancy Foils? Oh Emm Gee!  They are so much fun!  I used the Foilmates Background Ornamental Holiday pack with the stripes.  I also used the Holiday Colors Foil in Radiant Red and DecoFoil foil in  Green.  

I decided on making a shaker card for this one.  I stamped with Versafine Onyx Black Ink and embossed with Brutus Monroe Ultra Fine Icicle Embossing Powder.  I used Bristol Smooth Paper and colored with Zig Markers and put some Clear Wink of Stella over the top, nothing fancy here. I always try to use a Cardinal anytime I can because I lived in the St. Louis area for 20 years, need I say more?? For the snow part, I used Nuvo Gloss White and put a thick coat on.  I then tied some red and white bakers twine around the mailbox, so cute!

I used My Favorite Things Wide Circle Stitch Dies and cut out in a heavy white cardstock for the frame of the shaker. For the clear part I used Fellowes Binder Covers.  They are the perfect weight for shaker cards and not expensive. I didn't want to cover the beautiful striped foil so I cut circles from regular circle dies for the front window and back layer.  I embossed the front clear window with a snowflake embossing folder to give the window some texture. I filled the shaker window with red, green and silver sequins from my stash and some silver bugle beads for something a little different.

I stamped the greeting with the Versafine Onyx Black to make it really stand out from all the red and green I have going on here.  I used a fishtail banner die and cut a frame outline using Thermoweb Toner Paper and then foiled in DecoFoil Green foil from Thermoweb. I just love how that green foil looks with the red and white.  To finish it off I used some Nuvo Red Berry drops around the window frame and each side of sentiment.  

I had a lot of fun making this card!  Did I inspire you to make some Christmas cards?  Foil is so much fun!  It can really jazz up anything you are doing.  You can't go wrong with birds and bird houses on your holiday cards.

For more inspiration, please visit my blog at http://cardsbyregina.blogspot.com

Thanks so much for stopping by and have a great day!


Regina

Thursday, October 26, 2017

Wise Men


Hello, Sweet 'n Sassy Stampers! 
It's Ceal, here to share with you today.  I am featuring one of my favorite Christmas sets of ours We Three Kings. I love this silhouette of the wise men traveling to see the newborn king.
This is a set you can have so much fun creating backgrounds for with distress inks, distress oxide ink and of course alcohol inks like I used for mine.
To create the card I started with a side folding white note card and a piece of yupo paper for the background. I used several different shades of blue alcohol re inkers and dropped drops of them randomly on the yupo paper and then dropped drops of rubbing alcohol on top of them and just let them spread. After I achieved the look I was happy with I cut it out with an oval stitched die. Using the Misti stamping tool, I stamped the image from the We Three Kings set several times to get a good dark image and then used the ScanNCut to cut it out. 
To finish the card I added it to the oval background and added the greeting underneath. 


Tuesday, October 24, 2017

thanks for everything.

Hello! It's Monika here today with a thank you card. 
I didn't have a lot of time but really wanted to use the gorgeous flower image from Floral Greeting clear stamp set, so I decided to use just leave it black & white:


I love making simple cards, but I don't like one layer cards... so I just cut the flower image out, and adhered it loosely to the inked background, adding a little bit of dimension to my card.
The background was sponged with Tim Holtz Pistachio Distress Oxide ink. I splashed some water on the card for some interesting pattern, then spritzed black ink over it...


The greeting is from Keep in Touch, Too clear stamp set.

Thanks for stopping by,
Monika


Sunday, October 22, 2017

Autumn Blessings

Hello friends, Stephanie here with a Autumn card for you.  I just love this season and we just don't get much change here in the desert! I so miss the smell of Autumn, the crunch of the leaves as you walk and most of all apple picking!  I can't wait to move back east so we have the seasons again.  I am using 2 awesome sets Autumn Leaves and Grateful Greetings both of which are 20% off right now.  I stamped with distress inks onto watercolor paper, added the sentiment with memento ink and heat embossed to make it stand out and just layered away. 


Saturday, October 21, 2017

dashing penguin

Good morning!
 
Today I am sharing this card using my Holiday Hugs stamp set.  I was inspired by a Partial Die Cutting technique by Jennifer McGuire.  I didn't use any dies here, but trimmed around the bottom of the penguin image with scissors after cutting the sides with a paper trimmer.
 

I layered a colored panel inside, as Jennifer did, with the sentiments.


Give this technique a try...it's quite easy and fun! Have a great day!
Diane


Friday, October 20, 2017

Harvest Blessings

Hello Everyone!!  It's Sheri here with a couple Fall themed cards to share with you.  With Thanksgiving just around the corner I thought that I would create a card featuring the Harvest Blessings stamp set.  I created two samples for you today with the same basic design to show that you can get two totally different looks with just making a couple changes to the basic design. 

My first card features an Ivory and Gold color combo for a more elegant design.  The cornucopia and sentiment are embossed in gold.  I then used an embossing folder on the back panel to add some texture.  For a final touch I added gold sheer ribbon.


My second card uses the same basic design except.  Instead of embossing the images I stamped them in charcoal brown ink.  I also substituted the gold glitter card stock for coordinating charcoal brown.  I used an oval die to cut out the image panel and used brown sheer ribbon.  The sentiment was stamped on a tag die and tied to the ribbon with twine.


So which one is your favorite?   Hope you will take a look at some of your favorite creations and see how you can change them up!


http://www.sweetnsassystamps.com/products/Harvest-Blessings-Clear-Stamp-Set.html


Thank you so much for stopping by!


Wednesday, October 18, 2017

Snowman Hugs

Hello sweet friends...hope you are having a wonderful week!  SNSS has so many adorable snowmen sets that just make me smile!  Here are a couple of them on two Christmas cards created for today's post.


This smiling snowman is part of the new Christmas Blocks stamp set.  The background was created with the snowflakes from the Holiday Hugs set and Distress Oxide Inks.  Perfect Pearls mixed with water and sprayed onto the background add just the right amount of shimmer behind the embossed vellum frame.


The galaxy sky on this charming Christmas card was also created with Distress Oxide Inks.  Several colors of ink were sponged onto a mixed media panel.  Black Soot Oxide Ink was then added on top of the colors, spritzed with water and again sprayed with Perfect Pearls.  Several Sequins were added to add to the shimmer.  I found this Galaxy Sky Technique on Jennifer McGuire's Blog and had to give it a try.  The cute snowman and sentiment are from the Welcome Jesus stamp set.

Here are the adorable snowmen stamp sets available at the Sweet 'n Sassy Stamps Store that were used to make these cards:
Love the new look!

I'm snow glad you stopped by...be sure to stop again for more SNSS inspiration!
Hugs,
Cathy

Tuesday, October 17, 2017

Warmest Wishes

Hello crafty friends and welcome to today's blog post! I'm sharing a quick and easy card technique with you today that only requires a few Distress Oxide inks (the regular Distress Inks would work too), an detailed outline stamp, such as the Christmas Pine stamp set, watercolor paper, clean water, a water brush, and a few embellishments or Nuvo Crystal Drops.

Start by using Distress Oxide inks to stamp the pine branches (I used Peeled Paint, Vintage Photo, and Broken China). Use a fine tip water brush to color the pine needles. Due to properties of Distress Ink, which reacts with water, they're perfect for creating a water color look.

Smoosh some Vintage Photo ink on a non-stick craft sheet and use the water brush to pick up ink and paint the branches. Next, stamp the pine cones and follow the above procedure. I used a heat gun to dry the pine cones and then added another layer of Vintage Photo ink to darken the edges of the pine cone and cover where I had stamped over the pine needles. The Oxide inks have been coverage than the regular Distress Inks, which aren't as opaque. 

Once the pine branches were completely dry, I used Broken China to water color the background. You can add clean water to the paper first and then drop in color. This creates a beautiful fluid background with lots of visual interest.

Once my entire piece was dry, I used a regular Distress Ink pad in Antique Linen to ink up a background stamp (the text) and randomly stamped the image on top of the entire piece. I then used the Antique Linen and a blending tool to add some color to the edges of my panel and card base. I attached my panel to the base with foam tape and added a few Nuvo Crystal Drops, in bright gold, to the card.

A close up look is below along with links to purchase the stamp sets. Happy Crafting!


Stamp sets used: 
       
Christmas Pine                                  Typewriter Text Background


Monday, October 16, 2017

Autumn Blessings

Hello Sweet Friends!  Julie here and today I am sharing a fun Autumn card using So Grateful and Tree Background Clear Stamp Sets (both were designed by Korin Sutherland).


To create this card, distress oxide inks were added to a piece of vanilla cardstock to achieve the multi-colored background, then the Tree Background image was stamped in espresso ink and heat embossed with clear embossing powder and once cooled, die cut using a pierced tag die.

The sentiment from So Grateful was also heat embossed in the same manner as above and once cooled, a few jewel drops were added for additional texture.

The card was finished with a bit of dry embossing, layering some pretty designer papers along with twine and a wooden button.  

This was a fairly quick card to create and celebrate this beautiful autumn season here on the East Coast!  

The So Grateful stamp set allows you to create projects to celebrate so many different occasions and blessings- a must have in your collection for sure!


I hope I have inspired you today to get out your stamps and create something fun! 

Thanks for taking the time to visit us- hugs and God Bless, sweet friends!

Friday, October 13, 2017

Joy to the world!

Hello everyone! When I made a page in my bible with this stamp set I thought it would be great to use it for my Christmas cards too. A great message to send to you friends and family :).
I stamped the image and words on watercolor paper with a black ink and colored them with watercolor markers and a waterbrush. Nothing too fancy and really relaxing to do. I die-cut the image, added a Christmas themed background paper to my card and adhered the image on top with some foam tape. That’s all for this card!
http://www.sweetnsassystamps.com/peace-on-earth-clear-stamp-set/
I used the stamp set ‘Peace on Earth

- Lucinde

Thursday, October 12, 2017

Christmas Botanicals


Hello Sweet 'n Sassy friends!
It's Ceal, here to share with you today a card featuring the Christmas Botanicals set. This is one of our latest releases and it's gorgeous and so fun to color.


For my card I randomly stamped the poinsettia using memento ink to create the background. I used Chameleon pens to color it in and then attached it to a black top folding note card. Next I stamped the greeting with Versamark ink on a black strip of card stock to match the card base and embossed it in white and attached it across the front. Because of the black base I put a piece of white card stock on the inside and stamped a small poinsettia on the inside


Wednesday, October 11, 2017

Sending Christmas Blessings

Hi Everybody,

I have a beautiful Christmas card to show you today and it's all glittered up with glitter pens and foil.  Who doesn't love that?  I used two stamp sets for this card from Sweet 'N Sassy Stamps called, Christmas Pine and I just used the bird from the Season's Greetings stamp set.


Close up of foiled pine cones


I started by using the MISTI stamping tool and stamped the pine branches with Kraft Ink by Gina K Designs and then I stamped over that except for the end part of the branch with Memento, Cottage Ivy ink.  This is a great green ink for pine branches.  I just randomly stamped them.  I went over the branches with a white Signo Uniball Gel Pen (my favorite white gel pen) to make them look like they have snow on the them.  

I cut out the word die 'Sending' from Sending Joy by Penny Black with Cherry Red Cardstock from Gina K Designs, the Kraft Cardstock is also from Gina K Designs.  I then lined up Christmas Blessings in the MISTI to make sure I stamped straight and used Gina K Designs Cherry Red Ink, in the cube.  I'll be honest, when the ink cubes first came out, I thought they weren't very practical for me to buy because I already had the full size ink pads.  As I learned how people were using them and putting them in the cute Tim Holtz metal tins, I quickly got over my practicality and started buying them. :)

I traced over the sentiment with a Sakura Clear Star Glitter Pen.  Next I stamped the bird from the Season's Greetings set and colored with Copics.  I traced around him with the Clear Star Pen too.  I used Scrapbook Adhesives small black foam squares to pop him up.  (I love these by the way)

I wanted the pine cones to have some sparkle too but I didn't just want to trace over them with a glitter pen so I decided to foil them.  Have you ever foiled stamps?  I actually made a video on how to do it live on Facebook and was that a disaster initially!  My phone was pointed to the ceiling so people heard me while watching the ceiling.  I had moved my supplies to the kitchen so I could use my heat gun and so I didn't have my laptop to look at to make sure I was set up correctly.  Lesson learned.... I did immediately delete that one and I made a new one so I was a trooper.   Here is a link to this video on YouTube.  I hope you'll subscribe to my channel. https://www.youtube.com/watch?v=33B-IYOJ3XY&t=3s

I stamped the pine cones on the Kraft Cardstock with Tim Holtz Vintage Photo Distress Ink to make sure I had a good impression since this was a detailed stamp with the openings on the pine cone etc. and sprinkled Ranger Sticky Embossing Powder on them.  After I used a heat gun on them I placed a little piece of foil on top and gently tapped it down and then burnished it with my finger.  Anywhere there were spots missed, I went back over it with the unused foil areas. 

I hope I inspired you to try foiling your stamps.  It's a lot of fun, something different to try. 

Thanks for stopping by and have a great day!


Regina

Tuesday, October 10, 2017

season's greetings

Hello! It's Monika here today with a Christmas card. I love circle cards so I decided to make one:


The scallop circle base was die-cut out of heavy designer paper. The birdhouse image is from Season's Greetings clear stamp set. I stamped an extra holly cluster and after coloring the images and cutting them out, I adhered the cluster to the main image with dimensional tape. I added psychedelic embossing powder to the snowy areas and red rhinestones as berries. The greeting is from Christmas Pine clear stamp set. I also added some holly branches from a retired stamp set... just to fill in some empty areas... 
The black frame (die-cut with 2 circle dies), the birdhouse and holly leaves underneath, and the greeting are all popped up with dimensional tape... to finish off the card, I added more rhinestones and red/white baker's twine.
If you are really creative, by adding a clear window sheet you could easily turn this into a circle shaker card!

Thanks for stopping by,
Monika